环境准备
软件版本:java1.8,maven3.5.0,mysql5.7.25
安装maven3.5.0
Maven系列教材 (二)- 下载与配置Maven (how2j.cn)
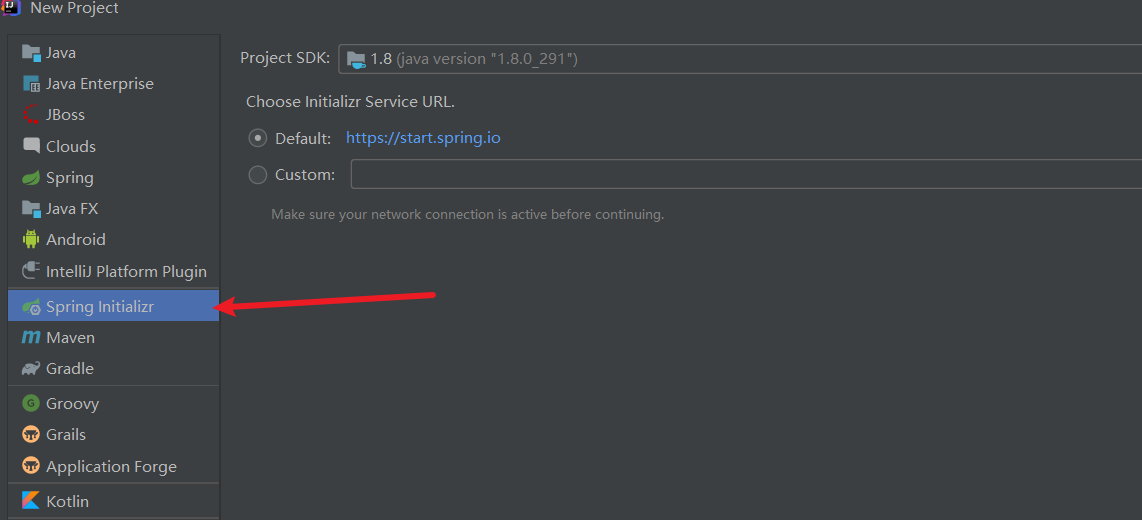
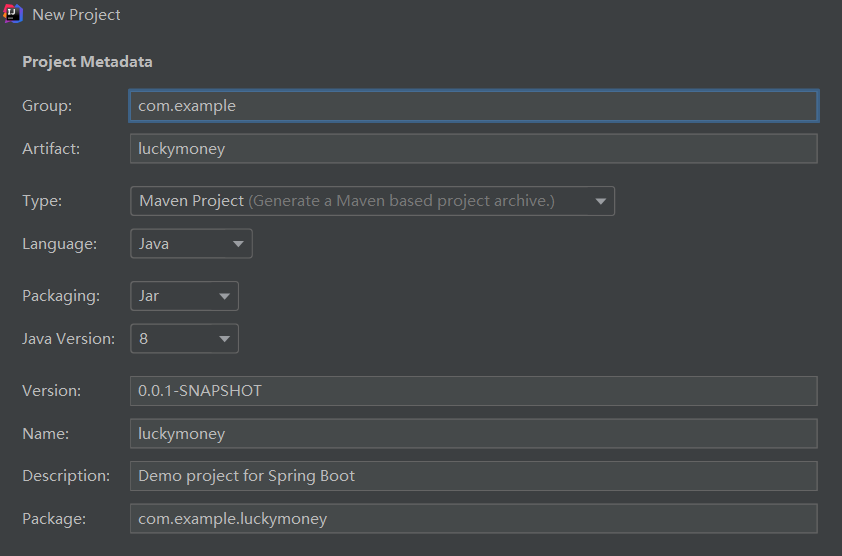
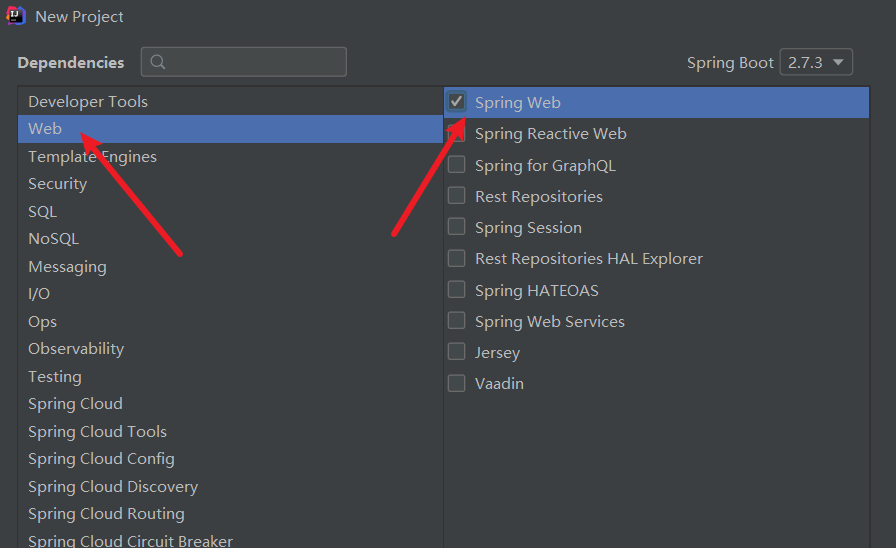
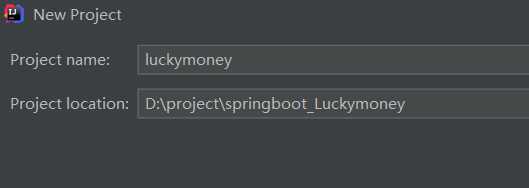
新建项目
D:\apache-maven-3.5.0\conf\settings.xml更改成阿里云的下载地址
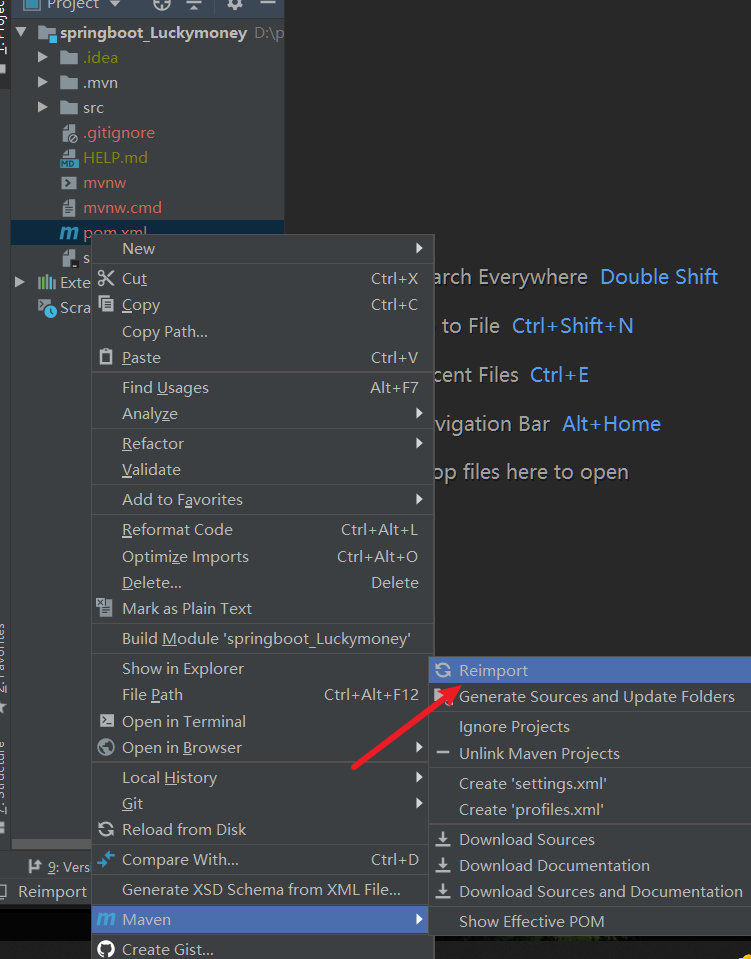
重新引入一下
第一次启动
注意Test可能报错类不存在,是因为test的包名错了
改成import org.junit.Test;

什么都没有,因为什么都没写
注解
@SpringBootApplication:申明让spring boot自动给程序进行必要的配置
一般用在main方法所在的类上面
1
2
3
4
5
6
7
8
9
10
11
| import org.springframework.boot.SpringApplication;
import org.springframework.boot.autoconfigure.SpringBootApplication;
@SpringBootApplication
public class LuckymoneyApplication {
public static void main(String[] args) {
SpringApplication.run(LuckymoneyApplication.class, args);
}
}
|
@Controller:处理http请求
@RestController:用于标注控制层组件
一般在实施具体逻辑的类上面,Spring4之后新加的注解,原来返回json需要@ResponseBody配合@Controller
@GetMapping:只支持GET请求访问
一般放到@RestControlle标注的类的方法上面,通过return值,将内容展示出来
例如@GetMapping(“/hello”),就是可以用GET请求访问http://localhost:8080/hello
1
2
3
4
5
6
7
8
9
10
11
| import org.springframework.web.bind.annotation.GetMapping;
import org.springframework.web.bind.annotation.RestController;
@RestController
public class HelloController {
@GetMapping("/hello")
public String say() {
return "Hello SpringBoot!";
}
}
|
@Value(),单个配置载入,用在变量上
例如:
1
2
| @Value("${minMoney}")
private BigDecimal minMoney;
|
**将类连接yml配置,@Component和@ConfigurationProperties()**,放在类上面,参考后文的 多个配置载入
@Autowired 参考后文的 多个配置载入
@Entity 表明这是一个实体类,要与数据库做orm映射,默认表的名字就是类名,表中的字段就是类中的属性
@Id 标注用于声明一个实体类的属性映射为数据库的主键列
@GeneratedValue 表示自增
@PostMapping(“”) 类似@GetMapping,支持POST请求,并且可以指定访问路径
@RequestParam(“produce”) String produce 获取请求参数的值。请求参数,谁创建的红包,发了多少钱
@PathVariable(“id”) Integer id 获取url中的数据。一般是接受@GetMapping(“/luckymoneys/{id}”)或者@PutMapping(“/luckymoneys/{id}”)里面的参数{id}的
@PutMapping
@Service 注解用于类上,标记当前类是一个service类,加上该注解会将当前类自动注入到spring容器中,不需要再在applicationContext.xml文件定义bean了
@Transactional 相当于事务的注解,**@Transactional只能保证java一同给你提交,也就是只是在java层面支持事务,但是不代表数据库本身支持事务,数据库引擎要更换成InnoDB才支持事务**
项目启动方式
直接通过idea启动
mvn命令启动
进入项目包
1
| C:\Users>cd /d D:\project\springboot_Luckymoney
|
启动
注意:
如果使用maven命令打包报错:无效的目标发行版
可能是使用的jdk版本和maven中配置的jdk版本不一致
只需要在D:\apache-maven-3.5.0\conf目录下修改setting.xml配置文件,在<profiles>标签中添加以下内容
1
2
3
4
5
6
7
8
9
10
11
12
| <profile>
<id>jdk-1.8</id>
<activation>
<activeByDefault>true</activeByDefault>
<jdk>1.8</jdk>
</activation>
<properties>
<maven.compiler.source>1.8</maven.compiler.source>
<maven.compiler.target>1.8</maven.compiler.target>
<maven.compiler.compilerVersion>1.8</maven.compiler.compilerVersion>
</properties>
</profile>
|
mvn打包后启动
打包:mvn clean package
启动:java -jar target/luckymoney-0.0.1-SNAPSHOT.jar
配置
配置端口及path
方式一:
配置都写在D:\project\springboot_Luckymoney\src\main\resources\application.properties里面
改变端口:
增加一个路径:
1
| server.servlet.context-path=/luckymoney
|
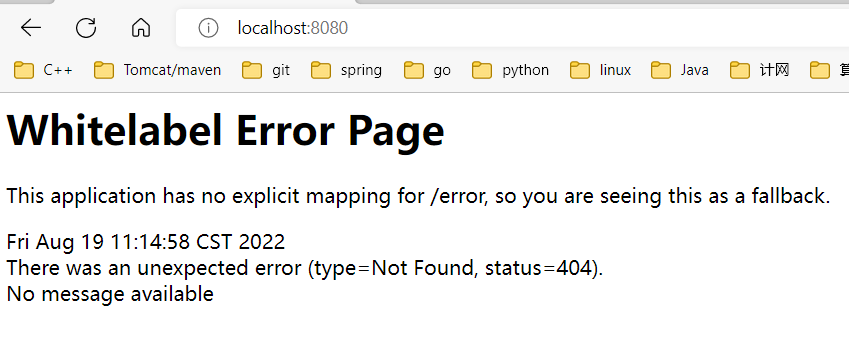
这样http://localhost:8080/hello就不能访问了,要访问http://localhost:8081/luckymoney/hello
方式二:
在application.properties同文件,创建一个application.yml,文件,然后删除application.properties,在application.yml文件里面配置
1
2
3
4
| server:
port: 8081
servlet:
context-path: /luckymoney
|
配置红包最小金额
在application.yml文件里面添加
单个配置载入
单个配置直接用@Value()
1
2
3
4
5
6
7
8
9
10
11
12
13
14
15
16
17
18
| package com.example.luckymoney;
import org.springframework.beans.factory.annotation.Value;
import org.springframework.web.bind.annotation.GetMapping;
import org.springframework.web.bind.annotation.RestController;
import java.math.BigDecimal;
@RestController
public class HelloController {
@Value("${minMoney}")
private BigDecimal minMoney;
@GetMapping("/hello")
public String say() {
return "minMoney:" + minMoney;
}
}
|
配置发红包说明
在application.yml文件里面添加
配置载入:
1
2
3
4
5
6
7
8
9
10
11
12
13
14
15
16
17
18
19
20
21
| package com.example.luckymoney;
import org.springframework.beans.factory.annotation.Value;
import org.springframework.web.bind.annotation.GetMapping;
import org.springframework.web.bind.annotation.RestController;
import java.math.BigDecimal;
@RestController
public class HelloController {
@Value("${minMoney}")
private BigDecimal minMoney;
@Value("${description}")
private String description;
@GetMapping("/hello")
public String say() {
return "minMoney:" + minMoney + ",说明:" + description;
}
}
|
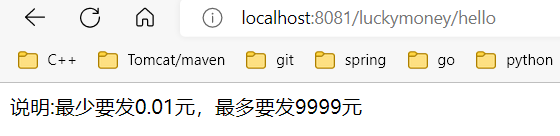
结果:
在配置里面使用配置:
1
2
3
| minMoney: 2
description: 最少要发${minMoney}元
|
多个配置载入,使用对象配置
配置很多,并且配置之间有联系,则把配置放到类里面去,通过这个类的对象调用变量
1.更改 .yml 文件,加前缀 limit
1
2
3
4
5
| limit:
minMoney: 2
maxMoney: 9999
description: 最少要发${minMoney}元
|
2.然后使用@Component,以及将类连接yml配置@ConfigurationProperties,并且LimitConfig这个类里面的变量名必须和配置变量名一致,例如配置中的maxMoney: 9999就对应LimitConfig的private BigDecimal maxMoney;
1
| @ConfigurationProperties(prefix = "limit")的意思就是连接limit这个前缀的配置
|
1
2
3
4
5
6
7
8
9
10
11
12
13
14
15
16
17
18
19
20
21
22
23
24
25
26
27
28
29
30
31
32
33
34
35
36
37
38
| package com.example.luckymoney;
import org.springframework.boot.context.properties.ConfigurationProperties;
import org.springframework.stereotype.Component;
import java.math.BigDecimal;
@Component
@ConfigurationProperties(prefix = "limit")
public class LimitConfig {
private BigDecimal minMoney;
private BigDecimal maxMoney;
private String description;
public BigDecimal getMinMoney() {
return minMoney;
}
public void setMinMoney(BigDecimal minMoney) {
this.minMoney = minMoney;
}
public BigDecimal getMaxMoney() {
return maxMoney;
}
public void setMaxMoney(BigDecimal maxMoney) {
this.maxMoney = maxMoney;
}
public String getDescription() {
return description;
}
public void setDescription(String description) {
this.description = description;
}
}
|
3.HelloController类,通过@Autowired自动接线,连接LimitConfig,得到LimitConfig对象
1
2
3
4
5
6
7
8
9
10
11
12
13
14
15
16
17
18
19
| package com.example.luckymoney;
import org.springframework.beans.factory.annotation.Autowired;
import org.springframework.beans.factory.annotation.Value;
import org.springframework.web.bind.annotation.GetMapping;
import org.springframework.web.bind.annotation.RestController;
import java.math.BigDecimal;
@RestController
public class HelloController {
@Autowired
private LimitConfig limitConfig;
@GetMapping("/hello")
public String say() {
return "说明:" + limitConfig.getDescription();
}
}
|
分离开发和上线环境
让测试的时候,最小金额是1分钱,上线以后,最小金额是1元钱
复制application.yml文件,变成开发环境配置application-dev.yml,和上线配置application-prod.yml
application-dev.yml:
1
2
3
4
5
6
7
8
9
10
| server:
port: 8081
servlet:
context-path: /luckymoney
limit:
minMoney: 0.01
maxMoney: 9999
description: 最少要发${limit.minMoney}元,最多要发${limit.maxMoney}元
|
application-prod.yml:
1
2
3
4
5
6
7
8
9
10
| server:
port: 8081
servlet:
context-path: /luckymoney
limit:
minMoney: 1
maxMoney: 9999
description: 最少要发${limit.minMoney}元,最多要发${limit.maxMoney}元
|
application.yml:
表示现在用的是dev,开发环境
1
2
3
| spring:
profiles:
active: dev
|
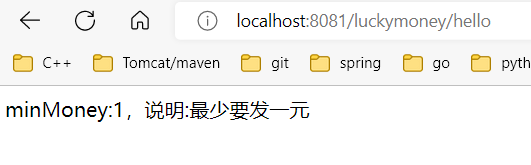
测试结果:
不通过idea应用不同配置的方法:
打包:mvn clean package
启动:java -jar target/luckymoney-0.0.1-SNAPSHOT.jar
启动prod配置:java -jar -Dspring.profiles.active=prod target/luckymoney-0.0.1-SNAPSHOT.jar
连接数据库


明确设计目标
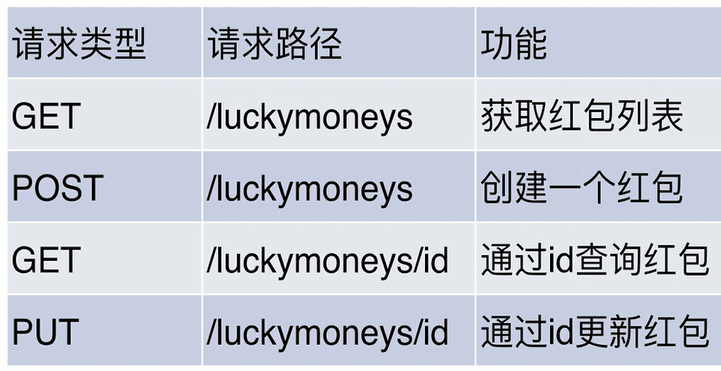
resful API设计
引入依赖
在pom.xml文件中加入
1
2
3
4
5
6
7
8
9
| <dependency>
<groupId>org.springframework.boot</groupId>
<artifactId>spring-boot-starter-data-jpa</artifactId>
</dependency>
<dependency>
<groupId>mysql</groupId>
<artifactId>mysql-connector-java</artifactId>
</dependency>
|
这时,完整的依赖文件是
pom.xml:
1
2
3
4
5
6
7
8
9
10
11
12
13
14
15
16
17
18
19
20
21
22
23
24
25
26
27
28
29
30
31
32
33
34
35
36
37
38
39
40
41
42
43
44
45
46
47
48
49
50
51
| <?xml version="1.0" encoding="UTF-8"?>
<project xmlns="http://maven.apache.org/POM/4.0.0" xmlns:xsi="http://www.w3.org/2001/XMLSchema-instance"
xsi:schemaLocation="http://maven.apache.org/POM/4.0.0 https://maven.apache.org/xsd/maven-4.0.0.xsd">
<modelVersion>4.0.0</modelVersion>
<parent>
<groupId>org.springframework.boot</groupId>
<artifactId>spring-boot-starter-parent</artifactId>
<version>2.1.3.RELEASE</version>
<relativePath/>
</parent>
<groupId>com.example</groupId>
<artifactId>luckymoney</artifactId>
<version>0.0.1-SNAPSHOT</version>
<name>luckymoney</name>
<description>Demo project for Spring Boot</description>
<properties>
<java.version>1.8</java.version>
</properties>
<dependencies>
<dependency>
<groupId>org.springframework.boot</groupId>
<artifactId>spring-boot-starter-web</artifactId>
</dependency>
<dependency>
<groupId>org.springframework.boot</groupId>
<artifactId>spring-boot-starter-data-jpa</artifactId>
</dependency>
<dependency>
<groupId>mysql</groupId>
<artifactId>mysql-connector-java</artifactId>
</dependency>
<dependency>
<groupId>org.springframework.boot</groupId>
<artifactId>spring-boot-starter-test</artifactId>
<scope>test</scope>
</dependency>
</dependencies>
<build>
<plugins>
<plugin>
<groupId>org.springframework.boot</groupId>
<artifactId>spring-boot-maven-plugin</artifactId>
</plugin>
</plugins>
</build>
</project>
|
配置数据库
application-dev.yml:
注意:在url结尾一定要加&serverTimezone=Asia/Shanghai,不然Spring Boot连接数据库的时候会报错
1
2
3
4
5
6
7
8
9
10
11
12
13
14
15
16
17
18
19
20
21
22
23
24
25
| server:
port: 8081
servlet:
context-path: /luckymoney
limit:
minMoney: 0.01
maxMoney: 9999
description: 最少要发${limit.minMoney}元,最多要发${limit.maxMoney}元
spring:
datasource:
driver-class-name: com.mysql.cj.jdbc.Driver
url: jdbc:mysql://127.0.0.1:3306/luckymoney?characterEncoding=UTF-8&serverTimezone=Asia/Shanghai
username: root
password: 'admin'
jpa:
hibernate:
ddl-auto: update
show-sql: true
|
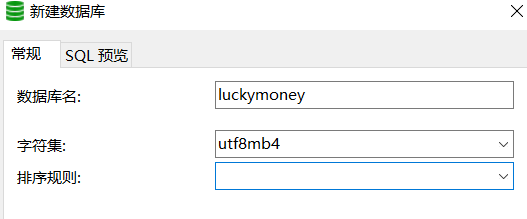
建库
建表ORM映射
1
2
3
4
5
6
7
8
9
10
11
12
13
14
15
16
17
18
19
20
21
22
23
24
25
26
27
28
29
30
31
32
33
34
35
36
37
38
39
40
41
42
43
44
45
46
47
48
49
50
51
52
53
54
55
56
| package com.example.luckymoney;
import javax.persistence.Entity;
import javax.persistence.GeneratedValue;
import javax.persistence.Id;
import java.math.BigDecimal;
@Entity
public class Luckymoney {
@Id
@GeneratedValue
private Integer id;
private BigDecimal money;
private String produce;
private String consumer;
public Luckymoney() {
}
public Integer getId() {
return id;
}
public void setId(Integer id) {
this.id = id;
}
public BigDecimal getMoney() {
return money;
}
public void setMoney(BigDecimal money) {
this.money = money;
}
public String getProduce() {
return produce;
}
public void setProduce(String produce) {
this.produce = produce;
}
public String getConsumer() {
return consumer;
}
public void setConsumer(String consumer) {
this.consumer = consumer;
}
}
|
查询数据库的接口
LuckmoneyRepository继承JpaRepository接口,主要是用来得到JpaRepository的方法,例如findAll()等
1
2
3
4
5
6
7
| package com.example.luckymoney;
import org.springframework.data.jpa.repository.JpaRepository;
public interface LuckmoneyRepository extends JpaRepository<Luckymoney, Integer> {
}
|
控制红包数据库的类
1
2
3
4
5
6
7
8
9
10
11
12
13
14
15
16
17
18
19
20
| package com.example.luckymoney;
import org.springframework.beans.factory.annotation.Autowired;
import org.springframework.web.bind.annotation.GetMapping;
import org.springframework.web.bind.annotation.RestController;
import java.util.List;
@RestController
public class LuckymoneyController {
@Autowired
private LuckmoneyRepository repository;
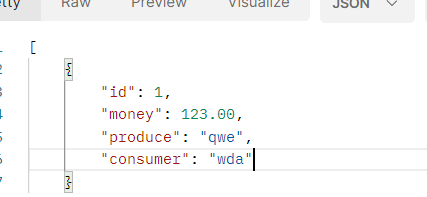
@GetMapping("/luckymoneys")
public List<Luckymoney> list() {
return repository.findAll();
}
}
|
用postman测试:http://localhost:8081/luckymoney/luckymoneys
实现其他接口
1
2
3
4
5
6
7
8
9
10
11
12
13
14
15
16
17
18
19
20
21
22
23
24
25
26
27
28
29
30
31
32
33
34
35
36
37
38
39
40
41
42
43
44
45
46
47
48
49
50
51
52
53
54
55
56
57
| package com.example.luckymoney;
import org.springframework.beans.factory.annotation.Autowired;
import org.springframework.web.bind.annotation.*;
import java.math.BigDecimal;
import java.util.List;
import java.util.Optional;
@RestController
public class LuckymoneyController {
@Autowired
private LuckmoneyRepository repository;
@GetMapping("/luckymoneys")
public List<Luckymoney> list() {
return repository.findAll();
}
@PostMapping("/luckymoney")
public Luckymoney create(@RequestParam("produce") String produce,
@RequestParam("money") BigDecimal money) {
Luckymoney luckymoney = new Luckymoney();
luckymoney.setProduce(produce);
luckymoney.setMoney(money);
return repository.save(luckymoney);
}
@GetMapping("/luckymoneys/{id}")
public Luckymoney findById(@PathVariable("id") Integer id) {
return repository.findById(id).orElse(null);
}
@PutMapping("/luckymoneys/{id}")
public Luckymoney update(@PathVariable("id") Integer id,
@RequestParam("consumer") String consumer) {
Optional<Luckymoney> optional= repository.findById(id);
if (optional.isPresent()) {
Luckymoney luckymoney = optional.get();
luckymoney.setConsumer(consumer);
return repository.save(luckymoney);
}
return null;
}
}
|
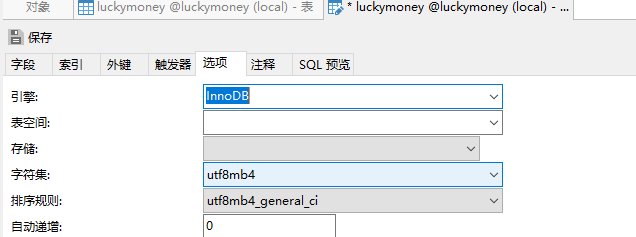
事务
数据库事务,是指作为单个逻辑工作单元执行的一系列操作,要么完全地执行,要么完全地不执行
@Transactional只能保证java一同给你提交,也就是只是在java层面支持事务,但是不代表数据库本身支持事务,数据库引擎要更换成InnoDB才支持事务
可以用于 扣库存 > 创建订单 的同时性
修改数据库的引擎,事务即可生效:
LuckymoneyController
1
2
3
4
5
6
7
8
9
10
11
12
13
14
15
16
17
18
19
20
21
22
23
24
25
26
27
28
29
30
31
32
33
34
35
36
37
38
39
40
41
42
43
44
45
46
47
48
49
50
51
52
53
54
55
56
57
58
59
60
61
62
63
64
65
| package com.example.luckymoney;
import org.springframework.beans.factory.annotation.Autowired;
import org.springframework.web.bind.annotation.*;
import java.math.BigDecimal;
import java.util.List;
import java.util.Optional;
@RestController
public class LuckymoneyController {
@Autowired
private LuckmoneyRepository repository;
@Autowired
private LuckymoneyService service;
@GetMapping("/luckymoneys")
public List<Luckymoney> list() {
return repository.findAll();
}
@PostMapping("/luckymoney")
public Luckymoney create(@RequestParam("produce") String produce,
@RequestParam("money") BigDecimal money) {
Luckymoney luckymoney = new Luckymoney();
luckymoney.setProduce(produce);
luckymoney.setMoney(money);
return repository.save(luckymoney);
}
@GetMapping("/luckymoneys/{id}")
public Luckymoney findById(@PathVariable("id") Integer id) {
return repository.findById(id).orElse(null);
}
@PutMapping("/luckymoneys/{id}")
public Luckymoney update(@PathVariable("id") Integer id,
@RequestParam("consumer") String consumer) {
Optional<Luckymoney> optional= repository.findById(id);
if (optional.isPresent()) {
Luckymoney luckymoney = optional.get();
luckymoney.setConsumer(consumer);
return repository.save(luckymoney);
}
return null;
}
@PostMapping("/luckymoney/two")
public void createTwo() {
service.createTwo();
}
}
|
LuckymoneyService事务
1
2
3
4
5
6
7
8
9
10
11
12
13
14
15
16
17
18
19
20
21
22
23
24
25
26
27
28
29
30
| package com.example.luckymoney;
import org.springframework.beans.factory.annotation.Autowired;
import org.springframework.stereotype.Service;
import org.springframework.transaction.annotation.Transactional;
import java.math.BigDecimal;
@Service
public class LuckymoneyService {
@Autowired
private LuckmoneyRepository repository;
@Transactional
public void createTwo() {
Luckymoney luckymoney1 = new Luckymoney();
luckymoney1.setProduce("熊大");
luckymoney1.setMoney(new BigDecimal(520));
repository.save(luckymoney1);
Luckymoney luckymoney2 = new Luckymoney();
luckymoney2.setProduce("熊大");
luckymoney2.setMoney(new BigDecimal(1314));
repository.save(luckymoney2);
}
}
|