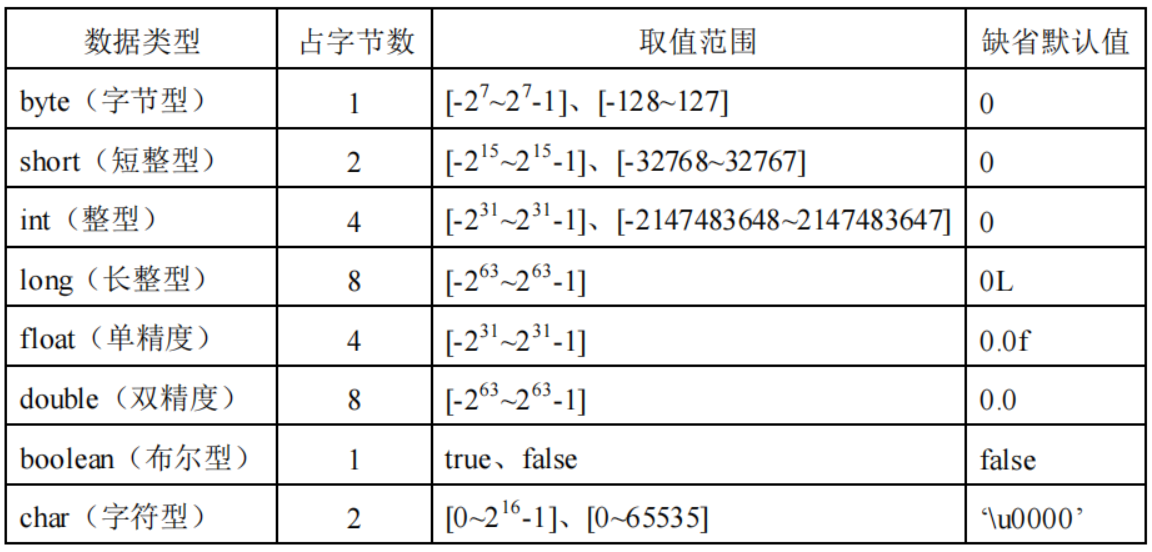
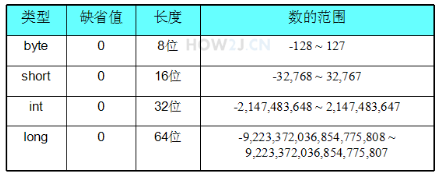
变量 基本变量类型
1
2
3
4
5
6
public class Hero { public static void main (String [] args) byte b = 200 ; } }
浮点型
浮点数类型有两种 float 长度为32位 double 长度为64位 注意: 默认的小数值是double类型的 所以 float f = 54.321会出现编译错误,因为54.321的默认类型是 double,其类型 长度为64,超过了float的长度32 在数字后面加一个字母f ,直接把该数字声明成float类型 float f2 = 54.321f , 这样就不会出错了
1
2
3
4
5
6
7
8
public class Hero { public static void main (String [] args) double d = 123.45 ; float f = 54.321 ; float f2 = 54.321f ; } }
整数字面值
当以l或者L结尾的时候,一个整数字面值是long类型,否则就是int类型。 建议使用大写的L 而非小写的l,因为容易和1混淆。 byte,short,int和long的值都可以通过int类型的字面值来创建。整数的字面值可以用如下四种进制来表示: 十进制: 基 10, 包含从0-9的数字,平常用的就是这种 十六进制: 基 16, 包含从0-9的数字,和从A-F的字母。 八进制: 基 8, 包含从0-7的数字 二进制: 基 2, 包含0和1。(从 JAVA7开始就可以创建 二进制的字面值了)
1
2
3
4
5
6
7
8
9
10
11
12
13
14
15
16
17
18
19
public class HelloWorld { public static void main (String [] args) int a = 1e4 ; long val = 26L ; int decVal = 26 ; int hexVal = 0x1a ; int oxVal = 032 ; int binVal = 0b11010 ; System.out.println (oxVal); } } public class Hero { public static void main (String [] args) long val = 3000000000L ; } }
浮点数字面值
1
2
3
4
5
6
7
public class Hero { public static void main (String [] args) float f1 = 3.13F ; double d1 = 123.3 ; double d2 = 12.2e5 ; } }
转义字符
需要注意的是,\表示转义,比如需要表示制表符,回车换行,双引号等就需要用 \t \r \n “ 的方式进行
1
2
3
4
5
6
7
8
9
10
11
public class Hero { public static void main (String [] args) char tab = '\t' ; char carriageReturn = '\r' ; char newLine = '\n' ; char doubleQuote = '\"' ; char singleQuote = '\'' ; char backslash = '\\' ; } }
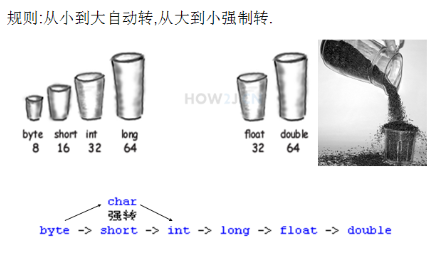
类型转换 转换规则
转换规则如图所示 精度高 的数据类型就像容量大 的杯子,可以放更大 的数据 精度低 的数据类型就像容量小 的杯子,只能放更小 的数据 小杯子往大杯子里倒东西,大杯子怎么都放得下 大杯子往小杯子里倒东西,有的时候放的下 ,有的时候就会有溢出 需要注意的一点是 虽然short和char都是16位的,长度是一样的 但是彼此之间,依然需要进行强制转换
1
2
3
4
5
6
7
8
9
10
public class Hero { public static void main (String [] args) char c = 'A' ; short s = 80 ; c = (char )s; System.out.println (c); } }
低精度向高精度转换
1
2
3
// 自动类型转换 long l = 50 int i = 50
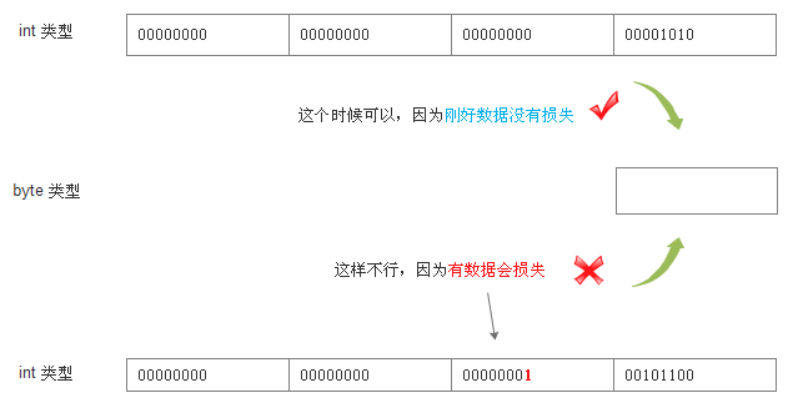
高精度向低精度转换(强转)
把int类型的数据转成为byte类型的数据,是有风险的 有的时候是可以转换的 ,比如 b = i1 (i1=10); 有的时候不可以转换 比如 b= i2 (i2=300) 因为放不下了 编译器就会提示错误 这个时候就只能采用强制转换 ,强制转换的意思就是,转是可以转的,但是不对转换之后的值负责。 风险自担,后果自负
1
2
3
4
5
6
7
8
9
10
11
12
public class Hero { public static void main (String[] args ) byte b; int i1 = 10 ; int i2 = 300 ; b = (byte ) i1; System.out .println(b); b = (byte ) i2; System.out .println(b); } }
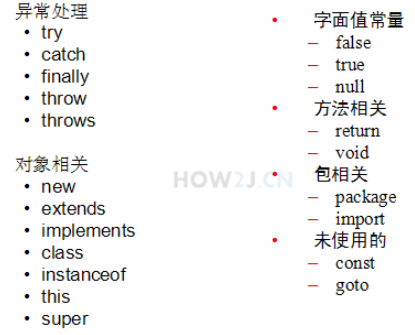
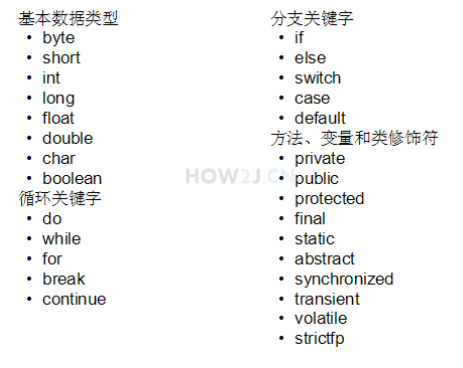
关键字列表
final 当一个变量被final修饰的时候,该变量只有一次赋值的机会
1
2
3
// 报错 final int i = 5 i = 19
final 修饰的变量在方法中,可以先初始化再赋值
1
2
3
// 正确 final int i i = 19
但是如果是成员变量,必须在初始化的时赋值,不然会报错
经过测试静态方法不能调用成员变量
1
2
3
4
5
6
public class Hero { final int i; public static void main (String [] args) } }
final修饰的类不能被继承
final定义的方法不能被重写
final定义的常量不能被重写赋值
操作符 异或^:
不同,返回真 相同,返回假
1
2
3
4
5
6
7
8
9
10
11
public class Test { public static void main(String[] args) { int i = 1 ; boolean b = !(i++ == 3 ) ^ (i++ ==2 ) && (i++ == 3 ); System .out .println(b); System .out .println(i); } } 输出: false 3
一个整数的二进制表达:
通过Integer.toBinaryString() 方法,将一个十进制整数转换为一个二进制字符串
位或:
5的二进制是101
6的二进制是110
所以 5|6 对每一位进行或运算,得到 111->7
位与:
5的二进制是101
6的二进制是110
所以 5&6 对每一位进行与运算,得到 100->4
异或:
5的二进制是101 6的二进制是110 所以 5^6 对每一位进行异或运算,得到 011->3
一些特别情况: 任何数和自己进行异或 都等于 0 任何数和0 进行异或 都等于自己
取非~:
5 的二进制是 00000101 所以取反即为 11111010 这个二进制换算成十进制即为-6
左移 右移:
左移:根据一个整数的二进制表达,将其每一位都向左移动,最右边一位补0 右移:根据一个整数的二进制表达,将其每一位都向右移动
使用Scanner读取整数:
1
2
3
4
5
6
7
8
9
10
11
import java.util.Scanner; public class HelloWorld { public static void main (String[] args) { Scanner s = new Scanner (System.in); int a = s.nextInt(); System.out.println("第一个整数:" +a); int b = s.nextInt(); System.out.println("第二个整数:" +b); } }
使用Scanner读取浮点数:
1
2
3
4
5
6
7
8
9
10
import java.util.Scanner; public class HelloWorld { public static void main (String[] args) { Scanner s = new Scanner (System.in); float a = s.nextFloat(); System.out.println("读取的浮点数的值是:" +a); } }
使用Scanner读取字符串:
1
2
3
4
5
6
7
8
9
import java.util.Scanner; public class HelloWorld { public static void main (String[] args) { Scanner s = new Scanner (System.in); String a = s.nextLine(); System.out.println("读取的字符串是:" +a); } }
读取了整数后,接着读取字符串:
需要注意的是,如果在通过nextInt()读取了整数后,再接着读取字符串,读出来的是回车换行:”\r\n”,因为nextInt仅仅读取数字信息,而不会读取 回车换行”\r\n”.
所以,如果在业务上需要读取了整数后,接着读取字符串,那么就应该连续执行两次nextLine(),第一次是取走回车换行,第二次才是读取真正的字符串
1
2
3
4
5
6
7
8
9
10
11
12
import java.util.Scanner; public class HelloWorld { public static void main (String[] args) { Scanner s = new Scanner (System.in); int i = s.nextInt(); System.out.println("读取的整数是" + i); String rn = s.nextLine(); String a = s.nextLine(); System.out.println("读取的字符串是:" +a); } }
控制流程 switch switch可以使用byte,short,int,char,String,enum
注: 每个表达式结束,都应该有一个break; 注: String在Java1.7之前是不支持的, Java从1.7开始支持switch用String的,编译后是把String转化为hash值,其实还是整数 注: enum是枚举类型,在枚举 章节有详细讲解
1
2
3
4
5
6
7
8
9
10
11
12
13
14
15
16
17
18
19
20
21
public class Test { public static void main (String[] args ) int day = 1 ; switch (day) { case 1 : System.out .println("星期一" ); System.out .println("星期111" ); case 2 : System.out .println("星期二" ); default : System.out .println("都不是" ); } } } 输出: 星期一 星期111 星期二 都不是
使用boolean变量结束外部循环 1 2 3 4 5 6 7 8 9 10 11 12 13 14 15 16 17 public class Test { public static void main (String [] args) boolean breakout = false ; for (int i = 0 ; i < 10 ; i++) { for (int j = 0 ; j < 10 ; j++) { System.out.println (i + ":" + j); if (0 == j % 2 ) { breakout = true ; break ; } } if (breakout) { break ; } } } }
使用标签结束外部循环: 在外部循环的前一行,加上标签 在break的时候使用该标签 即能达到结束外部循环的效果
1
2
3
4
5
6
7
8
9
10
11
12
13
14
15
16
17
public class HelloWorld { public static void main (String [] args) outloop: for (int i = 0 ; i < 10 ; i++) { for (int j = 0 ; j < 10 ; j++) { System.out.println (i+":" +j); if (0 ==j%2 ) break outloop; } } } }
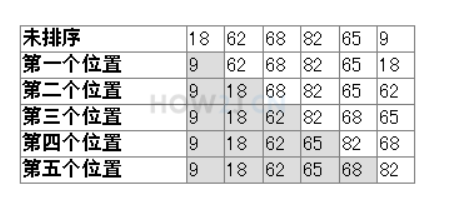
数组 选择法排序 选择法排序的思路: 把第一位 和其他所有的进行比较,只要比第一位小的,就换到第一个位置来 比较完后,第一位就是最小的 然后再从第二位 和剩余的其他所有进行比较,只要比第二位小,就换到第二个位置来 比较完后,第二位就是第二小的 以此类推
1 2 3 4 5 6 7 8 9 10 11 12 13 14 15 16 17 18 19 20 21 22 public class Test { public static void main(String[] args) { int [] a = {18 , 62 , 68 , 82 , 65 , 9 }; for (int i = 0 ; i < a.length; i++) { System .out .print(a[i] + " "); } System .out .println(""); for (int i = 0 ; i < a.length; i++) { for (int j = i + 1 ; j < a.length; j++) { if (a[i] > a[j]) { int temp = a[i]; a[i] = a[j]; a[j] = temp ; } } } for (int i = 0 ; i < a.length; i++) { System .out .print(a[i] + " "); } System .out .println(); } }
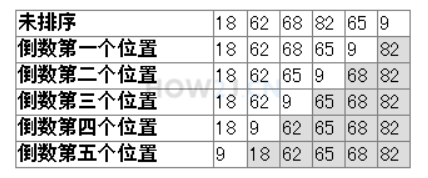
冒泡法排序 冒泡法排序的思路: 第一步:从第一位开始,把相邻两位进行比较 如果发现前面的比后面的大,就把大的数据交换在后面,循环比较完毕后,最后一位就是最大的 第二步: 再来一次,只不过不用比较最后一位 以此类推
1
2
3
4
5
6
7
8
9
10
11
12
13
14
15
16
17
18
19
20
21
22
public class Test { public static void main(String[] args) { int [] a = {18 , 62 , 68 , 82 , 65 , 9 }; for (int i = 0 ; i < a.length; i++) { System .out .print(a[i] + " "); } System .out .println(""); for (int i = 0 ; i < a.length; i++) { for (int j = 0 ; j < a.length - i - 1 ; j++) { if (a[j] > a[j + 1 ]) { int temp = a[j]; a[j] = a[j + 1 ]; a[j + 1 ] = temp ; } } } for (int i = 0 ; i < a.length; i++) { System .out .print(a[i] + " "); } System .out .println(); } }
复制数组 把一个数组的值,复制到另一个数组中
1 System.arraycopy(src, srcPos , dest, destPos , length)
src: 源数组 srcPos: 从源数组复制数据的起始位置 dest: 目标数组 destPos: 复制到目标数组的起始位置 length: 复制的长度
1 2 3 4 5 6 7 8 9 10 11 public class Test { public static void main(String[] args) { int [] a = {18 , 62 , 68 , 82 , 65 , 9 }; int [] b = new int [3 ]; System .arraycopy(a, 0 , b, 0 , 3 ); for (int b1 : b) { System .out .print(b1 + " "); } System .out .println(); } }
Arrays 工具类 与使用System.arraycopy进行数组复制类似的, Arrays提供了一个copyOfRange方法进行数组复制。 不同的是System.arraycopy,需要事先准备好目标数组,并分配长度。 copyOfRange 只需要源数组就就可以了,通过返回值,就能够得到目标数组了。 除此之外,需要注意的是 copyOfRange 的第3个参数 ,表示源数组的结束位置,是取不到的 。
数组复制 1 2 3 4 5 6 7 8 9 10 11 12 13 14 15 16 import java.util.Arrays;public class Test { public static void main(String[] args) { int [] a = {18 , 62 , 68 , 82 , 65 , 9 }; // copyOfRange(int [] original, int from , int to ) // 第一个参数表示源数组 // 第二个参数表示开始位置(取得到) // 第三个参数表示结束位置(取不到) int [] b = Arrays.copyOfRange(a, 0 , 3 ); for (int b1 : b) { System .out .print(b1 + " "); } System .out .println(); } }
转换为字符串 1 2 3 4 5 6 7 8 9 import java.util.Arrays;public class Test { public static void main (String[] args) { int [] a = {18 , 62 , 68 , 82 , 65 , 9 }; String content = Arrays.toString(a); System.out.println(content); } }
排序 1 2 3 4 5 6 7 8 9 10 import java.util.Arrays; public class Test { public static void main(String[] args) { int [] a = {18 , 62 , 68 , 82 , 65 , 9 }; System .Arrays .to String(a ) ); Arrays . System .Arrays .to String(a ) ); } }
搜索 查询元素出现的位置 需要注意的是,使用binarySearch进行查找之前,必须使用sort进行排序 如果数组中有多个相同的元素,查找结果是不确定的
1 2 3 4 5 6 7 8 9 10 import java.util.Arrays; public class Test { public static void main(String[] args) { int [] a = {18 , 62 , 68 , 82 , 65 , 9 }; Arrays . System .Arrays .to String(a ) ); System ."数字62出现的位置:" + Arrays .Search(a , 62) ); } }
判断是否相同 1 2 3 4 5 6 7 8 9 import java.util.Arrays;public class Test { public static void main (String[] args) { int [] a = {18 , 62 , 68 , 82 , 65 , 9 }; int [] b = {18 , 62 , 68 , 82 , 65 , 8 }; System.out.println(Arrays.equals(a, b)); } }
填充 使用同一个值,填充整个数组
1 2 3 4 5 6 7 8 9 10 import java.util.Arrays;public class Test { public static void main (String [] args) int [] a = new int [10 ]; Arrays.fill (a, 5 ); System.out.println (Arrays.toString (a)); } }
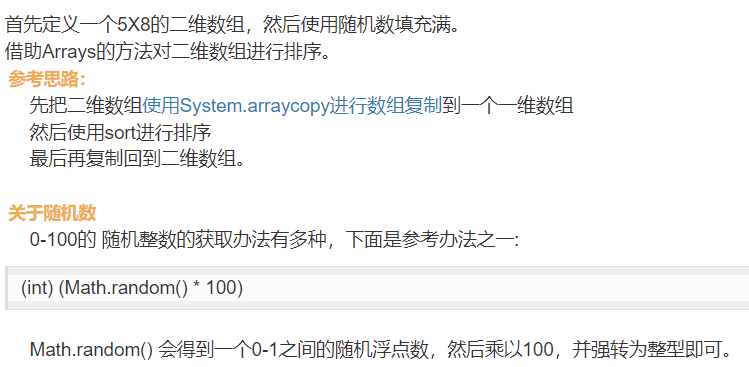
练习-二维数组排序
1 2 3 4 5 6 7 8 9 10 11 12 13 14 15 16 17 18 19 20 21 22 23 24 25 import java.util.Arrays; public class Test { public static void main(String[] args) { int [] [] a = new int [5 ] [8 ] ; int [] temp = new int [40 ] ; for (int i = 0 ; i < 5 ; i ++) { for (int j = 0 ; j < 8 ; j++) { a[i ] [j ] = (int )(Math .() * 100 ); } System .Arrays .to String(a [i ]) ); } System .() ; for (int i = 0 ; i < 5 ; i++) { System .[i ] , 0 , temp, i * 8 , 8 ); } System .Arrays .to String(temp ) ); Arrays . System .Arrays .to String(temp ) ); for (int i = 0 ; i < 5 ; i++) { System . * 8 , a[i ] , 0 , 8 ); System .Arrays .to String(a [i ]) ); } } }
类和对象 重载(可变数量的参数) 如果要攻击更多的英雄,就需要设计更多的方法,这样类会显得很累赘,像这样:
1 2 3 public void attack (Hero h1) public void attack (Hero h1,Hero h2) public void attack (Hero h1,Hero h2,Hero h3)
这时,可以采用可变数量的参数 只需要设计一个方法 public void attack(Hero **…**heros) 即可代表上述所有的方法了 在方法里,使用操作数组的方式处理参数heros即可
1 2 3 4 5 6 7 8 9 10 11 12 13 14 15 16 17 18 19 20 21 22 23 24 25 26 27 28 29 public class ADHero extends Hero { public void attack () { System.out.println(name + " 进行了一次攻击 ,但是不确定打中谁了" ); } public void attack (Hero... heros) { for (int i = 0 ; i < heros.length; i++) { System.out.println(name + " 攻击了 " + heros[i].name); } } public static void main (String[] args) { ADHero bh = new ADHero (); bh.name = "赏金猎人" ; Hero h1 = new Hero (); h1.name = "盖伦" ; Hero h2 = new Hero (); h2.name = "提莫" ; bh.attack(h1); bh.attack(h1, h2); } }
this this代表当前对象(打印对象地址) 1 2 3 4 5 6 7 8 9 10 11 12 13 14 15 16 17 18 19 20 21 22 23 24 25 26 27 28 29 30 31 32 public class Hero { String name; float hp; float armor; int moveSpeed; public Hero () System.out .println("调用Hero的构造方法" ); } public Hero (String name ) this .name = name; } public void showAddressInMemory () System.out .println("打印this看到的虚拟地址:" +this ); } public static void main (String[] args ) Hero garen = new Hero("盖伦" ); garen.hp = 616.28f ; garen.armor = 27.536f ; garen.moveSpeed = 350 ; garen.showAddressInMemory(); Hero teemo = new Hero("提莫" ); teemo.hp = 383f ; teemo.armor = 14f ; teemo.moveSpeed = 330 ; teemo.showAddressInMemory(); } }
通过this访问属性 直接this.属性即可
通过this调用其他的构造方法 如果要在一个构造方法中,调用另一个构造方法,可以使用this()
1 2 3 4 5 6 7 8 9 10 11 12 13 14 15 16 17 18 19 20 21 22 23 24 25 26 27 28 29 30 31 32 33 34 35 36 37 38 39 40 public class Hero { String name; float hp; float armor; int moveSpeed; public Hero () System.out .println("调用Hero的构造方法" ); } public Hero (String name ) System.out .println("一个参数的构造方法" ); this .name = name; } public Hero (String name, float hp ) this (name); System.out .println("两个参数的构造方法" ); this .hp = hp; } public void showAddressInMemory () System.out .println("打印this看到的虚拟地址:" +this ); } public static void main (String[] args ) Hero garen = new Hero("盖伦" ); garen.hp = 616.28f ; garen.armor = 27.536f ; garen.moveSpeed = 350 ; garen.showAddressInMemory(); System.out .println(garen.name); Hero teemo = new Hero("提莫" ); teemo.hp = 383f ; teemo.armor = 14f ; teemo.moveSpeed = 330 ; teemo.showAddressInMemory(); } }
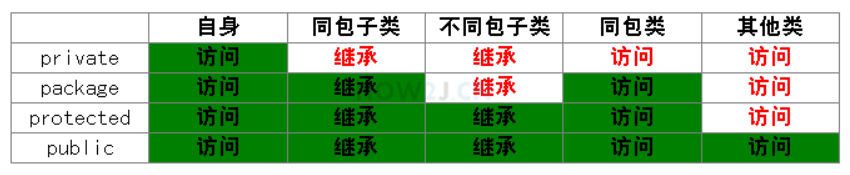
访问修饰符 类和类之间的关系有如下几种: 以Hero为例 自身: 指的是Hero自己 同包子类: ADHero这个类是Hero的子类,并且和Hero处于同一个包下 不同包子类: Support这个类是Hero的子类,但是在另一个包下 同包类: GiantDragon 这个类和Hero是同一个包 ,但是彼此没有继承关系 其他类: Item这个类,在不同包 ,也没有继承关系的类
类属性 类属性: 又叫做静态属性 对象属性: 又叫实例属性,非静态属性 如果一个属性声明成类属性,那么所有的对象,都共享这么一个值 给英雄设置一个类属性叫做“版权” (copyright), 无论有多少个具体的英雄,所有的英雄的版权都属于 Riot Games公司。
1 2 3 4 5 6 7 8 9 10 11 12 13 14 15 16 17 18 19 20 public class Hero { public String name ;//实例属性,对象属性,非静态属性 protected float hp; static String copyright;//类属性,静态属性 public static void main(String[] args) { Hero garen = new Hero(); garen.name = "盖伦"; Hero.copyright = "版权由Riot Games公司所有"; System .out .println(garen.name); System .out .println(garen.copyright); Hero teemo = new Hero(); teemo.name = "提莫"; System .out .println(teemo.name); System .out .println(teemo.copyright); } }
访问类属性有两种方式
这两种方式都可以访问类属性,访问即修改和获取,但是建议使用第二种 类.类属性 的方式进行,这样更符合语义上的理解
什么时候使用对象属性,什么时候使用类属性?
如果一个属性,每个英雄都不一样,比如name,这样的属性就应该设计为对象属性,因为它是跟着对象走的 ,每个对象的name都是不同的
如果一个属性,所有的英雄都共享 ,都是一样的,那么就应该设计为类属性。比如血量上限,所有的英雄的血量上限都是 9999,不会因为英雄不同,而取不同的值。 这样的属性,就适合设计为类属性
类方法 类方法: 又叫做静态方法
对象方法: 又叫实例方法,非静态方法
访问一个对象方法,必须建立在有一个对象 的前提的基础上 访问类方法,不需要对象 的存在,直接就访问
类方法 类方法: 又叫做静态方法
对象方法: 又叫实例方法,非静态方法
访问一个对象方法,必须建立在有一个对象 的前提的基础上 访问类方法,不需要对象 的存在,直接就访问
1 2 3 4 5 6 7 8 9 10 11 12 13 14 15 16 17 18 19 20 21 22 23 24 25 26 27 28 public class Hero { public String name; protected float hp; public void die () hp = 0 ; } public static void battleWin () System.out .println("battle win" ); } public static void main (String[] args ) Hero garen = new Hero(); garen.name = "盖伦" ; System.out .println(garen.name); garen.die(); Hero.battleWin(); Hero teemo = new Hero(); teemo.name = "提莫" ; System.out .println(teemo.name); } }
调用类方法 和访问类属性 一样,调用类方法也有两种方式
对象.类方法
类.类方法
这两种方式都可以调用类方法,但是建议使用第二种 类.类方法 的方式进行,这样更符合语义上的理解。 并且在很多时候,并没有实例,比如在前面练习的时候用到的随机数的获取办法
random()就是一个类方法,直接通过类Math进行调用,并没有一个Math的实例存在。
什么时候设计对象方法,什么时候设计类方法 如果在某一个方法里,调用了对象属性,比如
1 2 3 public String getName ( return name; }
name属性是对象属性,只有存在一个具体对象的时候,name才有意义。 如果方法里访问了对象属性,那么这个方法,就必须设计为对象方法
如果一个方法,没有调用任何对象属性,那么就可以考虑设计为类方法,比如
1 2 3 public static void printGameDuration () System.out .println("已经玩了10分50秒" ); }
printGameDuration 打印当前玩了多长时间了,不和某一个具体的英雄关联起来,所有的英雄都是一样的。 这样的方法,更带有功能性 色彩 就像取随机数一样,random()是一个功能用途的方法
属性初始化 对象属性初始化 对象属性初始化有3种 \1. 声明该属性的时候初始化 \2. 构造方法中初始化 \3. 初始化块
1 2 3 4 5 6 7 8 9 10 11 12 13 14 public class Hero { public String name = "some hero" ; protected float hp; float maxHP; { maxHP = 200 ; } public Hero () hp = 100 ; } }
类属性初始化 类属性初始化有2种 \1. 声明该属性的时候初始化 \2. 静态初始化块
1 2 3 4 5 6 7 8 9 10 11 12 13 14 15 16 17 18 19 20 21 22 23 24 25 26 27 28 29 30 31 32 33 34 35 36 37 38 39 public class Hero { public String name; protected float hp; float maxHP; public static int itemCapcity = 8 ; static { itemCapcity = 6 ; } public Hero () } public static void main (String [] args) System.out.println (Hero.itemCapcity); } } 输出: 6 public class Hero { public String name = "some hero" ; public Hero () name = "one hero" ; } { name = "the hero" ; } public static void main (String [] args) Hero h = new Hero (); System.out.println (h.name); } } 输出: one hero
单例模式 单例模式又叫做 Singleton模式,指的是一个类,在一个JVM里,只有一个实例存在。
饿汉式单例模式 GiantDragon 应该只有一只,通过私有化其构造方法,使得外部无法通过new 得到新的实例。 GiantDragon 提供了一个public static的getInstance方法,外部调用者通过该方法获取12行定义的对象,而且每一次都是获取同一个对象。 从而达到单例的目的。 这种单例模式又叫做饿汉式 单例模式,无论如何都会创建一个实例
1 2 3 4 5 6 7 8 9 10 11 12 13 14 15 16 17 18 19 20 21 22 23 24 25 26 27 28 29 30 31 32 33 34 35 36 37 38 package charactor; public class GiantDragon { private GiantDragon () { } private static GiantDragon instance = new GiantDragon (); public static GiantDragon getInstance () { return instance; } } package charactor; public class TestGiantDragon { public static void main (String[] args) { GiantDragon g1 = GiantDragon.getInstance(); GiantDragon g2 = GiantDragon.getInstance(); GiantDragon g3 = GiantDragon.getInstance(); System.out.println(g1==g2); System.out.println(g1==g3); } }
懒汉式单例模式 懒汉式 单例模式与饿汉式 单例模式不同,只有在调用getInstance的时候,才会创建实例
1 2 3 4 5 6 7 8 9 10 11 12 13 14 15 16 17 18 19 20 21 22 23 24 25 26 27 28 29 30 31 32 33 34 35 36 37 38 39 40 41 package charactor; public class GiantDragon { private GiantDragon () { } private static GiantDragon instance; public static GiantDragon getInstance () { if (null ==instance){ instance = new GiantDragon (); } return instance; } } package charactor; public class TestGiantDragon { public static void main (String[] args) { GiantDragon g1 = GiantDragon.getInstance(); GiantDragon g2 = GiantDragon.getInstance(); GiantDragon g3 = GiantDragon.getInstance(); System.out.println(g1==g2); System.out.println(g1==g3); } }
什么时候使用饿汉式,什么时候使用懒汉式 饿汉式 是立即加载的方式,无论是否会用到这个对象,都会加载。 如果在构造方法里写了性能消耗较大,占时较久的代码,比如建立与数据库的连接,那么就会在启动的时候感觉稍微有些卡顿。
懒汉式 ,是延迟加载的方式,只有使用的时候才会加载。 并且有线程安全 的考量(鉴于同学们学习的进度,暂时不对线程的章节做展开)。 使用懒汉式,在启动的时候,会感觉到比饿汉式略快,因为并没有做对象的实例化。 但是在第一次调用的时候,会进行实例化操作,感觉上就略慢。
看业务需求,如果业务上允许有比较充分的启动和初始化时间,就使用饿汉式,否则就使用懒汉式
单例模式三元素 这个是面试的时候经常会考的点,面试题通常的问法是: 什么是单例模式?
回答的时候,要答到三元素
构造方法私有化
静态属性指向实例
public static的 getInstance方法,返回第二步的静态属性
枚举类型 预先定义常量 枚举enum是一种特殊的类(还是类),使用枚举可以很方便的定义常量 比如设计一个枚举类型 季节,里面有4种常量
1
2
3
public enum Season { SPRING,SUMMER,AUTUMN,WINTER }
一个常用的场合就是switch语句中,使用枚举来进行判断
注: 因为是常量,所以一般都是全大写
1 2 3 4 5 6 7 8 9 10 11 12 13 14 15 16 17 18 19 20 21 22 public class HelloWorld { public static void main (String[] args ) Season season = Season.SPRING; switch (season) { case SPRING: System.out .println("春天" ); break ; case SUMMER: System.out .println("夏天" ); break ; case AUTUMN: System.out .println("秋天" ); break ; case WINTER: System.out .println("冬天" ); break ; } } } public enum Season { SPRING,SUMMER,AUTUMN,WINTER }
使用枚举的好处 假设在使用switch 的时候,不是使用枚举,而是使用int,而int的取值范围就不只是1-4,有可能取一个超出1-4之间的值,这样判断结果就似是而非了。(因为只有4个季节)
但是使用枚举,就能把范围死死的限定在这四个当中
而不会出现奇怪的 第5季
1 2 3 4 5 6 7 8 9 10 11 12 13 14 15 16 17 18 19 public class HelloWorld { public static void main (String[] args ) int season = 5 ; switch (season) { case 1 : System.out .println("春天" ); break ; case 2 : System.out .println("夏天" ); break ; case 3 : System.out .println("秋天" ); break ; case 4 : System.out .println("冬天" ); break ; } } }
遍历枚举 借助增强型for循环 ,可以很方便的遍历一个枚举都有哪些常量
1 2 3 4 5 6 7 public class HelloWorld { public static void main (String [] args for (Season s : Season .values ()) { System .out .println (s); } } }
接口与继承 接口 在设计LOL的时候,进攻类英雄有两种,一种是进行物理系攻击,一种是进行魔法系攻击
这时候,就可以使用接口 来实现这个效果。
接口就像是一种约定 ,我们约定某些英雄是物理系英雄,那么他们就一定能够进行物理攻击。
物理攻击接口 创建一个接口 AD ,声明一个方法 physicAttack 物理攻击,但是没有方法体,是一个“空 ”方法
1 2 3 4 5 6 package charactor; public interface AD public void physicAttack () }
设计一类英雄,能够使用物理攻击 设计一类英雄,能够使用物理攻击,这类英雄在LOL中被叫做AD 类:ADHero 继承了Hero 类,所以继承了name,hp,armor等属性
实现某个接口,就相当于承诺了某种约定
所以,实现 了AD 这个接口,就必须 提供AD接口中声明的方法physicAttack() 实现 在语法上使用关键字 implements
1 2 3 4 5 6 7 8 9 10 package charactor; public class ADHero extends Hero implements AD @Override public void physicAttack() { System .out.println("进行物理攻击" ); } }
魔法攻击接口 1 2 3 4 5 6 package charactor; public interface AP public void magicAttack () }
设计一类英雄,只能使用魔法攻击 1 2 3 4 5 6 7 8 9 10 package charactor; public class APHero extends Hero implements AP @Override public void magicAttack() { System .out.println("进行魔法攻击" ); } }
设计一类英雄,既能进行物理攻击,又能进行魔法攻击 1 2 3 4 5 6 7 8 9 10 11 12 13 14 15 16 package charactor; public class ADAPHero extends Hero implements AD ,AP @Override public void magicAttack() { System .out.println("进行魔法攻击" ); } @Override public void physicAttack() { System .out.println("进行物理攻击" ); } }
什么样的情况下该使用接口? 如上的例子,似乎要接口,不要接口,都一样的,那么接口的意义是什么呢
学习一个知识点,是由浅入深得进行的。 这里呢,只是引入了接口的概念,要真正理解接口的好处,需要更多的实践,以及在较为复杂的系统中进行大量运用之后,才能够真正理解,比如在学习了多态 之后就能进一步加深理解。
刚刚接触一个概念,就希望达到炉火纯青的学习效果,这样的学习目标是不科学的。
对象转型 明确引用类型与对象类型的概念 首先,明确引用类型与对象类型的概念 在这个例子里,有一个对象 new ADHero(), 同时也有一个引用ad 对象是有类型的, 是ADHero 引用也是有类型的,是ADHero 通常情况下,引用类型和对象类型是一样的 接下来要讨论的类型转换的问题,指的是引用类型和对象类型 不一致的情况下的转换问题
1 2 3 4 5 6 7 8 9 10 public class Hero { public String name; protected float hp; public static void main (String [] args) ADHero ad = new ADHero (); } }
子类转父类(向上转型) 所谓的转型,是指当引用类型 和对象类型 不一致的时候,才需要进行类型转换 类型转换有时候会成功,有时候会失败(参考基本类型的类型转换 )
到底能否转换成功? 教大家一个很简单的判别办法 把右边的当做左边来用 ,看说得通不
1 2 3 Hero h = new Hero() ADHero ad = new ADHero() h = ad
右边ad引用所指向的对象的类型 是 物理攻击英雄 左边h引用的类型 是 普通英雄 把物理攻击英雄 当做 普通英雄,说不说得通? 说得通,就可以转
所有的子类转换为父类 ,都是说得通的。比如你身边的例子
苹果手机 继承了 手机,把苹果手机当做普通手机使用 怡宝纯净水 继承了 饮品, 把怡宝纯净水 当做饮品来使用
1 2 3 4 5 6 7 8 9 10 11 12 13 14 public class Hero { public String name; protected float hp; public static void main (String [] args) Hero h = new Hero (); ADHero ad = new ADHero (); h = ad; } }
父类转子类(向下转型) 父类转子类,有的时候行,有的时候不行,所以必须进行强制转换。 强制转换的意思就是 转换有风险,风险自担。
什么时候行呢?
1 2 3 4 5 6 7 8 9 10 11 public class Hero { public String name; protected float hp; public static void main (String [] args) Hero h = new Hero (); ADHero ad = new ADHero (); h = ad; ad = (ADHero)h; } }
第3行,是子类转父类,一定可以的 第4行,就是父类转子类,所以要进行强转。 h这个引用,所指向的对象是ADHero, 所以第4行,就会把ADHero转换为ADHero,就能转换成功。
什么时候转换不行呢?
1 2 3 4 5 6 7 8 9 10 11 12 13 14 public class Hero public String name; protected float hp; public static void main(String [] args) { Hero h = new Hero (); ADHero ad = new ADHero (); Support s = new Support (); h = s; ad = (ADHero)h; } } public class Support extends Hero }
第4行,是子类转父类,是可以转换成功的 第5行,是把h引用所指向的对象 Support,转换为ad引用的类型ADHero。 从语义上讲,把物理攻击英雄,当成辅助英雄来用,说不通,所以会强制转换失败,并且抛出异常
以下是对完整的代码的关键行分析 14行: 把ad当做Hero使用,一定可以 转换之后,h引用指向一个ad对象 15行: h引用有可能指向一个ad对象,也有可能指向一个support对象 所以把h引用转换成AD类型的时候,就有可能成功,有可能失败 因此要进行强制转换,换句话说转换后果自负 到底能不能转换成功,要看引用h到底指向的是哪种对象 在这个例子里,h指向的是一个ad对象,所以转换成ADHero类型,是可以的 16行:把一个support对象当做Hero使用,一定可以 转换之后,h引用指向一个support对象 17行:这个时候,h指向的是一个support对象,所以转换成ADHero类型,会失败。 失败的表现形式是抛出异常 ClassCastException 类型转换异常
没有继承关系的两个类,互相转换 没有继承关系的两个类,互相转换,一定会失败 虽然ADHero和APHero都继承了Hero,但是彼此没有互相继承关系 “把魔法英雄当做物理英雄来用 “,在语义上也是说不通的
1 2 3 4 5 6 7 8 9 10 11 public class Hero { public String name; protected float hp; public static void main (String [] args) ADHero ad = new ADHero (); APHero ap = new APHero (); ad = (ADHero)ap; } }
实现类转换成接口(向上转型) 引用ad指向的对象是ADHero类型,这个类型实现了AD接口 10行: 把一个ADHero类型转换为AD接口 从语义上来讲,把一个ADHero当做AD来使用,而AD接口只有一个physicAttack方法,这就意味着转换后就有可能要调用physicAttack方法,而ADHero一定是有physicAttack方法的,所以转换是能成功的。
1 2 3 4 5 6 7 8 9 public class Hero { public String name; protected float hp; public static void main (String [] args) ADHero ad = new ADHero (); AD adi = ad; } }
接口转换成实现类(向下转型) 10行: ad引用指向ADHero, 而adi引用是接口类型:AD,实现类转换为接口,是向上转型,所以无需强制转换,并且一定能成功 12行: adi实际上是指向一个ADHero的,所以能够转换成功 14行: adi引用所指向的对象是一个ADHero,要转换为ADAPHero就会失败。
假设能够转换成功 ,那么就可以使用magicAttack 方法,而adi引用所指向的对象*ADHero*是 没有magicAttack**方法的。
1 2 3 4 5 6 7 8 9 10 11 12 public class Hero { public String name; protected float hp; public static void main (String[] args) { ADHero ad = new ADHero (); AD adi = ad; ADHero adHero = (ADHero)adi; } }
重写 子类可以继承父类的对象方法
在继承后,重复提供该方法,就叫做方法的重写
又叫覆盖 override
父类Item 父类Item有一个方法,叫做effect
1 2 3 4 5 6 7 8 9 10 public class Item { String name; int price; public void buy () System.out .println("购买" ); } public void effect () System.out .println("物品使用后,可以有效果" ); } }
子类LifePotion 子类LifePotion继承Item,同时也提供了方法effect
1 2 3 4 5 public class LifePotion extends Item public void effect() { System .out.println("血瓶使用后,可以回血" ); } }
调用重写的方法 调用重写的方法 调用就会执行重写的方法,而不是从父类的方法 所以LifePotion的effect会打印: “血瓶使用后,可以回血”
1 2 3 4 5 6 7 8 9 10 11 12 13 14 15 16 17 18 19 public class Item { String name; int price; public void effect ( System .out .println ("物品使用后,可以有效果" ); } public static void main (String [] args Item i = new Item (); i.effect (); LifePotion lp = new LifePotion (); lp.effect (); } } 输出: 物品使用后,可以有效果 血瓶使用后,可以回血
多态 操作符的多态 + 可以作为算数运算,也可以作为字符串连接
类的多态 父类引用指向子类对象
操作符的多态 同一个操作符在不同情境下,具备不同的作用 如果+号两侧都是整型,那么**+代表 数字相加** 如果+号两侧,任意一个是字符串,那么**+代表字符串连接**
1 2 3 4 5 6 7 8 9 10 11 12 13 14 15 16 17 18 19 20 21 22 package charactor; public class Hero { public String name; protected float hp; public static void main (String [] args) int i = 5 ; int j = 6 ; int k = i+j; System.out.println (k); int a = 5 ; String b = "5" ; String c = a+b; System.out.println (c); } }
观察类的多态现象 观察类的多态现象: \1. i1和i2都是Item类型 \2. 都调用effect方法 \3. 输出不同的结果
多态: 都是同一个类型,调用同一个方法,却能呈现不同的状态
1 2 3 4 5 6 7 8 9 10 11 12 13 14 15 16 17 18 19 20 21 22 23 24 25 public class Item { String name; int price; public void effect () System.out .println("物品使用后,可以有效果" ); } public static void main (String[] args ) Item i1 = new LifePotion(); Item i2 = new MagicPotion(); i1.effect(); i2.effect(); } } public class MagicPotion extends Item { public void effect () System.out .println("蓝瓶使用后,可以回魔法" ); } } public class LifePotion extends Item { public void effect () System.out .println("血瓶使用后,可以回血" ); } }
类的多态条件 要实现类的多态,需要如下条件 \1. 父类(接口)引用指向子类对象 \2. 调用的方法有重写 那么多态有什么作用呢? 通过比较不使用多态 与使用多态 来进一步了解
如果不使用多态 , 假设英雄要使用血瓶和魔瓶,就需要为Hero设计两个方法 useLifePotion useMagicPotion
除了血瓶和魔瓶还有很多种物品,那么就需要设计很多很多个方法,比如 usePurityPotion 净化药水 useGuard 守卫 useInvisiblePotion 使用隐形药水 等等等等
如果物品的种类特别多,那么就需要设计很多的方法 比如useArmor,useWeapon等等
这个时候采用多态来解决这个问题 设计一个方法叫做useItem,其参数类型是Item 如果是使用血瓶,调用该方法 如果是使用魔瓶,还是调用该方法 无论英雄要使用什么样的物品,只需要一个方法 即可
隐藏 与重写类似,方法的重写是 子类覆盖父类的对象方法
隐藏 ,就是子类覆盖父类的类方法
父类 父类有一个类方法 :battleWin
1 2 3 4 5 6 7 8 9 10 public class Hero { public String name; protected float hp; public static void battleWin () System.out .println("hero battle win" ); } }
子类隐藏父类的类方法 子类隐藏父类的类方法
1 2 3 4 5 6 7 8 9 10 11 12 13 14 15 16 public class ADHero extends Hero implements AD { @Override public void physicAttack ( System .out .println ("进行物理攻击" ); } public static void battleWin ( System .out .println ("ad hero battle win" ); } public static void main (String [] args Hero .battleWin (); ADHero .battleWin (); } }
super 准备一个显式提供无参构造方法的父类 准备显式提供无参构造方法的父类 在实例化Hero对象的时候,其构造方法会打印 “Hero的构造方法 “
1 2 3 4 5 6 7 8 9 10 11 12 13 14 15 16 17 18 19 public class Hero { String name; float hp; float armor; int moveSpeed; public void useItem (Item i ) System.out .println("hero use item" ); i.effect(); } public Hero () System.out .println("Hero的构造方法" ); } public static void main (String[] args ) new Hero(); } }
实例化子类,父类的构造方法一定会被调用 实例化一个ADHero(), 其构造方法会被调用 其父类的构造方法也会被调用 并且是父类构造方法先调用 子类构造方法会默认调用父类的 无参的构造方法
1 2 3 4 5 6 7 8 9 10 11 12 13 14 public class ADHero extends Hero implements AD { @Override public void physicAttack () System.out .println("进行物理攻击" ); } public ADHero () System.out .println("AD Hero的构造方法" ); } public static void main (String[] args ) new ADHero(); } }
父类显式提供两个构造方法 分别是无参的构造方法和带一个参数的构造方法
1 2 3 4 5 6 7 8 9 10 11 12 13 14 15 16 17 18 19 20 21 22 23 24 public class Hero { String name; float hp; float armor; int moveSpeed; public void useItem (Item i ) System.out .println("hero use item" ); i.effect(); } public Hero () System.out .println("Hero的构造方法" ); } public Hero (String name ) System.out .println("Hero的有一个参数的构造方法" ); this .name = name; } public static void main (String[] args ) new Hero(); } }
子类显式调用父类带参构造方法 使用关键字super 显式调用父类带参的构造方法
1 2 3 4 5 6 7 8 9 10 11 12 13 14 15 16 17 18 19 public class ADHero extends Hero implements AD { @Override public void physicAttack () System.out .println("进行物理攻击" ); } public ADHero () System.out .println("AD Hero的构造方法" ); } public ADHero (String name ) super(name); System.out .println("AD Hero的构造方法" ); } public static void main (String[] args ) new ADHero("德莱文" ); } }
调用父类属性 通过super调用父类的moveSpeed属性 ADHero也提供了属性moveSpeed
1 2 3 4 5 6 7 8 9 10 11 12 13 14 15 16 17 18 19 20 21 22 23 24 25 26 27 public class ADHero extends Hero implements AD { int moveSpeed = 400 ; @Override public void physicAttack () System.out .println("进行物理攻击" ); } public int getMoveSpeed () return this .moveSpeed; } public int getMoveSpeed2 () return super.moveSpeed; } public static void main (String[] args ) ADHero h = new ADHero(); System.out .println(h.getMoveSpeed()); System.out .println(h.getMoveSpeed2()); } } 输出: Hero的构造方法 400 0
调用父类方法 ADHero重写了useItem方法,并且在useItem中通过super调用父类的useItem方法
1 2 3 4 5 6 7 8 9 10 11 12 13 14 15 16 17 18 19 20 21 22 23 24 25 26 27 28 29 30 31 32 33 34 public class ADHero extends Hero implements AD { int moveSpeed = 400 ; @Override public void physicAttack () { System.out.println("进行物理攻击" ); } public int getMoveSpeed () { return this .moveSpeed; } public int getMoveSpeed2 () { return super .moveSpeed; } public void useItem (Item i) { System.out.println("adhero use item" ); super .useItem(i); } public static void main (String[] args) { ADHero h = new ADHero (); LifePotion lp = new LifePotion (); h.useItem(lp); } } 输出: Hero的构造方法 adhero use item hero use item 血瓶使用后,可以回血
Object类 Object类是所有类的父类
Object类是所有类的父类 声明一个类的时候,默认是继承了Object public class Hero extends Object
toString() Object类提供一个toString方法,所以所有的类都有toString方法 toString()的意思是返回当前对象的字符串表达 通过 System.out.println 打印对象就是打印该对象的toString()返回值
1 2 3 4 5 6 7 8 9 10 11 12 13 14 15 16 17 18 public class Hero { String name ; float hp; public String toString() { return name ; } public static void main(String[] args) { Hero h = new Hero(); h.name = "盖伦"; System .out .println(h.toString()); System .out .println(h); } } 输出: 盖伦 盖伦
finalize() 当一个对象没有任何引用指向的时候,它就满足垃圾回收的条件
当它被垃圾回收的时候,它的finalize() 方法就会被调用。
finalize() 不是开发人员主动调用的方法,而是由虚拟机JVM调用的。
1 2 3 4 5 6 7 8 9 10 11 12 13 14 15 16 17 18 19 20 21 22 23 24 25 26 27 28 public class Hero { String name; float hp; public void finalize () System.out.println ("这个英雄正在被回收" ); } public static void main (String [] args) Hero h; for (int i = 0 ; i < 10000000 ; i++) { h = new Hero (); } } } 输出: 这个英雄正在被回收 这个英雄正在被回收 这个英雄正在被回收 这个英雄正在被回收 这个英雄正在被回收 ...
equals() equals() 用于判断两个对象的内容是否相同
假设,当两个英雄的hp相同的时候,我们就认为这两个英雄相同
1 2 3 4 5 6 7 8 9 10 11 12 13 14 15 16 17 18 19 20 21 22 23 public class Hero { String name float hp public boolean equals(Object o) { if (o instanceof Hero) { Hero h = (Hero)o return this.hp = = h.hp } return false } public static void main(String[] args) { Hero h1 = new Hero() h1.hp = 300 Hero h2 = new Hero() h2.hp = 400 Hero h3 = new Hero() h3.hp = 500 System.out.println(h1.equals(h2)) System.out.println(h1.equals(h3)) } }
== 这不是Object的方法,但是用于判断两个对象是否相同 更准确的讲 ,用于判断两个引用,是否指向了同一个对象
1 2 3 4 5 6 7 8 9 10 11 12 13 14 15 16 17 18 19 20 21 22 23 public class Hero { String name float hp public boolean equals(Object o) { if (o instanceof Hero) { Hero h = (Hero)o return this.hp = = h.hp } return false } public static void main(String[] args) { Hero h1 = new Hero() h1.hp = 300 Hero h2 = new Hero() h2.hp = 400 Hero h3 = new Hero() h3.hp = 500 System.out.println(h1 = = h2) System.out.println(h1 = = h3) } }
hashCode() hashCode方法返回一个对象的哈希值,但是在了解哈希值的意义之前,讲解这个方法没有意义。
hashCode的意义,将放在hashcode 原理 章节讲解
线程同步相关方法 Object还提供线程同步相关方法 wait() notify() notifyAll() 这部分内容的理解需要建立在对线程安全有足够的理解的基础之上,所以会放在线程交互 的章节讲解
getClass() getClass()会返回一个对象的类对象 ,属于高级内容,不适合初学者过早接触,关于类对象的详细内容请参考反射机制
final final修饰类,方法,基本类型变量,引用的时候分别有不同的意思。
final修饰类 当Hero被修饰成final的时候,表示Hero不能够被继承 其子类会出现编译错误
1 2 3 4 5 6 7 8 9 package charactor; public final class Hero extends Object String name; float hp; }
final修饰方法 Hero的useItem方法被修饰成final,那么该方法在ADHero中,不能够被重写
final修饰基本类型变量 final修饰基本类型变量,表示该变量只有一次赋值机会 16行进行了赋值,17行就不可以再进行赋值了
1 2 3 4 5 6 7 8 9 10 11 12 13 14 15 public class Hero extends Object { String name; float hp; float armor; int moveSpeed; public static void main (String [] args) final int hp; hp = 5 ; } }
final修饰引用 final修饰引用 h引用被修饰成final,表示该引用只有1 次指向对象的机会 所以17行会出现编译错误 但是,依然通过h引用修改对象的属性值hp,因为hp并没有final修饰
1 2 3 4 5 6 7 public class Hero extends Object public static void main(String [] args) { final Hero h; h = new Hero (); } }
常量 常量指的是可以公开,直接访问,不会变化的值 比如 itemTotalNumber 物品栏的数量是6个
1 2 3 4 5 6 7 8 9 10 11 public class Hero extends Object public static final int ITEMTOTALNUMBER = 6 ; float hp; public static void main(String [] args) { final Hero h; h = new Hero (); h.hp = 5 ; } }
抽象类 在类中声明一个方法,这个方法没有实现体,是一个“空”方法
这样的方法就叫抽象方法,使用修饰符“abstract”
当一个类有抽象方法的时候,该类必须被声明为抽象类
抽象类 为Hero增加一个抽象方法 attack ,并且把Hero声明为abstract的。 APHero,ADHero,ADAPHero是Hero的子类,继承了Hero的属性和方法。 但是各自的攻击手段是不一样的,所以继承Hero类后,这些子类就必须提供 不一样的attack方法实现。
1 2 3 4 5 6 7 8 9 10 11 12 13 14 15 16 17 18 19 20 21 22 23 24 25 26 27 28 29 30 31 32 33 34 35 36 37 38 39 40 41 42 43 44 45 46 47 48 49 50 51 52 53 54 55 56 57 58 59 public abstract class Hero { String name; float hp; float armor; int moveSpeed; public static void main (String [] args } public abstract void attack (); } public class ADHero extends Hero implements AD { @Override public void physicAttack ( System .out .println ("进行物理攻击" ); } @Override public void attack ( physicAttack (); } } public class APHero extends Hero implements AP { @Override public void magicAttack ( System .out .println ("进行魔法攻击" ); } @Override public void attack ( magicAttack (); } } public class ADAPHero extends Hero implements AD , AP { @Override public void attack ( System .out .println ("既可以进行物理攻击,也可以进行魔法攻击" ); } @Override public void physicAttack ( System .out .println ("进行物理攻击" ); } @Override public void magicAttack ( System .out .println ("进行魔法攻击" ); } }
抽象类可以没有抽象方法 Hero类可以在不提供抽象方法的前提下,声明为抽象类 一旦一个类被声明为抽象类,就不能够被直接实例化
1 2 3 4 5 public abstract class Hero { public static void main (String [] args } }
抽象类和接口的区别 区别1:
子类只能继承一个抽象类,不能继承多个
子类可以实现多个 接口
区别2:
抽象类可以定义 public,protected,package,private
静态和非静态属性 final和非final属性
但是接口中声明的属性,只能是 public 静态 final的
即便没有显式的声明
注: 抽象类和接口都可以有实体方法。 接口中的实体方法,叫做默认方法
1 2 3 4 5 6 7 public interface AP public static final int resistPhysic = 100 ; int resistMagic = 0 ; public void magicAttack () }
内部类 非静态内部类 非静态内部类 BattleScore “战斗成绩” 非静态内部类可以直接在一个类里面定义
比如: 战斗成绩只有在一个英雄对象存在的时候才有意义 所以实例化BattleScore 的时候,必须建立在一个存在的英雄的基础上 语法: new 外部类().new 内部类() 作为Hero的非静态内部类,是可以直接访问外部类的private 实例属性name的
1 2 3 4 5 6 7 8 9 10 11 12 13 14 15 16 17 18 19 20 21 22 23 24 25 26 27 28 29 30 31 32 33 34 35 public class Hero { String name; float hp; float armor; int moveSpeed; class BattleScore { int kill; int die; int assit; public void legendary () if (kill >= 8 ) { System.out .println(name + "超神!" ); } else { System.out .println(name + "尚未超神!" ); } } } public static void main (String[] args ) Hero garen = new Hero(); garen.name = "盖伦" ; BattleScore score = garen.new BattleScore () score.kill = 9 ; score.legendary(); } } 输出: 盖伦超神!
静态内部类 在一个类里面声明一个静态内部类 比如敌方水晶,当敌方水晶没有血的时候,己方所有英雄都取得胜利,而不只是某一个具体的英雄取得胜利。 与非静态内部类不同,静态内部类 水晶类的实例化 不需要一个外部类的实例为基础 ,可以直接实例化 语法:new 外部类.静态内部类(); 因为没有一个外部类的实例,所以在静态内部类里面不可以访问外部类的实例属性和方法 除了可以访问外部类的私有静态成员外 ,静态内部类和普通类没什么大的区别
1 2 3 4 5 6 7 8 9 10 11 12 13 14 15 16 17 18 19 20 21 22 23 24 25 26 27 28 29 30 31 public class Hero { public String name; protected float hp; private static void battleWin () System.out .println("battle win" ); } static class EnemyCrystal { int hp = 5000 ; public void checkIfVictory () if (hp == 0 ) { Hero.battleWin(); } } } public static void main (String[] args ) Hero.EnemyCrystal crystal = new Hero.EnemyCrystal(); crystal.checkIfVictory(); } }
匿名类 匿名类指的是在声明一个类的同时实例化它 ,使代码更加简洁精练 通常情况下,要使用一个接口或者抽象类,都必须创建一个子类
有的时候,为了快速使用,直接实例化一个抽象类,并“当场 ”实现其抽象方法。 既然实现了抽象方法,那么就是一个新的类,只是这个类,没有命名。 这样的类,叫做匿名类
1 2 3 4 5 6 7 8 9 10 11 12 13 14 15 16 17 18 19 20 21 22 23 24 25 26 public abstract class Hero { String name; float hp; float armor; int moveSpeed; public abstract void attack () public static void main (String[] args ) ADHero adh = new ADHero(); adh.attack(); System.out .println(adh); Hero h = new Hero() { @Override public void attack () System.out .println("新的进攻手段" ); } }; h.attack(); System.out .println(h); } }
本地类 本地类可以理解为有名字的匿名类 内部类与匿名类不一样的是,内部类必须声明在成员的位置,即与属性和方法平等的位置。 本地类和匿名类一样,直接声明在代码块里面,可以是主方法,for循环里等等地方
1 2 3 4 5 6 7 8 9 10 11 12 13 14 15 16 17 18 19 20 21 22 23 24 public abstract class Hero { String name; float hp; float armor; int moveSpeed; public abstract void attack () public static void main (String[] args ) class SomeHero extends Hero { public void attack () System.out .println(name+ " 新的进攻手段" ); } } SomeHero h = new SomeHero(); h.name = "地卜师" ; h.attack(); } } 输出: 地卜师 新的进攻手段
在匿名类中使用外部的局部变量 在匿名类中使用外部的局部变量,外部的局部变量必须修饰为final
为什么要声明为final,其机制比较复杂,请参考第二个Hero代码中的解释
注: 在jdk8中,已经不需要强制修饰成final了,如果没有写final,不会报错,因为编译器偷偷的 帮你加上了看不见的final
1 2 3 4 5 6 7 8 9 10 11 12 13 14 15 16 17 18 19 20 21 22 23 24 25 26 27 28 29 30 31 32 33 34 35 36 37 38 39 40 41 42 43 44 45 46 47 48 49 50 51 52 53 54 public abstract class Hero { public abstract void attack () public static void main (String[] args ) final int damage = 5 ; Hero h = new Hero() { @Override public void attack () System.out .printf("新的进攻手段,造成%d点伤害" , damage); } }; h.attack(); } } 输出: 新的进攻手段,造成5 点伤害 public abstract class Hero { public abstract void attack () public static void main (String[] args ) int damage = 5 ; class AnonymousHero extends Hero { int damage; public AnonymousHero (int damage this .damage = damage; } public void attack () damage = 10 ; System.out .printf("新的进攻手段,造成%d点伤害" ,this .damage ); } } Hero h = new AnonymousHero(damage); } }
默认方法 什么是默认方法 默认方法是JDK8新特性,指的是接口也可以提供具体方法了,而不像以前,只能提供抽象方法
Mortal 这个接口,增加了一个默认方法 revive,这个方法有实现体,并且被声明为了default
1 2 3 4 5 6 public interface Mortal { public abstract void die () default public void revive () System.out .println("本英雄复活了" ); } }
为什么会有默认方法 default的中文意思就是“默认”
假设没有默认方法这种机制,那么如果要为Mortal增加一个新的方法revive,那么所有实现了Mortal接口的类,都需要做改动。
但是引入了默认方法后,原来的类,不需要做任何改动,并且还能得到 这个默认方法
通过这种手段,就能够很好的扩展新的类,并且做到不影响原来的类
数字与字符串 装箱拆箱 封装类 所有的基本类型 ,都有对应的类类型 比如int对应的类是Integer 这种类就叫做封装类
1 2 3 4 5 6 7 8 9 public class TestNumber { public static void main (String [] args) int i = 5 ; Integer it = new Integer (i); int i2 = it.intValue (); } }
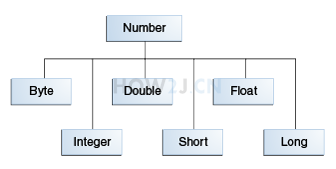
Number类 数字封装类有 Byte,Short,Integer,Long,Float,Double 这些类都是抽象类Number的子类
1 2 3 4 5 6 7 8 public class TestNumber { public static void main(String[] args) { int i = 5 ; Integer it = new Integer (i); //Integer 是Number的子类,所以打印true System .out .println(it instanceof Number); } }
自动装箱/拆箱 不需要调用构造方法,通过=符号自动 把 基本类型 转换为 类类型 就叫装箱
不需要调用Integer的intValue方法,通过=就自动转换成int类型,就叫拆箱
1 2 3 4 5 6 7 public class TestNumber { public static void main (String [] args) int i = 5 ; Integer it = i; int i2 = it; } }
int的最大值,最小值 int的最大值可以通过其对应的封装类Integer.MAX_VALUE获取
1 2 3 4 5 6 7 8 9 10 11 public class TestNumber { public static void main(String[] args) { //int 的最大值 System .out .println(Integer .MAX_VALUE); //int 的最小值 System .out .println(Integer .MIN_VALUE); } } 输出: 2147483647 -2147483648
字符串转换 数字转字符串 方法1: 使用String类的静态方法valueOf 方法2: 先把基本类型装箱为对象,然后调用对象的toString
1 2 3 4 5 6 7 8 9 10 11 public class TestNumber { public static void main (String [] args) int i = 5 ; String str = String .valueOf (i); Integer it = i; String str2 = it.toString (); } }
字符串转数字 调用Integer的静态方法parseInt
1 2 3 4 5 6 7 public class TestNumber { public static void main (String [] args) { String str = "999" ; int i = Integer.parseInt (str ); System.out .println (i); } }
数学方法 java.lang.Math提供了一些常用的数学运算方法,并且都是以静态方法的形式存在
四舍五入, 随机数,开方,次方,π,自然常数 1 2 3 4 5 6 7 8 9 10 11 12 13 14 15 16 17 18 19 20 21 22 23 24 25 26 27 public class TestNumber { public static void main(String[] args) { float f1 = 5.4 f; float f2 = 5.5 f; //5.4 四舍五入即5 System .out .println(Math.round(f1)); //5.5 四舍五入即6 System .out .println(Math.round(f2)); //得到一个0 -1 之间的随机浮点数(取不到1 ) System .out .println(Math.random()); //得到一个0 -10 之间的随机整数 (取不到10 ) System .out .println((int )( Math.random()*10 )); //开方 System .out .println(Math.sqrt(9 )); //次方(2 的4 次方) System .out .println(Math.pow(2 ,4 )); //π System .out .println(Math.PI); //自然常数 System .out .println(Math.E); } }
格式化输出 如果不使用格式化输出,就需要进行字符串连接,如果变量比较多,拼接就会显得繁琐 使用格式化输出,就可以简洁明了
%s 表示字符串 %d 表示数字 %n 表示换行
1
2
3
4
5
6
7
8
9
10
11
12
13
14
15
16
17
18
19
20
public class TestNumber { public static void main (String [] args) String name ="盖伦" ; int kill = 8 ; String title="超神" ; String sentence = name+ " 在进行了连续 " + kill + " 次击杀后,获得了 " + title +" 的称号" ; System.out.println (sentence); String sentenceFormat ="%s 在进行了连续 %d 次击杀后,获得了 %s 的称号%n" ; System.out.printf (sentenceFormat,name,kill,title); } }
printf和format能够达到一模一样的效果,如何通过eclipse查看java源代码 可以看到,在printf中直接调用了format
1 2 3 4 5 6 7 8 9 10 11 12 13 14 15 16 public class TestNumber { public static void main (String [] args) String name ="盖伦" ; int kill = 8 ; String title="超神" ; String sentenceFormat ="%s 在进行了连续 %d 次击杀后,获得了 %s 的称号%n" ; System.out.printf (sentenceFormat,name,kill,title); System.out.format(sentenceFormat,name,kill,title); } }
换行符 换行符 就是另起一行 — ‘\n’ 换行(newline) 回车符 就是回到一行的开头 — ‘\r’ 回车(return) 在eclipse里敲一个回车,实际上是回车换行符 Java是跨平台的编程语言,同样的代码,可以在不同的平台使用,比如Windows,Linux,Mac 然而在不同的操作系统,换行符是不一样的 (1)在DOS和Windows中,每行结尾是 “\r\n”; (2)Linux系统里,每行结尾只有 “\n”; (3)Mac系统里,每行结尾是只有 “\r”。 为了使得同一个java程序的换行符在所有的操作系统中都有一样的表现,使用%n,就可以做到平台无关的换行
1 2 3 4 5 6 public class TestNumber { public static void main (String [] args) System.out.printf ("这是换行符%n" ); System.out.printf ("这是换行符%n" ); } }
总长度,左对齐,补0,千位分隔符,小数点位数,本地化表达 1 2 3 4 5 6 7 8 9 10 11 12 13 14 15 16 17 18 19 20 21 22 23 24 25 26 27 28 29 import java.util.Locale; public class TestNumber { public static void main(String[] args) { int year = 2020 ; //总长度,左对齐,补0 ,千位分隔符,小数点位数,本地化表达 //直接打印数字 System .out .format("%d%n",year); //总长度是8 ,默认右对齐 System .out .format("%8d%n",year); //总长度是8 ,左对齐 System .out .format("%-8d%n",year); //总长度是8 ,不够补0 System .out .format("%08d%n",year); //千位分隔符 System .out .format("%,8d%n",year*10000 ); //小数点位数 System .out .format("%.2f%n",Math.PI); //不同国家的千位分隔符 System .out .format(Locale.FRANCE,"%,.2f%n",Math.PI*10000 ); System .out .format(Locale.US,"%,.2f%n",Math.PI*10000 ); System .out .format(Locale.UK,"%,.2f%n",Math.PI*10000 ); } }
字符串 保存一个字符的时候使用char 1 2 3 4 5 6 7 8 9 10 public class TestChar public static void main (String[] args) char c1 = 'a' ; char c2 = '1' ; char c3 = '中' ; char c4 = 'ab' ; } }
char对应的封装类 char对应的封装类是Character 装箱拆箱概念,参考 拆箱装箱
1 2 3 4 5 6 7 8 9 public class TestChar { public static void main (String [] args) char c1 = 'a' ; Character c = c1; c1 = c; } }
Character常见方法 1 2 3 4 5 6 7 8 9 10 11 12 13 14 15 16 17 18 public class TestChar { public static void main(String[] args) { System .Character .Letter('a ') ); System .Character .Digit('a ') ); System .Character .Whitespace(' ') ); System .Character .UpperCase('a ') ); System .Character .LowerCase('a ') ); System .Character .to UpperCase('a ') ); System .Character .to LowerCase('A') ); String a = 'a' ; String a2 = Character .to String('a ') ; } }
常见转义 1 2 3 4 5 6 7 8 9 10 11 12 13 14 15 16 17 18 19 20 21 22 23 24 25 26 27 public class TestChar { public static void main (String[] args) { System.out .println ("使用空格无法达到对齐的效果" ); System.out .println ("abc def" ); System.out .println ("ab def" ); System.out .println ("a def" ); System.out .println ("使用\\t制表符可以达到对齐的效果" ); System.out .println ("abc\tdef" ); System.out .println ("ab\tdef" ); System.out .println ("a\tdef" ); System.out .println ("一个\\t制表符长度是8" ); System.out .println ("12345678def" ); System.out .println ("换行符 \\n" ); System.out .println ("abc\ndef" ); System.out .println ("单引号 \\'" ); System.out .println ("abc\'def" ); System.out .println ("双引号 \\\"" ); System.out .println ("abc\"def" ); System.out .println ("反斜杠本身 \\" ); System.out .println ("abc\\def" ); } }
字符串 创建字符串 字符串即字符的组合,在Java中,字符串是一个类,所以我们见到的字符串都是对象 常见创建字符串手段: \1. 每当有一个字面值 出现的时候,虚拟机就会创建一个字符串 \2. 调用String的构造方法创建一个字符串对象 \3. 通过+加号进行字符串拼接也会创建新的字符串对象
1 2 3 4 5 6 7 8 9 10 11 12 13 14 public class TestString { public static void main (String [] args String garen ="盖伦" ; String teemo = new String ("提莫" ); char[] cs = new char[]{'崔' ,'斯' ,'特' }; String hero = new String (cs); String hero3 = garen + teemo; } }
final String 被修饰为final,所以是不能被继承的
immutable immutable 是指不可改变的 比如创建了一个字符串对象 String garen =”盖伦”; 不可改变 的具体含义是指: 不能增加长度 不能减少长度 不能插入字符 不能删除字符 不能修改字符 一旦创建好这个字符串,里面的内容 永远 不能改变
String 的表现就像是一个常量
1 2 3 4 5 6 7 public class TestString { public static void main (String [] args String garen ="盖伦" ; } }
字符串格式化 如果不使用字符串格式化,就需要进行字符串连接,如果变量比较多,拼接就会显得繁琐 使用字符串格式化 ,就可以简洁明了 更多的格式化规则,参考格式化输出
1 2 3 4 5 6 7 8 9 10 11 12 13 14 15 16 17 18 19 20 21 22 23 public class TestString { public static void main (String [] args) String name ="盖伦" ; int kill = 8 ; String title="超神" ; String sentence = name+ " 在进行了连续 " + kill + " 次击杀后,获得了 " + title +" 的称号" ; System.out.println (sentence); String sentenceFormat ="%s 在进行了连续 %d 次击杀后,获得了 %s 的称号%n" ; String sentence2 = String .format(sentenceFormat, name,kill,title); System.out.println (sentence2); } }
字符串长度 length方法返回当前字符串的长度 可以有长度为0的字符串,即空字符串
1 2 3 4 5 6 7 8 9 10 11 12 13 14 15 public class TestString { public static void main(String[] args) { String name ="盖伦"; System .out .println(name .length()); String unknowHero = ""; //可以有长度为0 的字符串,即空字符串 System .out .println(unknowHero.length()); } }
操纵字符串 获取字符 charAt(int index)获取指定位置的字符
1 2 3 4 5 6 7 8 9 10 11 12 public class TestString { public static void main (String [] args) String sentence = "盖伦,在进行了连续8次击杀后,获得了 超神 的称号" ; char c = sentence.charAt (0 ); System.out.println (c); } }
获取对应的字符数组 toCharArray() 获取对应的字符数组
1 2 3 4 5 6 7 8 9 10 11 12 public class TestString { public static void main (String [] args) String sentence = "盖伦,在进行了连续8次击杀后,获得了超神 的称号" ; char [] cs = sentence.toCharArray (); System.out.println (sentence.length () == cs.length); } }
截取子字符串 subString 截取子字符串
1 2 3 4 5 6 7 8 9 10 11 12 13 14 15 16 17 18 19 20 public class TestString { public static void main (String [] args String sentence = "盖伦,在进行了连续8次击杀后,获得了 超神 的称号" ; String subString1 = sentence.substring (3 ); System .out .println (subString1); String subString2 = sentence.substring (3 ,5 ); System .out .println (subString2); } }
分隔 split 根据分隔符进行分隔
1 2 3 4 5 6 7 8 9 10 11 12 13 14 public class TestString { public static void main(String[] args) { String sentence = "盖伦,在进行了连续8次击杀后,获得了 超神 的称号" ; // 根据,进行分割,得到3 个子字符串 String subSentences[] = sentence.split ("," ); for (String sub : subSentences ) System.out.println(sub ) } } }
去掉首尾空格 trim 去掉首尾空格
1 2 3 4 5 6 7 8 9 10 11 public class TestString { public static void main (String [] args String sentence = " 盖伦,在进行了连续8次击杀后,获得了 超神 的称号 " ; System .out .println (sentence); System .out .println (sentence.trim ()); } }
大小写 toLowerCase 全部变成小写 toUpperCase 全部变成大写
1 2 3 4 5 6 7 8 9 10 11 12 13 public class TestString { public static void main (String [] args String sentence = "Garen" ; System .out .println (sentence.toLowerCase ()); System .out .println (sentence.toUpperCase ()); } }
定位 indexOf 判断字符或者子字符串出现的位置 contains 是否包含子字符串
1 2 3 4 5 6 7 8 9 10 11 12 13 14 15 16 17 18 public class TestString { public static void main (String[] args ) String sentence = "盖伦,在进行了连续8次击杀后,获得了超神 的称号" ; System.out .println(sentence.indexOf('8' )); System.out .println(sentence.indexOf("超神" )); System.out .println(sentence.lastIndexOf("了" )); System.out .println(sentence.indexOf(',' ,5 )); System.out .println(sentence.contains("击杀" )); } }
替换 replaceAll 替换所有的 replaceFirst 只替换第一个
1 2 3 4 5 6 7 8 9 10 11 12 13 14 15 16 17 18 public class TestString { public static void main(String[] args) { String sentence = "盖伦,在进行了连续8次击杀后,获得了超神 的称号"; String temp = sentence.replaceAll("击杀", "被击杀"); //替换所有的 temp = temp .replaceAll("超神", "超鬼"); System .out .println(temp ); temp = sentence.replaceFirst(",","");//只替换第一个 System .out .println(temp ); } }
比较字符串 是否是同一个对象 str1和str2的内容一定是一样的! 但是,并不是同一个字符串对象
1 2 3 4 5 6 7 8 9 10 11 12 13 14 public class TestString { public static void main (String [] args String str1 = "the light" ; String str2 = new String (str1); System .out .println ( str1 == str2); } }
是否是同一个对象-特例 字符串常量池的存在
一般说来,编译器每碰到一个字符串的字面值,就会创建一个新的对象 所以在第6行会创建了一个新的字符串”the light” 但是在第7行,编译器发现已经存在现成的”the light”,那么就直接拿来使用,而没有进行重复创建
1 2 3 4 5 6 7 8 9 public class TestString { public static void main (String [] args String str1 = "the light" ; String str3 = "the light" ; System .out .println ( str1 == str3); } }
内容是否相同 使用equals进行字符串内容的比较,必须大小写一致 equalsIgnoreCase,忽略大小写判断内容是否一致
1 2 3 4 5 6 7 8 9 10 11 12 13 14 15 16 17 18 19 20 21 public class TestString { public static void main (String [] args ) { String str1 = "the light" ; String str2 = new String (str1 ); String str3 = str1 .toUpperCase (); System .out .println ( str1 == str2 ); System .out .println (str1 .equals (str2 )); System .out .println (str1 .equals (str3 )); System .out .println (str1 .equalsIgnoreCase (str3 )); } }
是否以子字符串开始或者结束 1 2 3 4 5 6 7 8 9 10 11 12 13 14 public class TestString { public static void main (String [] args) String str1 = "the light" ; String start = "the" ; String end = "Ight" ; System.out.println (str1.startsWith (start)); System.out.println (str1.endsWith (end)); } }
StringBuffer StringBuffer是可变长的字符串
追加 删除 插入 反转 append追加 delete 删除 insert 插入 reverse 反转
1 2 3 4 5 6 7 8 9 10 11 12 13 14 15 16 17 18 19 20 21 22 23 24 25 public class TestString { public static void main(String[] args) { String str1 = "let there " ; StringBuffer sb = new StringBuffer(str1); sb.append ("be light" ); System.out.println (sb); sb.delete (4 , 10 ); System.out.println (sb); sb.insert(4 , "there " ); System.out.println (sb); sb.reverse (); System.out.println (sb); } }
长度 容量 为什么StringBuffer可以变长? 和String内部是一个字符数组 一样,StringBuffer也维护了一个字符数组。 但是,这个字符数组,留有冗余长度 比如说new StringBuffer(“the”),其内部的字符数组的长度,是19,而不是3,这样调用插入和追加,在现成的数组的基础上就可以完成了。 如果追加的长度超过了19,就会分配一个新的数组,长度比原来多一些,把原来的数据复制到新的数组中,看上去 数组长度就变长了 参考MyStringBuffer length: “the”的长度 3 capacity: 分配的总空间 19
注: 19这个数量,不同的JDK数量是不一样的
1 2 3 4 5 6 7 8 9 10 11 12 13 14 public class TestString { public static void main (String [] args String str1 = "the" ; StringBuffer sb = new StringBuffer (str1); System .out .println (sb.length ()); System .out .println (sb.capacity ()); } }
MyStringBuffer IStringBuffer接口 1 2 3 4 5 6 7 8 9 10 public interface IStringBuffer { public void append (String str) public void append (char c) public void insert (int pos,char b) public void insert (int pos,String b) public void delete (int start) public void delete (int start,int end) public void reverse () public int length () }
value和capacity value:用于存放字符数组 capacity: 容量 无参构造方法: 根据容量初始化value
1 2 3 4 5 6 7 8 9 10 11 12 13 14 15 16 17 18 19 20 21 22 23 24 25 26 27 28 29 30 31 32 33 34 35 36 37 38 39 40 41 42 43 44 45 46 47 48 49 50 51 52 public class MyStringBuffer implements IStringBuffer int capacity = 16 ; int length = 0 ; char [] value; public MyStringBuffer () value = new char [capacity]; } @Override public void append (String str) } @Override public void append (char c) } @Override public void insert (int pos, char b) } @Override public void delete (int start) } @Override public void delete (int start, int end) } @Override public void reverse () } @Override public int length () return 0 ; } }
带参构造方法 1 2 3 4 5 6 7 8 9 10 11 12 13 14 15 16 17 18 19 20 21 22 23 24 25 26 27 28 29 30 31 32 33 34 35 36 37 38 39 40 41 42 43 44 45 46 47 48 49 50 51 52 53 54 55 56 57 58 59 public class MyStringBuffer implements IStringBuffer int capacity = 16 ; int length = 0 ; char [] value; public MyStringBuffer () value = new char [capacity]; } public MyStringBuffer (String str) if (null != str) { value = str.toCharArray(); } length = value.length; if (capacity < value.length) { capacity = value.length * 2 ; } } @Override public void append (String str) } @Override public void append (char c) } @Override public void insert (int pos, char c) } @Override public void insert (int pos, String b) } @Override public void delete (int start) } @Override public void delete (int start, int end) } @Override public void reverse () } @Override public int length () return length; } }
反转 reverse 1 2 3 4 5 6 7 8 9 10 11 12 13 14 15 16 17 18 19 20 21 22 23 24 25 26 27 28 29 30 31 32 33 34 35 36 37 38 39 40 41 42 43 44 45 46 47 48 49 50 51 52 53 54 55 56 57 58 59 60 61 62 63 64 65 66 67 68 69 70 71 72 73 74 75 76 public class MyStringBuffer implements IStringBuffer { int capacity = 16 ; int length = 0 ; char [] value; public MyStringBuffer () { value = new char [capacity]; } public MyStringBuffer (String str) { this (); if (null != str) { value = str.toCharArray(); } length = value.length; if (capacity < value.length) { capacity = value.length * 2 ; } } @Override public void append (String str) { } @Override public void append (char c) { } @Override public void insert (int pos, char c) { } @Override public void insert (int pos, String b) { } @Override public void delete (int start) { } @Override public void delete (int start, int end) { } @Override public void reverse () { for (int i = 0 ; i < length / 2 ; i++) { char temp = value[i]; value[i] = value[length - i - 1 ]; value[length - i - 1 ] = temp; } } @Override public int length () { return length; } public String toString () { char [] realValue = new char [length]; System.arraycopy(value, 0 , realValue, 0 , length); return new String (realValue); } public static void main (String[] args) { MyStringBuffer sb = new MyStringBuffer ("the light" ); sb.reverse(); System.out.println(sb); } }
插入insert 和 append 边界条件判断 插入之前,首先要判断的是一些边界条件。 比如插入位置是否合法,插入的字符串是否为空
扩容 \1. 要判断是否需要扩容 。 如果插入的字符串加上已经存在的内容的总长度超过了容量,那么就需要扩容。 \2. 数组的长度是固定的,不能改变的,数组本身不支持扩容 。 我们使用变通的方式来解决这个问题。 \3. 根据需要插入的字符串的长度和已经存在的内容的长度,计算出一个新的容量。 然后根据这个容量,创建一个新的数组,接着把原来的数组的内容,复制到这个新的数组中来。并且让value这个引用,指向新的数组,从而达到扩容 的效果。
插入字符串 \1. 找到要插入字符串的位置,从这个位置开始,把原数据看成两段 ,把后半段向后挪动一个距离,这个距离刚好是插入字符串的长度 \2. 然后把要插入的数据,插入这个挪出来的,刚刚好的位置里。
修改length的值 最后修改length的值,是原来的值加上插入字符串的长度
insert(int, char) 参数是字符的insert方法,通过调用insert(int, String) 也就实现了。
append 追加,就是在最后位置插入。 所以不需要单独开发方法,直接调用insert方法,就能达到最后位置插入的效果
1 2 3 4 5 6 7 8 9 10 11 12 13 14 15 16 17 18 19 20 21 22 23 24 25 26 27 28 29 30 31 32 33 34 35 36 37 38 39 40 41 42 43 44 45 46 47 48 49 50 51 52 53 54 55 56 57 58 59 60 61 62 63 64 65 66 67 68 69 70 71 72 73 74 75 76 77 78 79 80 81 82 83 84 85 86 87 88 89 90 91 92 93 94 95 96 97 98 99 100 101 102 103 104 105 106 107 108 109 110 111 112 113 114 115 116 117 118 119 120 public class MyStringBuffer implements IStringBuffer { int capacity = 16 ; int length = 0 ; char [] value ; public MyStringBuffer() { value = new char [capacity]; } public MyStringBuffer(String str) { this(); if (null == str) return ; while (capacity < str.length()) { capacity = value .length * 2 ; value = new char [capacity]; } if (capacity >= str.length()) { System .arraycopy(str.toCharArray(), 0 , value , 0 , str.length()); } length = str.length(); } @Override public void append(String str) { insert (length, str); } @Override public void append(char c) { append(String.valueOf(c)); } @Override public void insert (int pos, char c) { //String.valueOf(c)将c转换为字符串 insert (pos, String.valueOf(c)); } @Override public void insert (int pos, String b) { //边界条件判断 if (pos < 0 ) { return ; } if (pos > length) { return ; } if (null == b) { return ; } //扩容 while (length + b.length() > capacity) { capacity = (int )((length + b.length()) * 1.5 f); char [] newValue = new char [capacity]; System .arraycopy(value , 0 , newValue, 0 , length); value = newValue; } char [] cs = b.toCharArray(); //先把已经存在的数据往后移 System .arraycopy(value , pos, value , pos + cs.length, length - pos); //把要插入的数据插入到指定位置 System .arraycopy(cs, 0 , value , pos, cs.length); length = length + cs.length; } @Override public void delete (int start ) { } @Override public void delete (int start , int end ) { } @Override public void reverse() { for (int i = 0 ; i < length / 2 ; i++) { char temp = value [i]; value [i] = value [length - i - 1 ]; value [length - i - 1 ] = temp ; } } @Override public int length() { return length; } public String toString() { char [] realValue = new char [length]; System .arraycopy(value , 0 , realValue, 0 , length); return new String(realValue); } public static void main(String[] args) { MyStringBuffer sb = new MyStringBuffer("there light"); System .out .println(sb); sb.insert (0 , "let "); System .out .println(sb); sb.insert (10 , "be "); System .out .println(sb); sb.insert (0 , "God Say:"); System .out .println(sb); sb.append("!"); System .out .println(sb); sb.append('?' ); System .out .println(sb); sb.reverse(); System .out .println(sb); } }
删除 delete
1 2 3 4 5 6 7 8 9 10 11 12 13 14 15 16 17 18 19 20 21 22 23 24 25 26 27 28 29 30 31 32 33 34 35 36 37 38 39 40 41 42 43 44 45 46 47 48 49 50 51 52 53 54 55 56 57 58 59 60 61 62 63 64 65 66 67 68 69 70 71 72 73 74 75 76 77 78 79 80 81 82 83 84 85 86 87 88 89 90 91 92 93 94 95 96 97 98 99 100 101 102 103 104 105 106 107 108 109 110 111 112 113 114 115 116 117 118 119 120 121 122 123 124 125 126 127 128 129 130 131 132 133 134 135 136 137 138 139 140 public class MyStringBuffer implements IStringBuffer { int capacity = 16 ; int length = 0 ; char [] value ; public MyStringBuffer() { value = new char [capacity]; } public MyStringBuffer(String str) { this(); if (null == str) return ; while (capacity < str.length()) { capacity = value .length * 2 ; value = new char [capacity]; } if (capacity >= str.length()) { System .arraycopy(str.toCharArray(), 0 , value , 0 , str.length()); } length = str.length(); } @Override public void append(String str) { insert (length, str); } @Override public void append(char c) { append(String.valueOf(c)); } @Override public void insert (int pos, char c) { //String.valueOf(c)将c转换为字符串 insert (pos, String.valueOf(c)); } @Override public void insert (int pos, String b) { //边界条件判断 if (pos < 0 ) { return ; } if (pos > length) { return ; } if (null == b) { return ; } //扩容 while (length + b.length() > capacity) { capacity = (int )((length + b.length()) * 1.5 f); char [] newValue = new char [capacity]; System .arraycopy(value , 0 , newValue, 0 , length); value = newValue; } char [] cs = b.toCharArray(); //先把已经存在的数据往后移 System .arraycopy(value , pos, value , pos + cs.length, length - pos); //把要插入的数据插入到指定位置 System .arraycopy(cs, 0 , value , pos, cs.length); length = length + cs.length; } @Override public void delete (int start ) { delete (start , length); } @Override public void delete (int start , int end ) { //边界条件判断 if (start < 0 ) return ; if (start > length) return ; if (end < 0 ) return ; if (end > length) return ; if (start >= end ) return ; System .arraycopy(value , end , value , start , length - end ); length -= end - start ; } @Override public void reverse() { for (int i = 0 ; i < length / 2 ; i++) { char temp = value [i]; value [i] = value [length - i - 1 ]; value [length - i - 1 ] = temp ; } } @Override public int length() { return length; } public String toString() { char [] realValue = new char [length]; System .arraycopy(value , 0 , realValue, 0 , length); return new String(realValue); } public static void main(String[] args) { MyStringBuffer sb = new MyStringBuffer("there light"); System .out .println(sb); sb.insert (0 , "let "); System .out .println(sb); sb.insert (10 , "be "); System .out .println(sb); sb.insert (0 , "God Say:"); System .out .println(sb); sb.append("!"); System .out .println(sb); sb.append('?' ); System .out .println(sb); sb.reverse(); System .out .println(sb); sb.reverse(); System .out .println(sb); sb.delete (0 ,4 ); System .out .println(sb); sb.delete (4 ); System .out .println(sb); } }
日期 Date Date类 注意:是java.util.Date; 而非 java.sql.Date,此类是给数据库访问的时候使用的
时间原点概念 所有的数据类型,无论是整数,布尔,浮点数还是字符串,最后都需要以数字的形式表现出来。
日期类型也不例外,换句话说,一个日期,比如2020年10月1日,在计算机里,会用一个数字来代替。
那么最特殊的一个数字,就是零. 零这个数字,就代表Java中的时间原点,其对应的日期是1970年1月1日 8点0分0秒 。 (为什么是8点,因为中国的太平洋时区是UTC-8,刚好和格林威治时间差8个小时)
为什么对应1970年呢? 因为1969年发布了第一个 UNIX 版本:AT&T,综合考虑,当时就把1970年当做了时间原点。
所有的日期,都是以为这个0点为基准,每过一毫秒,就+1。
创建日期对象 1 2 3 4 5 6 7 8 9 10 11 12 13 14 15 16 17 18 package date ; import java.util.Date;public class TestDate { public static void main(String[] args) { // 当前时间 Date d1 = new Date (); System .out .println("当前时间:"); System .out .println(d1); System .out .println(); // 从1970 年1 月1 日 早上8 点0 分0 秒 开始经历的毫秒数 Date d2 = new Date (5000 ); System .out .println("从1970年1月1日 早上8点0分0秒 开始经历了5秒的时间"); System .out .println(d2); } }
getTime getTime() 得到一个long型的整数 这个整数代表 从1970.1.1 08:00:00:000 开始 每经历一毫秒,增加1 直接打印对象,会看到 “Tue Jan 05 09:51:48 CST 2016” 这样的格式,可读性比较差,为了获得“2016/1/5 09:51:48”这样的格式 请参考日期格式化
1 2 3 4 5 6 7 8 9 10 11 12 13 14 15 16 17 package date ; import java.util.Date;public class TestDate { public static void main(String[] args) { Date now= new Date (); //打印当前时间 System .out .println("当前时间:"+now.toString()); //getTime() 得到一个long型的整数 //这个整数代表 1970.1 .1 08 :00 :00 :000 ,每经历一毫秒,增加1 System .out .println("当前时间getTime()返回的值是:"+now.getTime()); Date zero = new Date (0 ); System .out .println("用0作为构造方法,得到的日期是:"+zero); } }
System.currentTimeMillis() 当前日期的毫秒数 new Date().getTime() 和 System.currentTimeMillis() 是一样的 不过由于机器性能的原因,可能会相差几十毫秒,毕竟每执行一行代码,都是需要时间的
1 2 3 4 5 6 7 8 9 10 11 12 13 package date ; import java.util.Date;public class TestDate { public static void main(String[] args) { Date now= new Date (); //当前日期的毫秒数 System .out .println("Date.getTime() \t\t\t返回值: "+now.getTime()); //通过System .currentTimeMillis()获取当前日期的毫秒数 System .out .println("System.currentTimeMillis() \t返回值: "+System .currentTimeMillis()); } }
日期格式化 SimpleDateFormat 日期格式化类
日期转字符串 1 2 3 4 5 6 7 8 9 10 11 12 13 14 15 16 17 18 19 20 21 22 23 24 25 package date;import java.text.SimpleDateFormat;import java.util.Date;public class TestDate { public static void main (String[] args) { SimpleDateFormat sdf = new SimpleDateFormat ("yyyy-MM-dd HH:mm:ss SSS" ); Date d = new Date (); String str = sdf.format(d); System.out.println("当前时间通过 yyyy-MM-dd HH:mm:ss SSS 格式化后的输出: " +str); SimpleDateFormat sdf1 = new SimpleDateFormat ("yyyy-MM-dd" ); Date d1= new Date (1 ); String str1 = sdf1.format(d1); System.out.println("当前时间通过 yyyy-MM-dd 格式化后的输出: " +str1); } }
模式(yyyy/MM/dd HH:mm:ss)需要和字符串格式保持一致,如果不一样就会抛出解析异常ParseException
关于异常的详细讲解在Java 异常 Exception 章节展开
1 2 3 4 5 6 7 8 9 10 11 12 13 14 15 16 17 18 package date;import java.text.ParseException;import java.text.SimpleDateFormat;import java.util.Date;public class TestDate { public static void main (String[] args) { SimpleDateFormat sdf = new SimpleDateFormat ("yyyy/MM/dd HH:mm:ss" ); String str = "2016/1/5 12:12:12" ; try { Date d = sdf.parse(str); System.out.printf("字符串 %s 通过格式 yyyy/MM/dd HH:mm:ss %n转换为日期对象: %s" ,str,d.toString()); } catch (ParseException e) { e.printStackTrace(); } } }
Calendar Calendar类即日历类,常用于进行“翻日历”,比如下个月的今天是多久
Calendar与Date进行转换 采用单例模式 获取日历对象Calendar.getInstance();
1 2 3 4 5 6 7 8 9 10 11 12 13 14 15 package date;import java.util.Calendar;import java.util.Date;public class TestDate { public static void main (String[] args) { Calendar c = Calendar.getInstance(); Date d = c.getTime(); Date d2 = new Date (0 ); c.setTime(d2); } }
翻日历 add方法,在原日期上增加年/月/日 set方法,直接设置年/月/日
1 2 3 4 5 6 7 8 9 10 11 12 13 14 15 16 17 18 19 20 21 22 23 24 25 26 27 28 29 30 31 32 33 34 35 36 37 package date ; import java.text.SimpleDateFormat;import java.util.Calendar;import java.util.Date;public class TestDate { private static SimpleDateFormat sdf = new SimpleDateFormat("yyyy-MM-dd HH:mm:ss"); public static void main(String[] args) { //采用单例模式获取日历对象Calendar.getInstance(); Calendar c = Calendar.getInstance(); //通过日历对象得到日期对象 Date now = c.getTime(); // 当前日期 System .out .println("当前日期:\t" + format(c.getTime())); // 下个月的今天 c.setTime(now); c.add (Calendar.MONTH, 1 ); System .out .println("下个月的今天:\t" +format(c.getTime())); // 去年的今天 c.setTime(now); c.add (Calendar.YEAR, -1 ); System .out .println("去年的今天:\t" +format(c.getTime())); // 上个月的第三天 c.setTime(now); c.add (Calendar.MONTH, -1 ); c.set (Calendar.DATE, 3 ); System .out .println("上个月的第三天:\t" +format(c.getTime())); } private static String format(Date time ) { return sdf.format(time ); } }
异常处理 什么是异常 异常定义: 导致程序的正常流程被中断的事件,叫做异常
文件不存在异常 比如要打开d盘的LOL.exe文件,这个文件是有可能不存在的 Java中通过 new FileInputStream(f) 试图打开某文件,就有可能抛出文件不存在异常FileNotFoundException 如果不处理该异常,就会有编译错误 处理办法参见 异常处理
1 2 3 4 5 6 7 8 9 10 11 12 package exception;import java.io.File;import java.io.FileInputStream;public class TestException { public static void main (String[] args) { File f = new File ("d:/LOL.exe" ); new FileInputStream (f); } }
处理 异常处理常见手段: try catch finally throws
try catch 3.如果文件不存在,try 里的代码会立即终止,程序流程会运行到对应的catch块中
4.e.printStackTrace(); 会打印出方法的调用痕迹,如此例,会打印出异常开始于TestException的第16行,这样就便于定位和分析到底哪里出了异常
1 2 3 4 5 6 7 8 9 10 11 12 13 14 15 16 17 18 19 package exception;import java.io.File;import java.io.FileInputStream;import java.io.FileNotFoundException;public class TestException { public static void main (String[] args) { File f = new File ("d:/LOL.exe" ); try { System.out.println("试图打开 d:/LOL.exe" ); new FileInputStream (f); System.out.println("成功打开" ); } catch (FileNotFoundException e) { System.out.println("d:/LOL.exe不存在" ); e.printStackTrace(); } } }
使用异常的父类进行catch FileNotFoundException是Exception的子类,使用Exception也可以catch住FileNotFoundException
1 2 3 4 5 6 7 8 9 10 11 12 13 14 15 16 17 18 19 package exception;import java.io.File;import java.io.FileInputStream;import java.io.FileNotFoundException;public class TestException { public static void main (String[] args) { File f = new File ("d:/LOL.exe" ); try { System.out.println("试图打开 d:/LOL.exe" ); new FileInputStream (f); System.out.println("成功打开" ); } catch (Exception e) { System.out.println("d:/LOL.exe不存在" ); e.printStackTrace(); } } }
多异常捕捉办法1 1 2 new FileInputStream(f) Date d = sdf.parse("2016-06-03" )
这段代码,会抛出 文件不存在异常 FileNotFoundException 和 解析异常ParseException 解决办法之一是分别进行catch
1 2 3 4 5 6 7 8 9 10 11 12 13 14 15 16 17 18 19 20 21 22 23 24 25 26 27 28 29 30 31 32 33 34 catch (FileNotFoundException e) { System.out.println("d:/LOL.exe不存在" ); e.printStackTrace(); } catch (ParseException e) { System.out.println("日期格式解析错误" ); e.printStackTrace(); } package exception;import java.io.File;import java.io.FileInputStream;import java.io.FileNotFoundException;import java.text.ParseException;import java.text.SimpleDateFormat;import java.util.Date;public class TestException { public static void main (String[] args) { File f = new File ("d:/LOL.exe" ); try { System.out.println("试图打开 d:/LOL.exe" ); new FileInputStream (f); System.out.println("成功打开" ); SimpleDateFormat sdf = new SimpleDateFormat ("yyyy-MM-dd" ); Date d = sdf.parse("2016-06-03" ); } catch (FileNotFoundException e) { System.out.println("d:/LOL.exe不存在" ); e.printStackTrace(); } catch (ParseException e) { System.out.println("日期格式解析错误" ); e.printStackTrace(); } } }
多异常捕捉办法2 另一个种办法是把多个异常,放在一个catch里统一捕捉
1 2 3 4 5 6 7 8 9 10 11 12 13 14 15 16 17 18 19 20 21 22 23 24 25 26 27 28 29 package exception;import java.io.File;import java.io.FileInputStream;import java.io.FileNotFoundException;import java.text.ParseException;import java.text.SimpleDateFormat;import java.util.Date;public class TestException { public static void main (String[] args) { File f = new File ("d:/LOL.exe" ); try { System.out.println("试图打开 d:/LOL.exe" ); new FileInputStream (f); System.out.println("成功打开" ); SimpleDateFormat sdf = new SimpleDateFormat ("yyyy-MM-dd" ); Date d = sdf.parse("2016-06-03" ); } catch (FileNotFoundException | ParseException e) { if (e instanceof FileNotFoundException) { System.out.println("d:/LOL.exe不存在" ); } if (e instanceof ParseException) { System.out.println("日期格式解析错误" ); } e.printStackTrace(); } } }
finally 无论是否出现异常,finally中的代码都会被执行
1 2 3 4 5 6 7 8 9 10 11 12 13 14 15 16 17 18 19 20 21 package exception;import java.io.File;import java.io.FileInputStream;import java.io.FileNotFoundException;public class TestException { public static void main (String[] args) { File f = new File ("d:/LOL.exe" ); try { System.out.println("试图打开 d:/LOL.exe" ); new FileInputStream (f); System.out.println("成功打开" ); } catch (FileNotFoundException e) { System.out.println("d:/LOL.exe不存在" ); e.printStackTrace(); } finally { System.out.println("无论文件是否存在, 都会执行的代码" ); } } }
throws 考虑如下情况: 主方法调用method1 method1调用method2 method2中打开文件
method2中需要进行异常处理 但是method2不打算处理 ,而是把这个异常通过*throws*抛出去 那么method1就会 *。 处理办法也是两种,要么是try catch处理掉,要么也是抛出去 。 method1选择本地try catch住 一旦try catch住了,就相当于把这个异常消化掉了,主方法在调用method1的时候,就不需要进行异常处理了
1 2 3 4 5 6 7 8 9 10 11 12 13 14 15 16 17 18 19 20 21 22 23 24 25 26 27 package exception;import java.io.File;import java.io.FileInputStream;import java.io.FileNotFoundException;public class TestException { public static void main (String[] args) { method1(); } private static void method1 () { try { method2(); } catch (FileNotFoundException e) { e.printStackTrace(); } } private static void method2 () throws FileNotFoundException { File f = new File ("d:/LOL.exe" ); System.out.println("试图打开 d:/LOL.exe" ); new FileInputStream (f); System.out.println("成功打开" ); } }
throw和throws的区别 throws与throw这两个关键字接近,不过意义不一样,有如下区别: \1. throws 出现在方法声明上,而throw通常都出现在方法体内。 \2. throws 表示出现异常的一种可能性,并不一定会发生这些异常;throw则是抛出了异常,执行throw则一定抛出了某个异常对象。
异常分类 异常分类: 可查异常,运行时异常和错误3种 其中,运行时异常和错误又叫非可查异常
可查异常 可查异常: CheckedException 可查异常即必须进行处理的异常 ,要么try catch住,要么往外抛,谁调用,谁处理,比如 FileNotFoundException 如果不处理,编译器,就不让你通过
1 2 3 4 5 6 7 8 9 10 11 12 13 14 15 16 17 18 19 20 21 22 23 24 package exception; import java.io.File;import java.io.FileInputStream;import java.io.FileNotFoundException; public class TestException { public static void main (String[] args) { File f= new File ("d:/LOL.exe" ); try { System.out.println("试图打开 d:/LOL.exe" ); new FileInputStream (f); System.out.println("成功打开" ); } catch (FileNotFoundException e){ System.out.println("d:/LOL.exe不存在" ); e.printStackTrace(); } } }
运行时异常 运行时异常RuntimeException指: 不是必须进行try catch的异常 常见运行时异常: 除数不能为0异常:ArithmeticException 下标越界异常:ArrayIndexOutOfBoundsException 空指针异常:NullPointerException 在编写代码的时候,依然可以使用try catch throws进行处理,与可查异常不同之处在于,即便不进行try catch,也不会有编译错误 Java之所以会设计运行时异常的原因之一,是因为下标越界,空指针这些运行时异常太过于普遍 ,如果都需要进行捕捉,代码的可读性就会变得很糟糕。
1 2 3 4 5 6 7 8 9 10 11 12 13 14 15 16 17 18 package exception; public class TestException { public static void main (String [] args) { int k = 5 /0 ; int j[] = new int [5 ]; j[10 ] = 10 ; String str = null ; str .length (); } }
错误 错误Error,指的是系统级别的异常 ,通常是内存用光了 在默认设置下 ,一般java程序启动的时候,最大可以使用16m的内存 如例不停的给StringBuffer追加字符,很快就把内存使用光了。抛出OutOfMemoryError 与运行时异常一样,错误也是不要求强制捕捉的
1 2 3 4 5 6 7 8 9 10 11 12 13 14 15 package exception; public class TestException { public static void main (String[] args) { StringBuffer sb = new StringBuffer (); for (int i = 0 ; i < Integer.MAX_VALUE; i++) { sb.append('a' ); } } }
三种分类 总体上异常分三类: \1. 错误 \2. 运行时异常 \3. 可查异常
1.CheckedException:FileNotFoundException ……,必须 throw 或者利用 try …… catch 进行捕获
2.UnCheckedException(RuntimeException):NullPointerException ……
3.Error
1 2 3 4 5 6 7 8 9 10 11 12 13 14 15 16 17 18 19 20 21 ArithmeticException——由于除数为0 引起的异常; ArrayStoreException——由于数组存储空间不够引起的异常; ClassCastException—一当把一个对象归为某个类,但实际上此对象并不是由这个类 创建的,也不是其子类创建的,则会引起异常; IllegalMonitorStateException——监控器状态出错引起的异常; NegativeArraySizeException—一数组长度是负数,则产生异常; NullPointerException—一程序试图访问一个空的数组中的元素或访问空的对象中的 方法或变量时产生异常; OutofMemoryException——用new SecurityException——由于访问了不应访问的指针,使安全性出问题而引起异常; IndexOutOfBoundsExcention——由于数组下标越界或字符串访问越界引起异常; IOException——由于文件未找到、未打开或者I/O操作不能进行而引起异常; ClassNotFoundException——未找到指定名字的类或接口引起异常; CloneNotSupportedException——一程序中的一个对象引用Object类的clone方法,但 此对象并没有连接Cloneable接口,从而引起异常; InterruptedException—一当一个线程处于等待状态时,另一个线程中断此线程,从 而引起异常,有关线程的内容,将在下一章讲述; NoSuchMethodException一所调用的方法未找到,引起异常; Illega1AccessExcePtion—一试图访问一个非public 方法; StringIndexOutOfBoundsException——访问字符串序号越界,引起异常; ArrayIdexOutOfBoundsException—一访问数组元素下标越界,引起异常; NumberFormatException——字符的UTF代码数据格式有错引起异常; IllegalThreadException—一线程调用某个方法而所处状态不适当,引起异常; FileNotFoundException——未找到指定文件引起异常; EOFException——未完成输入操作即遇文件结束引起异常。
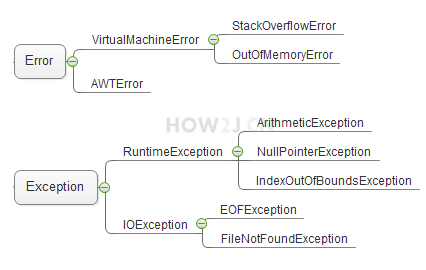
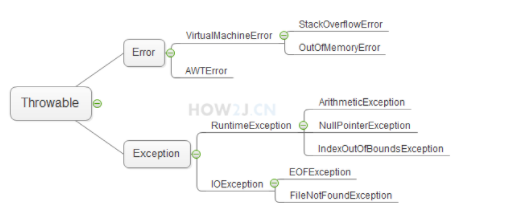
Throwable Throwable是类,Exception和Error都继承了该类 所以在捕捉的时候,也可以使用Throwable进行捕捉 如图: 异常分Error 和Exception Exception里又分运行时异常 和可查异常 。
1 2 3 4 5 6 7 8 9 10 11 12 13 14 15 16 package exception;import java.io.File;import java.io.FileInputStream;import java.io.FileNotFoundException;public class TestException { public static void main (String[] args) { File f = new File ("d:/LOL.exe" ); try { new FileInputStream (f); } catch (Throwable e) { e.printStackTrace(); } } }
自定义异常 创建自定义异常 一个英雄攻击另一个英雄的时候,如果发现另一个英雄已经挂了,就会抛出EnemyHeroIsDeadException 创建一个类EnemyHeroIsDeadException,并继承Exception 提供两个构造方法 \1. 无参的构造方法 \2. 带参的构造方法,并调用父类的对应的构造方法
1 2 3 4 5 6 7 8 9 10 package exception;public class EnemyHeroIsDeadException extends Exception public EnemyHeroIsDeadException () { } public EnemyHeroIsDeadException (String msg) { super (msg); } }
抛出自定义异常 在Hero的attack方法中,当发现敌方英雄的血量为0的时候,抛出该异常 \1. 创建一个EnemyHeroIsDeadException实例 \2. 通过throw 抛出该异常 \3. 当前方法通过 throws 抛出该异常
在外部调用attack方法的时候,就需要进行捕捉,并且捕捉的时候,可以通过e.getMessage() 获取当时出错的具体原因
1 2 3 4 5 6 7 8 9 10 11 12 13 14 15 16 17 18 19 20 21 22 23 24 25 26 27 28 29 30 31 32 33 34 35 36 37 38 39 40 public class Hero { public String name; protected float hp; public void attackHero (Hero h) throws EnemyHeroIsDeadException { if (h.hp == 0 ) { throw new EnemyHeroIsDeadException (h.name + " 已经挂了,不需要施放技能" ); } } public String toString () { return name; } class EnemyHeroIsDeadException extends Exception { public EnemyHeroIsDeadException () { } public EnemyHeroIsDeadException (String msg) { super (msg); } } public static void main (String[] args) { Hero garen = new Hero (); garen.name = "盖伦" ; garen.hp = 616 ; Hero teemo = new Hero (); teemo.name = "提莫" ; teemo.hp = 0 ; try { garen.attackHero(teemo); } catch (EnemyHeroIsDeadException e) { System.out.println("异常的具体原因:" +e.getMessage()); e.printStackTrace(); } } }
I/O 文件对象 创建一个文件对象 使用绝对路径或者相对路径创建File对象
1 2 3 4 5 6 7 8 9 10 11 12 13 14 15 16 17 18 19 20 21 22 23 package file ;import java.io.File ;public class TestFile { public static void main(String[] args) { File f1 = new File ("f:/LOLFolder" ); System.out.println ("f1的绝对路径:" + f1.getAbsolutePath()); File f2 = new File ("LOL.exe" ); System.out.println ("f2的绝对路径:" + f2.getAbsolutePath()); File f3 = new File (f1, "LOL.exe" ); System.out.println ("f3的绝对路径:" + f3.getAbsolutePath()); } } 输出: f1的绝对路径:f:\LOLFolder f2的绝对路径:E:\Javahow2j\LOL.exe f3的绝对路径:f:\LOLFolder\LOL.exe
文件常用方法1 注意1: 需要在D:\LOLFolder确实存在一个LOL.exe,才可以看到对应的文件长度、修改时间等信息
注意2: renameTo方法用于对物理文件名称进行修改,但是并不会修改File对象的name属性。
1 2 3 4 5 6 7 8 9 10 11 12 13 14 15 16 17 18 19 20 21 22 23 24 25 26 27 28 29 30 31 32 33 34 35 36 37 38 39 40 41 42 43 44 45 46 package file; import java.io.File; import java.util.Date; public class TestFile2 { public static void main(String[] args) { File f = new File("f:/LOLFolder/LOL.exe" ) ; System ."当前文件是:" +f); System ."判断是否存在:" +f.exists() ); System ."判断是否是文件夹:" +f.isDirectory() ); System ."判断是否是文件:" +f.isFile() ); System ."获取文件的长度:" +f.length() ); long time = f.lastModified() ; Date d = new Date(time ) ; System ."获取文件的最后修改时间:" +d); f.setLastModified(0) ; File f2 =new File("f:/LOLFolder/DOTA.exe" ) ; f.renameTo(f2 ) ; System ."把LOL.exe改名成了DOTA.exe" ); System ."注意: 需要在D:\\LOLFolder确实存在一个LOL.exe,\r\n才可以看到对应的文件长度、修改时间等信息" ); } } 输出: 当前文件是:f:\LOLFolder\LOL . 判断是否存在:true 判断是否是文件夹:false 判断是否是文件:true 获取文件的长度:0 获取文件的最后修改时间:Mon Jan 10 15 :49 :14 CST 2022 把LOL .DOTA . 注意: 需要在D:\LOLFolder确实存在一个LOL . 才可以看到对应的文件长度、修改时间等信息
文件常用方法2 1 2 3 4 5 6 7 8 9 10 11 12 13 14 15 16 17 18 19 20 21 22 23 24 25 26 27 28 29 30 31 32 33 34 35 36 37 38 39 40 41 42 43 package file ;import java.io.File ;import java.io.IOException;public class TestFile2 { public static void main(String[] args) throws IOException { File f = new File ("f:/LOLFolder/skin/garen.ski" ); f.list(); File []fs= f.listFiles(); f.getParent(); f.getParentFile(); f.mkdir(); f.mkdirs(); f.createNewFile(); f.getParentFile().mkdirs(); f.listRoots(); f.delete (); f.deleteOnExit(); } }
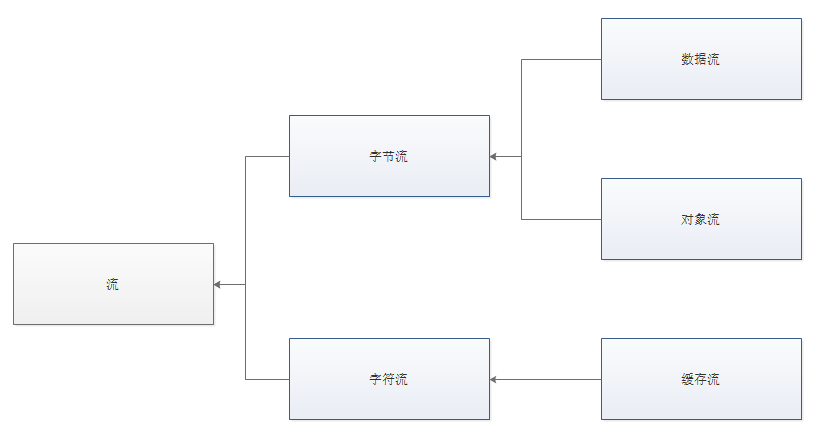
什么是流 什么是流 当不同的介质之间有数据交互的时候,JAVA就使用流来实现。 数据源可以是文件,还可以是数据库,网络甚至是其他的程序
比如读取文件的数据到程序中,站在程序的角度来看,就叫做输入流 输入流: InputStream 输出流:OutputStream
文件输入流 如下代码,就建立了一个文件输入流,这个流可以用来把数据从硬盘的文件,读取到JVM(内存)。
目前代码只是建立了流,还没有开始读取,真正的读取在下个章节讲解。
1 2 3 4 5 6 7 8 9 10 11 12 13 14 15 16 17 18 19 20 package stream;import java.io.File;import java.io.FileInputStream;import java.io.FileNotFoundException;public class TestStream { public static void main (String[] args) { File f = new File ("f/lol.txt" ); try { FileInputStream fis = new FileInputStream (f); } catch (FileNotFoundException e) { e.printStackTrace(); } } }
字节流 InputStream字节输入流 OutputStream字节输出流 用于以字节的形式读取和写入数据
ASCII码 概念 所有的数据存放在计算机中都是以数字的形式存放的。 所以字母就需要转换为数字才能够存放 。 比如A就对应的数字65,a对应的数字97. 不同的字母和符号对应不同的数字,就是一张码表。 ASCII是这样的一种码表。 只包含简单的英文字母 ,符号,数字等等。 不包含中文,德文,俄语等复杂 的。
示例中列出了可见的ASCII码以及对应的十进制和十六进制数字,不可见的暂未列出
以字节流的形式读取文件内容 InputStream是字节输入流,同时也是抽象类,只提供方法声明,不提供方法的具体实现。 FileInputStream 是InputStream子类,以FileInputStream 为例进行文件读取
1 2 3 4 5 6 7 8 9 10 11 12 13 14 15 16 17 18 19 20 21 22 23 24 25 26 27 28 29 30 31 32 33 34 35 36 37 38 package stream;import java.io.File;import java.io.FileInputStream;import java.io.FileNotFoundException;import java.io.IOException;public class TestStream { public static void main (String[] args) { File f = new File ("f:/LOLFolder/lol.txt" ); try { FileInputStream fis = new FileInputStream (f); byte [] all = new byte [(int )f.length()]; fis.read(all); for (byte b : all) { System.out.println(b); } fis.close(); } catch (IOException e) { e.printStackTrace(); } } } 输出: 65 66
以字节流的形式向文件写入数据 OutputStream是字节输出流,同时也是抽象类,只提供方法声明,不提供方法的具体实现。 FileOutputStream 是OutputStream子类,以FileOutputStream 为例向文件写出数据
注: 如果文件d:/lol2.txt不存在,写出操作会自动创建该文件。 但是如果是文件 d:/xyz/lol2.txt,而目录xyz又不存在,会抛出异常
1 2 3 4 5 6 7 8 9 10 11 12 13 14 15 16 17 18 19 20 21 22 23 24 25 26 package stream;import java.io.File;import java.io.FileOutputStream;import java.io.IOException;public class TestStream2 { public static void main (String[] args) { File f = new File ("f:/LOLFolder/lol2.txt" ); byte [] data = {88 , 89 }; try { FileOutputStream fos = new FileOutputStream (f); fos.write(data); fos.close(); } catch (IOException e) { e.printStackTrace(); } } }
关闭流的方式 在try中关闭 在try的作用域里关闭文件输入流,在前面的示例中都是使用这种方式,这样做有一个弊端; 如果文件不存在,或者读取的时候出现问题而抛出异常,那么就不会执行这一行关闭流的代码,存在巨大的资源占用隐患。 不推荐 使用
1 2 3 4 5 6 7 8 9 10 11 12 13 14 15 16 17 18 19 20 21 package stream;import java.io.*;public class TestStream2 { public static void main(String[] args) { File f = new File ("f:/LOLFolder/lol.txt" ); try { FileInputStream fis = new FileInputStream(f); byte [] all = new byte [(int )f.length()]; fis.read (all); for (byte b : all) { System.out.println (b); } fis.close(); } catch (IOException e) { e.printStackTrace(); } } }
在finally中关闭 这是标准的关闭流的方式 \1. 首先把流的引用声明在try的外面,如果声明在try里面,其作用域无法抵达finally. \2. 在finally关闭之前,要先判断该引用是否为空 \3. 关闭的时候,需要再一次进行try catch处理
这是标准的严谨的关闭流的方式,但是看上去很繁琐,所以写不重要的或者测试代码的时候,都会采用上面的有隐患 try的方式,因为不麻烦~
1 2 3 4 5 6 7 8 9 10 11 12 13 14 15 16 17 18 19 20 21 22 23 24 25 26 27 28 29 30 package stream;import java.io.*;public class TestStream2 { public static void main(String[] args) { File f = new File ("f:/LOLFolder/lol.txt" ); FileInputStream fis = null ; try { fis = new FileInputStream(f); byte [] all = new byte [(int )f.length()]; fis.read (all); for (byte b : all) { System.out.println (b); } } catch (IOException e) { e.printStackTrace(); } finally { if (null != fis) { try { fis.close(); } catch (IOException e) { e.printStackTrace(); } } } } }
使用try()的方式 把流定义在try()里,try,catch或者finally结束的时候,会自动关闭 这种编写代码的方式叫做 try-with-resources , 这是从JDK7开始支持的技术
所有的流,都实现了一个接口叫做 AutoCloseable ,任何类实现了这个接口,都可以在try()中进行实例化。 并且在try, catch, finally结束的时候自动关闭,回收相关资源。
1 2 3 4 5 6 7 8 9 10 11 12 13 14 15 16 17 18 19 20 package stream;import java.io.*;public class TestStream2 { public static void main(String[] args) { File f = new File ("f:/LOLFolder/lol.txt" ); try (FileInputStream fis = new FileInputStream(f)) { byte [] all = new byte [(int )f.length()]; fis.read (all); for (byte b : all) { System.out.println (b); } } catch (IOException e) { e.printStackTrace(); } } }
字符流 Reader字符输入流 Writer字符输出流 专门用于字符的形式读取和写入数据
使用字符流读取文件 FileReader 是Reader子类,以FileReader 为例进行文件读取
1 2 3 4 5 6 7 8 9 10 11 12 13 14 15 16 17 18 19 20 21 22 23 24 25 26 package stream;import java.io.File;import java.io.FileReader;public class TestStream3 { public static void main (String[] args) { File f = new File ("f:/LOLFolder/lol.txt" ); try (FileReader fr = new FileReader (f)) { char [] all = new char [(int )f.length()]; fr.read(all); for (char b : all) { System.out.println(b); } } catch (Exception e) { e.printStackTrace(); } } } 输出: A B
使用字符流把字符串写入到文件 FileWriter 是Writer的子类,以FileWriter 为例把字符串写入到文件
1 2 3 4 5 6 7 8 9 10 11 12 13 14 15 16 17 18 19 20 21 22 package stream;import java.io.File;import java.io.FileWriter;import java.io.IOException;public class TestStream3 { public static void main (String[] args) { File f = new File ("f:/LOLFolder/lol2.txt" ); try (FileWriter fr = new FileWriter (f, true )) { String data="abcdefg1234567890" ; char [] cs = data.toCharArray(); fr.write(cs); } catch (IOException e) { e.printStackTrace(); } } }
中文问题 编码概念 计算机存放数据只能存放数字,所有的字符都会被转换为不同的数字。 就像一个棋盘一样,不同的字,处于不同的位置,而不同的位置,有不同的数字编号。 有的棋盘很小,只能放数字和英文 有的大一点,还能放中文 有的“足够”大,能够放下世界人民所使用的所有文字和符号
如图所示,英文字符 A 能够放在所有的棋盘里,而且位置都差不多 中文字符, 中文字符 中 能够放在后两种棋盘里,并且位置不一样,而且在小的那个棋盘里,就放不下中文
常见编码 工作后经常接触的编码方式有如下几种: ISO-8859-1 ASCII 数字和西欧字母 GBK GB2312 BIG5 中文 UNICODE (统一码,万国码)
其中 ISO-8859-1 包含 ASCII GB2312 是简体中文,BIG5是繁体中文,GBK同时包含简体和繁体以及日文。 UNICODE 包括了所有的文字,无论中文,英文,藏文,法文,世界所有的文字都包含其中
UNICODE和UTF 根据前面的学习,我们了解到不同的编码方式对应不同的棋盘 ,而UNICODE因为要存放所有的数据,那么它的棋盘是最大的。 不仅如此,棋盘里每个数字都是很长的(4个字节),因为不仅要表示字母,还要表示汉字等。
如果完全按照UNICODE的方式来存储数据,就会有很大的浪费。 比如在ISO-8859-1中,a 字符对应的数字是0x61 而UNICODE中对应的数字是 0x00000061,倘若一篇文章大部分都是英文字母,那么按照UNICODE的方式进行数据保存就会消耗很多空间
在这种情况下,就出现了UNICODE的各种减肥 子编码, 比如UTF-8对数字和字母就使用一个字节,而对汉字就使用3个字节,从而达到了减肥还能保证健康 的效果
UTF-8,UTF-16和UTF-32 针对不同类型的数据有不同的减肥效果 ,一般说来UTF-8是比较常用的方式
UTF-8,UTF-16和UTF-32 彼此的区别在此不作赘述,有兴趣的可以参考 unicode-百度百科
Java采用的是Unicode 写在.java源代码中的汉字,在执行之后,都会变成JVM中的字符。 而这些中文字符采用的编码方式,都是使用UNICODE. “中”字对应的UNICODE是4E2D ,所以在内存中,实际保存的数据就是十六进制的0x4E2D, 也就是十进制的20013。
1 2 3 4 5 6 7 package stream; public class TestStream { public static void main (String [] args) { String str = "中" ; } }
一个汉字使用不同编码方式的表现 以字符 中 为例,查看其在不同编码方式下的值是多少
也即在不同的棋盘上的位置
1 2 3 4 5 6 7 8 9 10 11 12 13 14 15 16 17 18 19 20 21 22 23 24 25 26 27 28 29 30 31 32 33 34 35 36 37 38 39 40 41 42 43 44 45 46 47 48 49 50 51 package stream;import java.io .UnsupportedEncodingException ;public class TestStream4 { public static void main (String [] args) { String str = "中" ; showCode (str ); } private static void showCode (String str ) { String [] encodes = {"BIG5" , "GBK" , "GB2312" , "UTF-8" , "UTF-16" , "UTF-32" }; for (String encode : encodes) { showCode (str , encode); } } private static void showCode (String str , String encode) { try { System.out .printf ("字符: \"%s\" 的在编码方式%s下的十六进制值是%n" , str , encode); byte [] bs = str .getBytes (encode); for (byte b : bs) { int i = b&0xff ; System.out .print (Integer.toHexString (i) + "\t" ); } System.out .println (); System.out .println (); } catch (UnsupportedEncodingException e) { System.out .printf ("UnsupportedEncodingException: %s编码方式无法解析字符%s\n" , encode, str ); } } } 输出: 字符: "中" 的在编码方式BIG5下的十六进制值是 a4 a4 字符: "中" 的在编码方式GBK下的十六进制值是 d6 d0 字符: "中" 的在编码方式GB2312下的十六进制值是 d6 d0 字符: "中" 的在编码方式UTF-8 下的十六进制值是 e4 b8 ad 字符: "中" 的在编码方式UTF-16 下的十六进制值是 fe ff 4 e 2 d 字符: "中" 的在编码方式UTF-32 下的十六进制值是 0 0 4 e 2 d
文件的编码方式-记事本 接下来讲,字符在文件中的保存 字符保存在文件中肯定也是以数字形式保存的,即对应在不同的棋盘 上的不同的数字 用记事本 打开任意文本文件,并且另存为 ,就能够在编码这里看到一个下拉。 ANSI 这个*不是*ASCII 的意思,而是采用 *的意思。如果你是中文的操作系统,就会使GBK,如果是英文的就会是ISO-8859-1
Unicode UNICODE原生的编码方式 Unicode big endian 另一个 UNICODE编码方式 UTF-8 最常见的UTF-8编码方式,数字和字母用一个字节, 汉字用3个字节。
为了能够正确的读取中文内容 \1. 必须了解文本是以哪种编码方式保存字符的 \2. 使用字节流读取了文本后,再使用对应的编码方式去识别这些数字 ,得到正确的字符 如本例,一个文件中的内容是字符中 ,编码方式是GBK,那么读出来的数据一定是D6D0。 再使用GBK编码方式识别D6D0,就能正确的得到字符中
注: 在GBK的棋盘上找到的中 字后,JVM会自动找到中 在UNICODE这个棋盘上对应的数字,并且以UNICODE上的数字保存在内存中 。
1 2 3 4 5 6 7 8 9 10 11 12 13 14 15 16 17 18 19 20 21 22 23 24 25 26 27 28 29 package stream;import java.io.File;import java.io.FileInputStream;import java.io.IOException;public class TestStream5 { public static void main (String[] args) { File f = new File ("F:\\LOLFolder\\lol.txt" ); try (FileInputStream fis = new FileInputStream (f);) { byte [] all = new byte [(int ) f.length()]; fis.read(all); System.out.println("文件中读出来的数据是:" ); for (byte b : all) { int i = b&0x000000ff ; System.out.println(Integer.toHexString(i)); } System.out.println("把这个数字,放在GBK的棋盘上去:" ); String str = new String (all,"GBK" ); System.out.println(str); } catch (IOException e) { e.printStackTrace(); } } }
用FileReader 字符流正确读取中文 FileReader得到的是字符,所以一定是已经把字节根据某种编码识别成了字符 了 而FileReader使用的编码方式是Charset.defaultCharset()的返回值,如果是中文的操作系统,就是GBK
FileReader是不能手动设置编码方式的,为了使用其他的编码方式,只能使用InputStreamReader来代替,像这样:
1 new InputStreamReader(new FileInputStream(f ) ,Charset .for Name("UTF-8" ) );
在本例中,用记事本另存为UTF-8格式,然后用UTF-8就能识别对应的中文了。
解释: 为什么中字前面有一个? 如果是使用记事本另存为UTF-8的格式,那么在第一个字节有一个标示符 ,叫做BOM用来标志这个文件是用UTF-8来编码的。
1 2 3 4 5 6 7 8 9 10 11 12 13 14 15 16 17 18 19 20 21 22 23 24 25 26 27 28 29 30 31 32 33 34 35 36 37 package stream; import java.io.*; import java.nio.charset.Charset; public class TestStream5 { public static void main(String[] args) { File f = new File("F:\\LOLFolder\\text.txt" ) ; System ."默认编码方式:" + Charset .Charset() ); try (FileReader fr = new FileReader(f ) ) { char [] cs = new char [(int ) f .length ()] ; fr.read(cs); System ."FileReader会使用默认的编码方式%s,识别出来的字符是:%n" ,Charset .Charset() ); System .new String(cs ) ); } catch (IOException e) { e.printStackTrace() ; } try (InputStreamReader isr = new InputStreamReader(new FileInputStream(f ) ,Charset .for Name("UTF-8" ) )) { char [] cs = new char [(int ) f .length ()] ; isr.read(cs); System ."InputStreamReader 指定编码方式UTF-8,识别出来的字符是:%n" ); System .new String(cs ) ); } catch (IOException e) { e.printStackTrace() ; } } } 输出: 默认编码方式:UTF-8 FileReader会使用默认的编码方式UTF-8 ,识别出来的字符是: 中 InputStreamReader 指定编码方式UTF-8 ,识别出来的字符是: 中
缓存流 以介质是硬盘为例,字节流和字符流的弊端 : 在每一次读写的时候,都会访问硬盘。 如果读写的频率比较高的时候,其性能表现不佳。
为了解决以上弊端,采用缓存流。 缓存流在读取的时候,会一次性读较多的数据到缓存中 ,以后每一次的读取,都是在缓存中访问,直到缓存中的数据读取完毕,再到硬盘中读取。
就好比吃饭,不用缓存就是每吃一口都到锅里去铲 。用缓存就是先把饭盛到碗里 ,碗里的吃完了,再到锅里去铲
缓存流在写入数据的时候,会先把数据写入到缓存区,直到缓存区达到一定的量 ,才把这些数据,一起写入到硬盘中去 。按照这种操作模式,就不会像字节流,字符流那样每写一个字节都访问硬盘 ,从而减少了IO操作
使用缓存流读取数据 缓存字符输入流 BufferedReader 可以一次读取一行数据
1 2 3 4 5 6 7 8 9 10 11 12 13 14 15 16 17 18 19 20 21 22 23 24 25 26 27 28 29 30 31 package stream;import java.io.BufferedReader;import java.io.File;import java.io.FileReader;import java.io.IOException;public class TestStream6 { public static void main (String[] args) { File f = new File ("f:/LOLFolder/lol.txt" ); try (FileReader fr = new FileReader (f); BufferedReader br = new BufferedReader (fr);) { while (true ) { String line = br.readLine(); if (null == line) { break ; } System.out.println(line); } } catch (IOException e) { e.printStackTrace(); } } }
使用缓存流写出数据 PrintWriter 缓存字符输出流, 可以一次写出一行数据
1 2 3 4 5 6 7 8 9 10 11 12 13 14 15 16 17 18 19 20 21 22 package stream;import java.io.*;public class TestStream6 { public static void main (String[] args) { File f = new File ("f:/LOLFolder/lol2.txt" ); try ( FileWriter fw = new FileWriter (f, true ); PrintWriter pw = new PrintWriter (fw);) { pw.println("garen kill teemo" ); pw.println("teemo revive after 1 minutes" ); pw.println("teemo try to garen, but killed again" ); } catch (IOException e) { e.printStackTrace(); } } }
flush 有的时候,需要立即把数据写入到硬盘 ,而不是等缓存满了才写出去。 这时候就需要用到flush
1 2 3 4 5 6 7 8 9 10 11 12 13 14 15 16 17 18 19 20 21 22 23 24 25 26 27 28 package stream;import java.io.*;public class TestStream6 { public static void main (String[] args) { File f = new File ("f:/LOLFolder/lol2.txt" ); try ( FileWriter fw = new FileWriter (f, true ); PrintWriter pw = new PrintWriter (fw);) { pw.println("garen kill teemo" ); pw.flush(); pw.println("teemo revive after 1 minutes" ); pw.flush(); pw.println("teemo try to garen, but killed again" ); pw.flush(); } catch (IOException e) { e.printStackTrace(); } } }
数据流 DataInputStream 数据输入流 DataOutputStream 数据输出流
直接进行字符串的读写 使用数据流的writeUTF()和readUTF() 可以进行数据的格式化顺序读写 如本例,通过DataOutputStream 向文件顺序写出 布尔值,整数和字符串。 然后再通过DataInputStream 顺序读入这些数据。
注: 要用DataInputStream 读取一个文件,这个文件必须是由DataOutputStream 写出的,否则会出现EOFException,因为DataOutputStream 在写出的时候会做一些特殊标记,只有DataInputStream 才能成功的读取。
1 2 3 4 5 6 7 8 9 10 11 12 13 14 15 16 17 18 19 20 21 22 23 24 25 26 27 28 29 30 31 32 33 34 35 36 37 38 39 40 41 42 43 44 package stream;import java.io.*;public class TestStream6 { public static void main (String[] args) { write(); read(); } private static void read () { File f = new File ("f:/LOLFolder/lol2.txt" ); try (FileInputStream fis = new FileInputStream (f); DataInputStream dis = new DataInputStream (fis); ) { boolean b = dis.readBoolean(); int i = dis.readInt(); String str = dis.readUTF(); System.out.println("读取到布尔值:" +b); System.out.println("读取到整数:" +i); System.out.println("读取到字符串:" +str); } catch (IOException e) { e.printStackTrace(); } } private static void write () { File f = new File ("f:/LOLFolder/lol2.txt" ); try ( FileOutputStream fos = new FileOutputStream (f); DataOutputStream dos = new DataOutputStream (fos); ) { dos.writeBoolean(true ); dos.writeInt(300 ); dos.writeUTF("123 this is gareen" ); } catch (IOException e) { e.printStackTrace(); } } }
对象流 对象流指的是可以直接把一个对象以流的形式 传输给其他的介质,比如硬盘
一个对象以流的形式进行传输,叫做序列化。 该对象所对应的类,必须是实现Serializable接口
序列化一个对象 创建一个Hero对象,设置其名称为garen。 把该对象序列化到一个文件garen.lol。 然后再通过序列化把该文件转换为一个Hero对象
注: 把一个对象序列化有一个前提是:这个对象的类,必须实现了Serializable接口
1 2 3 4 5 6 7 8 9 10 11 12 13 14 15 16 17 18 19 20 21 22 23 24 25 26 27 28 29 30 31 32 33 34 35 36 37 38 39 40 41 42 43 44 45 46 package LOL;import java.io.Serializable;public class Hero implements Serializable { private static final long serialVersionUID = 1L ; public String name; public float hp; } package stream;import LOL.Hero;import java.io.*;public class TestStream { public static void main (String[] args) { Hero h = new Hero (); h.name = "garen" ; h.hp = 616 ; File f = new File ("F:\\LOLFolder\\garen.lol" ); try ( FileOutputStream fos = new FileOutputStream (f); ObjectOutputStream oos = new ObjectOutputStream (fos); FileInputStream fis = new FileInputStream (f); ObjectInputStream ois = new ObjectInputStream (fis); ) { oos.writeObject(h); Hero h2 = (Hero)ois.readObject(); System.out.println(h2.name); System.out.println(h2.hp); } catch (IOException | ClassNotFoundException e) { e.printStackTrace(); } } }
System.in System.out 是常用的在控制台输出数据的 System.in 可以从控制台输入数据
System.in 1 2 3 4 5 6 7 8 9 10 11 12 13 14 15 16 17 18 19 20 21 22 package stream;import java.io.IOException;import java.io.InputStream;public class TestStream { public static void main (String[] args) { try (InputStream is = System.in) { while (true ) { int i = is.read(); System.out.println(i); } } catch (IOException e) { e.printStackTrace(); } } }
Scanner读取字符串 使用System.in.read虽然可以读取数据,但是很不方便 使用Scanner就可以逐行读取了
1 2 3 4 5 6 7 8 9 10 11 12 13 14 package stream;import java.util.Scanner;public class TestStream { public static void main (String[] args) { Scanner s = new Scanner (System.in); while (true ){ String line = s.nextLine(); System.out.println(line); } } }
Scanner从控制台读取整数 1 2 3 4 5 6 7 8 9 10 11 12 13 package stream; import java.util.Scanner; public class TestStream { public static void main (String[] args) { Scanner s = new Scanner (System.in); int a = s.nextInt(); System.out.println("第一个整数:" +a); int b = s.nextInt(); System.out.println("第二个整数:" +b); } }
流关系图 流关系图 这个图把本章节学到的流关系做了个简单整理 \1. 流分为字节流和字符流 \2. 字节流下面常用的又有数据流和对象流 \3. 字符流下面常用的又有缓存流
其他流 除了上图所接触的流之外,还有很多其他流,如图所示InputStream下面有很多的子类。 这些子类不需要立即掌握,他们大体上用法是差不多的,只是在一些特殊场合下用起来更方便,在工作中用到的时候再进行学习就行了。
集合框架 ArrayList 与数组的区别 使用数组的局限性 如果要存放多个对象,可以使用数组,但是数组有局限性 比如 声明长度是10的数组 不用的数组就浪费了 超过10的个数,又放不下
ArrayList存放对象 为了解决数组的局限性,引入容器类的概念。 最常见的容器类就是 ArrayList 容器的容量 “capacity”会随着对象的增加,自动增长 只需要不断往容器里增加英雄即可,不用担心会出现数组的边界问题。
1 2 3 4 5 6 7 8 9 10 11 12 13 14 15 16 17 18 19 package collection;import LOL.Hero;import java.util.ArrayList;public class TestCollection { public static void main(String[] args) { ArrayList heros = new ArrayList(); heros.add(new Hero("盖伦" )); System.out.println (heros.size ()); heros.add( new Hero("提莫" )); System.out.println (heros.size ()); } }
常用方法 增加 add 有两种用法
第一种是直接add对象,把对象加在最后面
第二种是在指定位置加对象
1 2 3 4 5 6 7 8 9 10 11 12 13 14 15 16 17 18 19 20 21 22 23 24 25 26 27 28 29 30 31 32 33 34 35 36 37 38 39 40 41 42 43 44 45 46 47 package collection;import LOL.Hero;import java.util.ArrayList;public class TestCollection { public static void main (String[] args) { ArrayList heros = new ArrayList (); for (int i = 0 ; i < 5 ; i++) { heros.add(new Hero ("hero" + i)); } System.out.println(heros); Hero specialHero = new Hero ("special hero" ); heros.add(3 , specialHero); System.out.println(heros.toString()); } } package LOL;public class Hero { public String name; public float hp; public int damage; public Hero () { } public Hero (String name) { this .name = name; } public String toString () { return name; } }
判断是否存在 通过方法contains 判断一个对象是否在容器中 判断标准: 是否是同一个对象,而不是name是否相同
1 2 3 4 5 6 7 8 9 10 11 12 13 14 15 16 17 18 19 20 21 22 23 24 25 26 27 28 29 package collection; import LOL.Hero;import java.util.ArrayList;public class TestCollection { public static void main(String[] args) { ArrayList heros = new ArrayList(); // 把5 个对象加入到ArrayList中 for (int i = 0 ; i < 5 ; i++) { heros.add (new Hero("hero" + i)); } System .out .println(heros); // 在指定位置增加对象 Hero specialHero = new Hero("special hero"); heros.add (3 , specialHero); System .out .println(heros.toString()); // 判断一个对象是否在容器中 // 判断标准: 是否是同一个对象,而不是name 是否相同 System .out .print("虽然一个新的对象名字也叫 hero 1,但是contains的返回是:"); System .out .println(heros.contains(new Hero("hero1"))); System .out .print("而对specialHero的判断,contains的返回是:"); System .out .println(heros.contains(specialHero)); } }
获取指定位置的对象 通过get获取指定位置的对象,如果输入的下标越界,一样会报错
1 2 3 4 5 6 7 8 9 10 11 12 13 14 15 16 17 18 19 20 21 package collection;import LOL.Hero;import java.util.ArrayList;public class TestCollection public static void main(String [] args) { ArrayList heros = new ArrayList (); for (int i = 0 ; i < 5 ; i++) { heros.add(new Hero ("hero" + i)); } Hero specialHero = new Hero ("special hero" ); heros.add(3 , specialHero); System.out.println(heros.get (5 )); System.out.println(heros.get (6 )); } }
获取对象所处的位置 indexOf 用于判断一个对象在ArrayList中所处的位置 与contains 一样,判断标准是对象是否相同,而非对象的name值是否相等
1 2 3 4 5 6 7 8 9 10 11 12 13 14 15 16 17 18 19 20 21 22 23 24 package collection; import LOL.Hero;import java.util.ArrayList;public class TestCollection { public static void main(String[] args) { ArrayList heros = new ArrayList(); for (int i = 0 ; i < 5 ; i++) { heros.add (new Hero("hero" + i)); } Hero specialHero = new Hero("special hero"); heros.add (specialHero); System .out .println(heros); System .out .println("specialHero所处的位置:" + heros.indexOf(specialHero)); System .out .println("新的英雄,但是名字是\"hero 1 \"所处的位置:" + heros.indexOf(new Hero("hero1"))); } } 输出: [hero0, hero1, hero2, hero3, hero4, special hero] specialHero所处的位置:5 新的英雄,但是名字是"hero 1"所处的位置:-1
删除 remove 用于把对象从ArrayList中删除
remove可以根据下标删除ArrayList的元素
也可以根据对象删除
1 2 3 4 5 6 7 8 9 10 11 12 13 14 15 16 17 18 19 20 21 22 package collection; import LOL.Hero;import java.util.ArrayList;public class TestCollection { public static void main(String[] args) { ArrayList heros = new ArrayList(); for (int i = 0 ; i < 5 ; i++) { heros.add (new Hero("hero" + i)); } Hero specialHero = new Hero("special hero"); heros.add (specialHero); System .out .println(heros); heros.remove(2 ); System .out .println(heros); heros.remove(specialHero); System .out .println(heros); } }
替换 set 用于替换指定位置的元素
1 2 3 4 5 6 7 8 9 10 11 12 13 14 15 16 17 18 19 20 package collection;import LOL.Hero;import java.util.ArrayList;public class TestCollection public static void main(String [] args) { ArrayList heros = new ArrayList (); for (int i = 0 ; i < 5 ; i++) { heros.add(new Hero ("hero" + i)); } Hero specialHero = new Hero ("special hero" ); heros.add(specialHero); System.out.println(heros); heros.set (5 , new Hero ("hero 5" )); System.out.println(heros); } }
获取大小 size 用于获取ArrayList的大小
转换为数组 toArray 可以把一个ArrayList对象转换为数组。 需要注意的是,如果要转换为一个Hero数组,那么需要传递一个Hero数组类型的对象给toArray(),这样toArray方法才知道,你希望转换为哪种类型的数组,否则只能转换为Object数组
1 2 3 4 5 6 7 8 9 10 11 12 13 14 15 16 17 18 19 20 package collection;import LOL.Hero;import java.util.ArrayList;public class TestCollection { public static void main (String[] args) { ArrayList heros = new ArrayList (); for (int i = 0 ; i < 5 ; i++) { heros.add(new Hero ("hero" + i)); } Hero specialHero = new Hero ("special hero" ); heros.add(specialHero); System.out.println(heros); Hero[] hs = (Hero[])heros.toArray(new Hero []{}); System.out.println("数组:" + hs); } }
把另一个容器所有对象都加进来 addAll 把另一个容器所有对象都加进来
1 2 3 4 5 6 7 8 9 10 11 12 13 14 15 16 17 18 19 20 21 22 23 24 25 26 27 28 package collection; import LOL.Hero;import java.util.ArrayList;public class TestCollection { public static void main(String[] args) { ArrayList heros = new ArrayList(); // 初始化5 个对象 for (int i = 0 ; i < 5 ; i++) { heros.add (new Hero("hero" + i)); } System .out .println("ArrayList heros:\t" + heros); //把另一个容器里所有的元素,都加入到该容器里来 ArrayList anotherHeros = new ArrayList(); anotherHeros.add (new Hero("hero a")); anotherHeros.add (new Hero("hero b")); anotherHeros.add (new Hero("hero c")); System .out .println("anotherHeros heros:\t" + anotherHeros); heros.addAll(anotherHeros); System .out .println("把另一个ArrayList的元素都加入到当前ArrayList:"); System .out .println("ArrayList heros:\t" + heros); } }
清空 clear 清空一个ArrayList
1 2 3 4 5 6 7 8 9 10 11 12 13 14 15 16 package collection;import LOL.Hero;import java.util.ArrayList;public class TestCollection { public static void main (String[] args) { ArrayList heros = new ArrayList (); for (int i = 0 ; i < 5 ; i++) { heros.add(new Hero ("hero" + i)); } heros.clear(); System.out.println(heros.size()); } }
List接口 ArrayList和List ArrayList实现了接口List 常见的写法会把引用声明为接口List类型 注意:是java.util.List ,而不是 java.awt.List
1 2 3 4 5 6 7 8 9 10 11 12 13 14 15 16 17 18 package collection;import LOL.Hero;import java.util.ArrayList;import java.util.List;public class TestCollection { public static void main (String[] args) { List heros = new ArrayList (); heros.add(new Hero ("盖伦" )); System.out.println(heros.size()); } }
List接口的方法 因为ArrayList实现了List接口,所以List接口的方法ArrayList都实现了。 在ArrayList 常用方法 章节有详细的讲解,在此不作赘述
泛型Generic 泛型 Generic 不指定泛型的容器,可以存放任何类型的元素 指定了泛型的容器,只能存放指定类型的元素以及其子类
1 2 3 4 5 6 7 8 9 10 11 12 13 14 15 16 17 18 19 20 21 22 23 24 25 26 27 28 29 30 31 32 33 34 35 36 37 38 39 40 41 42 43 44 45 46 47 48 49 50 51 52 53 54 55 package LOL;public class Item { String name; int price; public Item () { } public Item (String name) { this .name = name; } public void effect () { System.out.println("物品使用后,可以有效果" ); } } package collection;import LOL.APHero;import LOL.Hero;import LOL.Item;import java.util.ArrayList;import java.util.List;public class TestCollection { public static void main (String[] args) { List heros = new ArrayList (); heros.add(new Hero ("盖伦" )); heros.add(new Item ("冰杖" )); Hero h1 = (Hero) heros.get(0 ); List<Hero> genericheros = new ArrayList <Hero>(); genericheros.add(new Hero ("盖伦" )); genericheros.add(new APHero ()); Hero h = genericheros.get(0 ); } }
泛型的简写 为了不使编译器出现警告,需要前后都使用泛型,像这样:
1 List<Hero> genericheros = new ArrayList<Hero>()
不过JDK7提供了一个可以略微减少代码量的泛型简写方式
1 2 3 4 5 6 7 8 9 10 11 12 13 14 15 16 List<Hero> genericheros2 = new ArrayList <>(); package collection;import LOL.APHero;import LOL.Hero;import LOL.Item;import java.util.ArrayList;import java.util.List;public class TestCollection { public static void main (String[] args) { List<Hero> genericheros = new ArrayList <Hero>(); List<Hero> genericheros2 = new ArrayList <>(); } }
泛型的系统学习 泛型的知识还包含 支持泛型的类 泛型转型 通配符 这些内容都在泛型章节 详细展开
遍历 用for循环遍历 通过前面的学习,知道了可以用size()和get()分别得到大小,和获取指定位置的元素,结合for循环就可以遍历出ArrayList的内容
1
2
3
4
5
6
7
8
9
10
11
12
13
14
15
16
17
18
19
20
21
22
package collection;import LOL.Hero;import java.util.ArrayList;import java.util.List;public class TestCollection { public static void main (String[] args) { List<Hero> heroes = new ArrayList <>(); for (int i = 0 ; i < 5 ; i++) { heroes.add(new Hero ("hero name " + i)); } System.out.println("--------for 循环-------" ); for (int i = 0 ; i < heroes.size(); i++) { Hero h = heroes.get(i); System.out.println(h); } } }
迭代器遍历 使用迭代器Iterator遍历集合中的元素
1 2 3 4 5 6 7 8 9 10 11 12 13 14 15 16 17 18 19 20 21 22 23 24 25 26 27 28 29 30 31 32 33 34 package collection;import LOL.Hero;import java.util.ArrayList;import java.util.Iterator;import java.util.List;public class TestCollection { public static void main (String[] args) { List<Hero> heroes = new ArrayList <>(); for (int i = 0 ; i < 5 ; i++) { heroes.add(new Hero ("hero name " + i)); } System.out.println("--------使用while的iterator-------" ); Iterator<Hero> it = heroes.iterator(); while (it.hasNext()) { Hero h = it.next(); System.out.println(h); } System.out.println("--------使用for的iterator-------" ); for (Iterator<Hero> iterator = heroes.iterator(); iterator.hasNext(); ){ Hero hero = iterator.next(); System.out.println(hero); } } }
用增强型for循环 使用增强型for循环可以非常方便的遍历ArrayList中的元素,这是很多开发人员的首选。
不过增强型for循环也有不足: 无法用来进行ArrayList的初始化 无法得知当前是第几个元素了,当需要只打印单数元素的时候,就做不到了。 必须再自定下标变量。
1 2 3 4 5 6 7 8 9 10 11 12 13 14 15 16 17 18 19 20 21 22 package collection;import LOL.Hero;import java.util.ArrayList;import java.util.Iterator;import java.util.List;public class TestCollection { public static void main (String[] args) { List<Hero> heroes = new ArrayList <>(); for (int i = 0 ; i < 5 ; i++) { heroes.add(new Hero ("hero name " + i)); } System.out.println("--------增强型for循环-------" ); for (Hero h : heroes) { System.out.println(h); } } }
其他集合 LinkedList 与 List接口 与ArrayList 一样,LinkedList也实现了List接口,诸如add,remove,contains等等方法。 详细使用,请参考 ArrayList 常用方法 ,在此不作赘述。
接下来要讲的是LinkedList的一些特别的地方
双向链表 - Deque 除了实现了List接口外,LinkedList还实现了双向链表结构 Deque,可以很方便的在头尾插入删除数据
什么是链表结构: 与数组结构相比较,数组结构,就好像是电影院,每个位置都有标示,每个位置之间的间隔都是一样的。 而链表就相当于佛珠,每个珠子,只连接前一个和后一个,不用关心除此之外的其他佛珠在哪里。
1 2 3 4 5 6 7 8 9 10 11 12 13 14 15 16 17 18 19 20 21 22 23 24 25 26 27 28 29 30 31 32 33 34 35 36 37 38 package collection; import LOL.Hero; import java.util.LinkedList; public class TestCollection { public static void main(String[] args) { LinkedList<Hero> ll = new LinkedList<>() ; ll.addLast(new Hero("hero1" ) ); ll.addLast(new Hero("hero2" ) ); ll.addLast(new Hero("hero3" ) ); ll.addFirst(new Hero("heroX" ) ); System . System .First() ); System .Last() ); System . System .First() ); System .Last() ); System . } }
队列 - Queue LinkedList 除了实现了List和Deque外,还实现了Queue 接口(队列)。 Queue是先进先出队列 FIFO ,常用方法: offer 在最后添加元素 poll 取出第一个元素 peek 查看第一个元素
1 2 3 4 5 6 7 8 9 10 11 12 13 14 15 16 17 18 19 20 21 22 23 24 25 26 27 28 29 30 31 32 33 34 35 36 37 38 39 40 package collection;import LOL.Hero;import java.util.LinkedList;import java.util.List;import java.util.Queue;public class TestCollection { public static void main(String[] args) { List ll = new LinkedList<Hero>(); Queue<Hero> q = new LinkedList<>(); System.out.print ("初始化队列:\t" ); q.offer(new Hero("Hero1" )); q.offer(new Hero("Hero2" )); q.offer(new Hero("Hero3" )); q.offer(new Hero("Hero4" )); System.out.println (q); System.out.print ("把第一个元素取poll()出来:\t" ); Hero h = q.poll(); System.out.println (h); System.out.print ("取出第一个元素之后的队列:\t" ); System.out.println (q); h = q.peek(); System.out.print ("查看peek()第一个元素:\t" ); System.out.println (h); System.out.print ("查看并不会导致第一个元素被取出来:\t" ); System.out.println (q); } }
ArrayList 与 LinkedList的区别 ArrayList 与 LinkedList的区别是面试常常会问到的考题 具体区别,详见 ArrayList 与 LinkedList的区别
二叉树 二叉树概念 二叉树由各种节点 组成 二叉树特点: 每个节点都可以有左子 节点,右子 节点 每一个节点都有一个值
1 2 3 4 5 6 7 8 9 10 package collection;public class Node public Node leftNode; public Node rightNode; public Object value; }
二叉树排序-插入数据 假设通过二叉树对如下10个随机数进行排序 67,7,30,73,10,0,78,81,10,74 排序的第一个步骤是把数据插入到该二叉树中 插入基本逻辑是,小、相同的放左边 ,大的放右边 \1. 67 放在根节点 \2. 7 比 67小,放在67的左节点 \3. 30 比67 小,找到67的左节点7,30比7大,就放在7的右节点 \4. 73 比67大, 放在67的右节点 \5. 10 比 67小,找到67的左节点7,10比7大,找到7的右节点30,10比30小,放在30的左节点。 … … \9. 10比67小,找到67的左节点7,10比7大,找到7的右节点30,10比30小,找到30的左节点10,10和10一样大,放在左边
1 2 3 4 5 6 7 8 9 10 11 12 13 14 15 16 17 18 19 20 21 22 23 24 25 26 27 28 29 30 31 32 33 34 35 36 37 38 39 40 41 42 43 package collection; public class Node { public Node leftNode; public Node rightNode; public Object value; public void add (Object v if (null == value) { value = v; } else { if ((Integer )v - (Integer )value <= 0 ) { if (null == leftNode) { leftNode = new Node (); } leftNode.add (v); } else { if (null == rightNode) { rightNode = new Node (); } rightNode.add (v); } } } public static void main (String [] args int[] randoms = new int[] {67 , 7 , 30 , 73 , 10 , 0 , 78 , 81 , 10 , 74 }; Node roots = new Node (); for (int number : randoms) { roots.add (number ); } } }
二叉树排序-遍历 通过上一个步骤的插入行为,实际上,数据就已经排好序了。 接下来要做的是看,把这些已经排好序的数据 ,遍历成我们常用的List或者数组的形式
二叉树的遍历分左序,中序,右序 左序 即: 中间的数遍历后放在左边 中序 即: 中间的数遍历后放在中间 右序 即: 中间的数遍历后放在右边 如图所见,我们希望遍历后的结果是从小到大的,所以应该采用中序遍历
1 2 3 4 5 6 7 8 9 10 11 12 13 14 15 16 17 18 19 20 21 22 23 24 25 26 27 28 29 30 31 32 33 34 35 36 37 38 39 40 41 42 43 44 45 46 47 48 49 50 51 52 53 54 55 56 57 58 59 60 61 62 63 64 65 66 67 package collection; import java.util .ArrayList ;import java.util .List ;public class Node { public Node leftNode; public Node rightNode; public Object value; public void add (Object v if (null == value) { value = v; } else { if ((Integer )v - (Integer )value <= 0 ) { if (null == leftNode) { leftNode = new Node (); } leftNode.add (v); } else { if (null == rightNode) { rightNode = new Node (); } rightNode.add (v); } } } public List <Object > values ( List <Object > values = new ArrayList <>(); if (null != leftNode) { values.addAll (leftNode.values ()); } values.add (value); if (null != rightNode) { values.addAll (rightNode.values ()); } return values; } public static void main (String [] args int[] randoms = new int[] {67 , 7 , 30 , 73 , 10 , 0 , 78 , 81 , 10 , 74 }; Node roots = new Node (); for (int number : randoms) { roots.add (number ); } System .out .println (roots.values ()); } }
HashMap HashMap的键值对 HashMap储存数据的方式是—— 键值对
1 2 3 4 5 6 7 8 9 10 11 12 13 14 package collection; import java.util.HashMap;public class TestCollection { public static void main(String[] args) { HashMap<String, String> dictionary = new HashMap<>(); dictionary .put("abc", "物理英雄"); dictionary .put("apc", "魔法英雄"); dictionary .put("t", "坦克"); System .out .println(dictionary .get ("t")); } }
键不能重复,值可以重复 对于HashMap而言,key是唯一的,不可以重复的。 所以,以相同的key 把不同的value插入到 Map中会导致旧元素被覆盖,只留下最后插入的元素 不过,同一个对象可以作为值插入到map中,只要对应的key不一样
1 2 3 4 5 6 7 8 9 10 11 12 13 14 15 16 17 18 19 20 21 22 23 24 25 26 27 28 29 30 31 package collection;import LOL.Hero;import java.util.HashMap;public class TestCollection public static void main(String [] args) { HashMap<String , Hero> heroMap = new HashMap <>(); heroMap.put("gareen" , new Hero ("gareen1" )); System.out.println(heroMap); heroMap.put("gareen" , new Hero ("gareen2" )); System.out.println(heroMap); heroMap.clear(); System.out.println(heroMap.size()); Hero gareen = new Hero ("gareen" ); heroMap.put("hero1" , gareen); heroMap.put("hero2" , gareen); System.out.println(heroMap); } }
HashSet 元素不能重复 Set中的元素,不能重复(是利用了equals判断重复的,所以就算new String(“gareen”);也插不进去
1 2 3 4 5 6 7 8 9 10 11 12 13 14 15 16 17 package collection;import java.util.HashSet;public class TestCollection public static void main(String [] args) { HashSet<String > names = new HashSet <>(); names.add("gareen" ); System.out.println(names); names.add(new String ("gareen" )); System.out.println(names); } }
没有顺序 Set中的元素,没有顺序。 严格的说,是没有按照元素的插入顺序排列
HashSet的具体顺序,既不是按照插入顺序,也不是按照hashcode的顺序。关于hashcode有专门的章节讲解: hashcode 原理 。
以下是HashSet源代码 中的部分注释
换句话说,同样是插入0-9到HashSet中, 在JVM的不同版本中,看到的顺序都是不一样的。 所以在开发的时候,不能依赖于某种臆测的顺序 ,这个顺序本身是不稳定的
1 2 3 4 5 6 7 8 9 10 11 12 13 14 15 16 17 18 package collection; import java.util.HashSet; public class TestCollection { public static void main (String[] args ) HashSet<Integer> numbers = new HashSet<>(); numbers.add (99 ); numbers.add (55 ); numbers.add (1 ); System.out .println(numbers); } } 输出: [1, 99, 55 ]
遍历 Set不提供get()来获取指定位置的元素 所以遍历需要用到迭代器,或者增强型for循环
1 2 3 4 5 6 7 8 9 10 11 12 13 14 15 16 17 18 19 20 21 22 23 24 25 26 package collection; import java.util.HashSet;import java.util.Iterator;public class TestCollection { public static void main(String[] args) { HashSet<Integer > numbers = new HashSet<>(); for (int i = 0 ; i < 20 ; i++) { numbers.add (i); } //Set 不提供get 方法来获取指定位置的元素 //numbers.get (0 ) //遍历Set 可以采用迭代器iterator for (Iterator<Integer > iterator = numbers.iterator(); iterator.hasNext(); ) { Integer i = iterator.next(); System .out .println(i); } //或者采用增强型for 循环 for (Integer i : numbers) { System .out .println(i); } } }
HashSet和HashMap的关系 通过观察HashSet的源代码(如何查看源代码 ) 可以发现HashSet自身并没有独立的实现,而是在里面封装了一个Map. HashSet是作为Map的key而存在的 而value是一个命名为PRESENT的static的Object对象,因为是一个类属性,所以只会有一个。
1 2 3 4 5 6 7 8 9 10 11 12 13 14 15 16 17 18 19 20 21 22 23 24 25 26 27 28 29 30 31 32 33 34 35 36 37 38 39 40 41 42 43 44 private static final Object PRESENT = new Object ();package collection; import java.util.AbstractSet;import java.util.HashMap;import java.util.Iterator;import java.util.Set; public class HashSet <E> extends AbstractSet <E> implements Set <E>, Cloneable, java.io.Serializable { private HashMap<E,Object> map; private static final Object PRESENT = new Object (); public HashSet () { map = new HashMap <E,Object>(); } public boolean add (E e) { return map.put(e, PRESENT)==null ; } public int size () { return map.size(); } public void clear () { map.clear(); } public Iterator<E> iterator () { return map.keySet().iterator(); } }
Collection Collection是一个接口
Collection是 Set List Queue和 Deque的接口 Queue: 先进先出队列 Deque: 双向链表
注: Collection和Map之间没有关系,Collection是放一个一个对象的,Map 是放键值对的 注: Deque 继承 Queue,间接的继承了 Collection
Collections Collections是一个类,容器的工具类,就如同Arrays是数组的工具类
反转 reverse 使List中的数据发生翻转
1 2 3 4 5 6 7 8 9 10 11 12 13 14 15 16 17 18 19 20 21 22 package collection;import java.util.ArrayList;import java.util.Collection;import java.util.Collections;import java.util.List;public class TestCollection { public static void main (String[] args) { List<Integer> numbers = new ArrayList <>(); for (int i = 0 ; i < 10 ; i++) { numbers.add(i); } System.out.println("集合中的数据:" ); System.out.println(numbers); Collections.reverse(numbers); System.out.println(numbers); } }
混淆 shuffle 混淆List中数据的顺序
1 2 3 4 5 6 7 8 9 10 11 12 13 14 15 16 17 18 19 20 21 22 package collection;import java.util.ArrayList;import java.util.Collection;import java.util.Collections;import java.util.List;public class TestCollection { public static void main (String[] args) { List<Integer> numbers = new ArrayList <>(); for (int i = 0 ; i < 10 ; i++) { numbers.add(i); } System.out.println("集合中的数据:" ); System.out.println(numbers); Collections.shuffle(numbers); System.out.println(numbers); } }
排序 sort 对List中的数据进行排序
1 2 3 4 5 6 7 8 9 10 11 12 13 14 15 16 17 18 19 20 21 22 23 24 25 package collection;import java.util.ArrayList;import java.util.Collection;import java.util.Collections;import java.util.List;public class TestCollection { public static void main (String[] args) { List<Integer> numbers = new ArrayList <>(); for (int i = 0 ; i < 10 ; i++) { numbers.add(i); } System.out.println("集合中的数据:" ); System.out.println(numbers); Collections.shuffle(numbers); System.out.println(numbers); Collections.sort(numbers); System.out.println(numbers); } }
交换 swap 交换两个数据的位置
1 2 3 4 5 6 7 8 9 10 11 12 13 14 15 16 17 18 19 20 21 22 package collection;import java.util.ArrayList;import java.util.Collection;import java.util.Collections;import java.util.List;public class TestCollection { public static void main (String[] args) { List<Integer> numbers = new ArrayList <>(); for (int i = 0 ; i < 10 ; i++) { numbers.add(i); } System.out.println("集合中的数据:" ); System.out.println(numbers); Collections.swap(numbers, 0 , 5 ); System.out.println(numbers); } }
滚动 rotate 把List中的数据,向右滚动指定单位的长度
1 2 3 4 5 6 7 8 9 10 11 12 13 14 15 16 17 18 19 20 21 22 package collection; import java.util.ArrayList; import java.util.Collection; import java.util.Collections; import java.util.List; public class TestCollection { public static void main (String[] args) { List<Integer> numbers = new ArrayList <>(); for (int i = 0 ; i < 10 ; i++) { numbers.add(i); } System.out.println("集合中的数据:" ); System.out.println(numbers); Collections.rotate(numbers, 2 ); System.out.println(numbers); } }
线程安全化 synchronizedList 把非线程安全的List转换为线程安全的List。 因为截至目前为止,还没有学习线程安全 的内容,暂时不展开。 线程安全的内容将在多线程 章节展开。
1 2 3 4 5 6 7 8 9 10 11 12 package collection;import java.util.ArrayList;import java.util.Collections;import java.util.List;public class TestCollection { public static void main (String[] args) { List<Integer> numbers = new ArrayList <>(); List<Integer> synchronizedNumbers = (List<Integer>)Collections.synchronizedList(numbers); } }
关系与区别 ArrayList 和 HasetSet 是否有顺序 ArrayList: 有顺序 HashSet: 无顺序
HashSet的具体顺序,既不是按照插入顺序,也不是按照hashcode的顺序。关于hashcode有专门的章节讲解: hashcode 原理 。
以下是HasetSet源代码 中的部分注释
换句话说,同样是插入0-9到HashSet中, 在JVM的不同版本中,看到的顺序都是不一样的。 所以在开发的时候,不能依赖于某种臆测的顺序 ,这个顺序本身是不稳定的
1 2 3 4 5 6 7 8 9 10 11 12 13 14 15 16 17 18 19 20 21 22 23 24 25 26 27 28 29 30 31 32 33 34 35 36 package collection; import java.util.ArrayList;import java.util.HashSet;public class TestCollection { public static void main(String[] args) { ArrayList<Integer > numberList = new ArrayList<>(); //List中的数据按照插入顺序存放 System .out .println("----------List----------"); System .out .println("向List 中插入 9 5 1"); numberList.add (9 ); numberList.add (5 ); numberList.add (1 ); System .out .println("List 按照顺序存放数据:"); System .out .println(numberList); System .out .println("----------Set----------"); HashSet<Integer > numberSet = new HashSet<>(); System .out .println("向Set 中插入9 5 1"); //Set 中的数据不是按照插入顺序存放 numberSet.add (9 ); numberSet.add (5 ); numberSet.add (1 ); System .out .println("Set 不是按照顺序存放数据:"); System .out .println(numberSet); } } 输出: 向List 中插入 9 5 1 List 按照顺序存放数据: [9 , 5 , 1 ] 向Set 中插入9 5 1 Set 不是按照顺序存放数据: [1 , 5 , 9 ]
能否重复 List中的数据可以重复 Set中的数据不能够重复 重复判断标准是: 首先看hashcode是否相同 如果hashcode不同,则认为是不同数据 如果hashcode相同,再比较equals,如果equals相同,则是相同数据,否则是不同数据 更多关系hashcode,请参考hashcode原理
1 2 3 4 5 6 7 8 9 10 11 12 13 14 15 16 17 18 19 20 21 22 23 24 25 26 27 package collection; import java.util.ArrayList;import java.util.HashSet; public class TestCollection { public static void main(String[] args) { ArrayList<Integer > numberList =new ArrayList<Integer >(); //List中的数据可以重复 System .out .println("----------List----------"); System .out .println("向List 中插入 9 9"); numberList.add (9 ); numberList.add (9 ); System .out .println("List 中出现两个9:"); System .out .println(numberList); System .out .println("----------Set----------"); HashSet<Integer > numberSet =new HashSet<Integer >(); System .out .println("向Set 中插入9 9"); //Set 中的数据不能重复 numberSet.add (9 ); numberSet.add (9 ); System .out .println("Set 中只会保留一个9:"); System .out .println(numberSet); } }
ArrayList 和 LinkedList ArrayList和LinkedList的区别 ArrayList 插入,删除数据慢 LinkedList, 插入,删除数据快 ArrayList是顺序结构,所以定位很快 ,指哪找哪。 就像电影院位置一样,有了电影票,一下就找到位置了。 LinkedList 是链表结构,就像手里的一串佛珠,要找出第99个佛珠,必须得一个一个的数过去,所以定位慢
插入数据 1 2 3 4 5 6 7 8 9 10 11 12 13 14 15 16 17 18 19 20 21 22 23 24 25 26 27 28 29 30 31 package collection;import java.util.ArrayList;import java.util.LinkedList;import java.util.List;public class TestCollection { public static void main (String[] args) { List<Integer> l; l = new ArrayList <>(); insertFirst(l, "ArrayList" ); l = new LinkedList <>(); insertFirst(l, "LinkedList" ); } private static void insertFirst (List<Integer> l, String type) { int total = 1000 * 100 ; final int number = 5 ; long start = System.currentTimeMillis(); for (int i = 0 ; i < total; i++) { l.add(0 , number); } long end = System.currentTimeMillis(); System.out.printf("在%s 最前面插入%d条数据,总共耗时 %d 毫秒 %n" , type, total, end - start); } } 输出: 在ArrayList 最前面插入100000 条数据,总共耗时 1289 毫秒 在LinkedList 最前面插入100000 条数据,总共耗时 4 毫秒
定位数据 1 2 3 4 5 6 7 8 9 10 11 12 13 14 15 16 17 18 19 20 21 22 23 24 25 26 27 28 29 30 31 32 33 34 35 36 37 38 39 40 41 42 43 44 package collection; import java.util.ArrayList;import java.util.LinkedList;import java.util.List;public class TestCollection { public static void main(String[] args) { List<Integer > l; l = new ArrayList<>(); modify(l, "ArrayList"); l = new LinkedList<>(); modify(l, "LinkedList"); } private static void modify(List<Integer > l, String type ) { int total = 100 * 1000 ; int index = total/2 ; final int number = 5 ; //初始化 for (int i = 0 ; i < total; i++) { l.add (number); } long start = System .currentTimeMillis(); for (int i = 0 ; i < total; i++) { int n = l.get (index ); n++; l.set (index , n); } long end = System .currentTimeMillis(); System .out .printf("%s总长度是%d,定位到第%d个数据,取出来,加1,再放回去%n 重复%d遍,总共耗时 %d 毫秒 %n", type ,total, index ,total, end - start ); System .out .println(); } } 输出: ArrayList总长度是100000 ,定位到第50000 个数据,取出来,加1 ,再放回去 重复100000 遍,总共耗时 4 毫秒 LinkedList总长度是100000 ,定位到第50000 个数据,取出来,加1 ,再放回去 重复100000 遍,总共耗时 19169 毫秒
HashMap 和 Hashtable HashMap和Hashtable都实现了Map接口,都是键值对保存数据的方式 区别1: HashMap可以存放 null Hashtable不能存放null 区别2: HashMap不是线程安全的类 Hashtable是线程安全的类
鉴于目前学习的进度,不对线程安全做展开,在线程章节 会详细讲解
1 2 3 4 5 6 7 8 9 10 11 12 13 14 15 16 17 18 19 20 package collection;import java.util.HashMap;import java.util.Hashtable;public class TestCollection public static void main(String [] args) { HashMap<String , String > hashMap = new HashMap <>(); hashMap.put(null , "123" ); hashMap.put("123" , null ); Hashtable<String , String > hashtable = new Hashtable <>(); } }
几种Set HashSet,LinkedHashSet,TreeSet HashSet: 无序 LinkedHashSet: 按照插入顺序 TreeSet: 从小到大排序
1 2 3 4 5 6 7 8 9 10 11 12 13 14 15 16 17 18 19 20 21 22 23 24 25 26 27 28 29 30 31 32 33 34 35 36 37 package collection; import java.util.HashSet;import java.util.LinkedHashSet;import java.util.TreeSet;public class TestCollection { public static void main(String[] args) { HashSet<Integer > numberSet1 =new HashSet<Integer >(); //HashSet中的数据不是按照插入顺序存放 numberSet1.add (88 ); numberSet1.add (8 ); numberSet1.add (888 ); System .out .println(numberSet1); LinkedHashSet<Integer > numberSet2 =new LinkedHashSet<Integer >(); //LinkedHashSet中的数据是按照插入顺序存放 numberSet2.add (88 ); numberSet2.add (8 ); numberSet2.add (888 ); System .out .println(numberSet2); TreeSet<Integer > numberSet3 =new TreeSet<Integer >(); //TreeSet 中的数据是进行了排序的 numberSet3.add (88 ); numberSet3.add (8 ); numberSet3.add (888 ); System .out .println(numberSet3); } } 输出: [88 , 8 , 888 ] [88 , 8 , 888 ] [8 , 88 , 888 ]
其他 hashcode 原理 List查找的低效率 假设在List中存放着无重复名称,没有顺序的2000000个Hero 要把名字叫做“hero 1000000”的对象找出来 List的做法是对每一个进行挨个遍历,直到找到名字叫做“hero 1000000”的英雄。 最差的情况下,需要遍历和比较2000000次 ,才能找到对应的英雄。 测试逻辑: \1. 初始化2000000个对象到ArrayList中 \2. 打乱容器中的数据顺序 \3. 进行10次查询,统计每一次消耗的时间 不同计算机的配置情况下,所花的时间是有区别的。 在本机上,花掉的时间大概是600毫秒左右
1 2 3 4 5 6 7 8 9 10 11 12 13 14 15 16 17 18 19 20 21 22 23 24 25 26 27 28 29 30 31 32 33 34 35 36 37 38 39 40 41 42 43 44 45 46 47 48 49 50 51 52 53 54 55 56 57 58 package collection;import LOL.Hero;import java.util.ArrayList;import java.util.Collections;import java.util.List;public class TestCollection { public static void main (String[] args) { List<Hero> heros = new ArrayList <>(); for (int j = 0 ; j < 2000000 ; j++) { Hero h = new Hero ("Hero " + j); heros.add(h); } for (int i = 0 ; i < 10 ; i++) { Collections.shuffle(heros); long start = System.currentTimeMillis(); String target = "Hero 1000000" ; for (Hero hero : heros) { if (hero.name.equals(target)) { System.out.println("找到了 hero!" ); break ; } } long end = System.currentTimeMillis(); long elapsed = end - start; System.out.println("一共花了:" + elapsed + " 毫秒" ); } } } 输出: 找到了 hero! 一共花了:55 毫秒 找到了 hero! 一共花了:68 毫秒 找到了 hero! 一共花了:40 毫秒 找到了 hero! 一共花了:66 毫秒 找到了 hero! 一共花了:9 毫秒 找到了 hero! 一共花了:104 毫秒 找到了 hero! 一共花了:88 毫秒 找到了 hero! 一共花了:22 毫秒 找到了 hero! 一共花了:43 毫秒 找到了 hero! 一共花了:29 毫秒
HashMap的性能表现 使用HashMap 做同样的查找 \1. 初始化2000000个对象到HashMap中。 \2. 进行10次查询 \3. 统计每一次的查询消耗的时间 可以观察到,几乎不花时间,花费的时间在1毫秒以内
1 2 3 4 5 6 7 8 9 10 11 12 13 14 15 16 17 18 19 20 21 22 23 24 25 26 27 28 29 30 31 32 33 34 35 36 37 38 39 40 41 42 43 44 45 46 47 48 49 50 51 52 package collection; import java.util.HashMap;import LOL.Hero;public class TestCollection { public static void main(String[] args) { HashMap<String,Hero> heroMap = new HashMap<String,Hero>(); for (int j = 0 ; j < 2000000 ; j++) { Hero h = new Hero("Hero " + j); heroMap.put(h.name, h); } System .out .println("数据准备完成"); for (int i = 0 ; i < 10 ; i++) { long start = System .currentTimeMillis(); //查找名字是Hero 1000000 的对象 Hero target = heroMap.get ("Hero 1000000"); System .out .println("找到了 hero!" + target.name); long end = System .currentTimeMillis(); long elapsed = end - start ; System .out .println("一共花了:" + elapsed + " 毫秒"); } } } 输出: 数据准备完成 找到了 hero!Hero 1000000 一共花了:0 毫秒 找到了 hero!Hero 1000000 一共花了:0 毫秒 找到了 hero!Hero 1000000 一共花了:0 毫秒 找到了 hero!Hero 1000000 一共花了:0 毫秒 找到了 hero!Hero 1000000 一共花了:0 毫秒 找到了 hero!Hero 1000000 一共花了:0 毫秒 找到了 hero!Hero 1000000 一共花了:0 毫秒 找到了 hero!Hero 1000000 一共花了:0 毫秒 找到了 hero!Hero 1000000 一共花了:0 毫秒 找到了 hero!Hero 1000000 一共花了:0 毫秒
HashMap原理与字典 在展开HashMap原理的讲解之前,首先回忆一下大家初中和高中使用的汉英字典。
比如要找一个单词对应的中文意思,假设单词是Lengendary,首先在目录找到Lengendary在第 555页。
然后,翻到第555页,这页不只一个单词,但是量已经很少了,逐一比较,很快就定位目标单词Lengendary。
555相当于就是Lengendary对应的hashcode
分析HashMap性能卓越的原因 —–hashcode概念—– 所有的对象,都有一个对应的hashcode(散列值) 比如字符串“gareen”对应的是1001 (实际上不是,这里是方便理解,假设的值) 比如字符串“temoo”对应的是1004 比如字符串“db”对应的是1008 比如字符串“annie”对应的**也**是1008
—–保存数据—– 准备一个数组,其长度是2000,并且设定特殊的hashcode算法,使得所有字符串对应的hashcode,都会落在0-1999之间 要存放名字是”gareen”的英雄,就把该英雄和名称组成一个键值对 ,存放在数组的1001这个位置上 要存放名字是”temoo”的英雄,就把该英雄存放在数组的1004这个位置上 要存放名字是”db”的英雄,就把该英雄存放在数组的1008这个位置上 要存放名字是”annie”的英雄,然而 “annie”的hashcode 1008对应的位置已经有db英雄了 ,那么就在这里创建一个链表,接在db英雄后面存放annie
—–查找数据—– 比如要查找gareen,首先计算”gareen”的hashcode是1001,根据1001这个下标,到数组中进行定位,(根据数组下标进行定位,是非常快速的 ) 发现1001这个位置就只有一个英雄,那么该英雄就是gareen. 比如要查找annie,首先计算”annie”的hashcode是1008,根据1008这个下标,到数组中进行定位,发现1008这个位置有两个英雄 ,那么就对两个英雄的名字进行逐一比较(equals ),因为此时需要比较的量就已经少很多了,很快也就可以找出目标英雄 这就是使用hashmap进行查询,非常快原理。
这是一种用空间换时间 的思维方式
HashSet判断是否重复 HashSet的数据是不能重复的,相同数据不能保存在一起,到底如何判断是否是重复的呢? 根据HashSet和HashMap的关系 ,我们了解到因为HashSet没有自身的实现,而是里面封装了一个HashMap,所以本质上就是判断HashMap的key是否重复。
再通过上一步的学习,key是否重复,是由两个步骤判断的: hashcode是否一样 如果hashcode不一样,就是在不同的坑里 ,一定是不重复的 如果hashcode一样,就是在同一个坑里 ,还需要进行equals比较 如果equals一样,则是重复数据 如果equals不一样,则是不同数据。
比较器 Comparator 假设Hero有三个属性 name,hp,damage 一个集合中放存放10个Hero,通过Collections.sort对这10个进行排序 那么到底是hp小的放前面?还是damage小的放前面? Collections.sort也无法确定 所以要指定到底按照哪种属性进行排序 这里就需要提供一个Comparator给定如何进行两个对象之间的大小 比较
1 2 3 4 5 6 7 8 9 10 11 12 13 14 15 16 17 18 19 20 21 22 23 24 25 26 27 28 29 30 31 32 33 34 35 36 37 38 39 40 41 42 43 44 45 46 47 48 49 50 51 52 53 54 55 56 57 58 59 60 61 62 63 64 65 66 67 68 69 70 71 package LOL;public class Hero { public String name; public float hp; public int damage; public Hero () { } public Hero (String name) { this .name = name; } @Override public String toString () { return "Hero{" + "name='" + name + '\'' + ", hp=" + hp + ", damage=" + damage + '}' ; } public Hero (String name, float hp, int damage) { this .name = name; this .hp = hp; this .damage = damage; } } package collection;import java.util.*;import LOL.Hero;public class TestCollection { public static void main (String[] args) { Random r = new Random (); List<Hero> heros = new ArrayList <>(); for (int i = 0 ; i < 10 ; i++) { heros.add(new Hero ("hero " + i, r.nextInt(100 ), r.nextInt(100 ))); } System.out.println("初始化后的集合:" ); System.out.println(heros); Comparator<Hero> c = new Comparator <Hero>() { @Override public int compare (Hero h1, Hero h2) { if (h1.hp >= h2.hp) { return 1 ; } else { return -1 ; } } }; Collections.sort(heros, c); System.out.println("按照血量排序后的集合:" ); System.out.println(heros); } }
Comparable 使Hero类实现Comparable接口 在类里面提供比较算法 Collections.sort就有足够的信息进行排序了,也无需额外提供比较器Comparator 注: 如果返回-1, 就表示当前的更小,否则就是更大
1 2 3 4 5 6 7 8 9 10 11 12 13 14 15 16 17 18 19 20 21 22 23 24 25 26 27 28 29 30 31 32 33 34 35 36 37 38 39 40 41 42 43 44 45 46 47 48 49 50 51 52 53 54 55 56 57 58 59 60 61 62 63 64 65 package LOL;public class Hero implements Comparable <Hero> { public String name; public float hp; public int damage; public Hero () { } public Hero (String name) { this .name =name; } public Hero (String name, float hp, int damage) { this .name = name; this .hp = hp; this .damage = damage; } @Override public String toString () { return "Hero{" + "name='" + name + '\'' + ", hp=" + hp + ", damage=" + damage + '}' ; } public int compareTo (Hero anotherHero) { if (damage < anotherHero.damage) { return 1 ; } else { return -1 ; } } } package collection;import java.util.*;import LOL.Hero;public class TestCollection { public static void main (String[] args) { Random r = new Random (); List<Hero> heros = new ArrayList <>(); for (int i = 0 ; i < 10 ; i++) { heros.add(new Hero ("hero " + i, r.nextInt(100 ), r.nextInt(100 ))); } System.out.println("初始化后的集合:" ); System.out.println(heros); Collections.sort(heros); System.out.println("按照伤害高低排序后的集合: " ); System.out.println(heros); } }
聚合操作 聚合操作 JDK8之后,引入了对集合的聚合操作,可以非常容易的遍历,筛选,比较集合中的元素。
像这样:
1 2 3 4 5 6 7 String name =heros .stream() .sorted((h1,h2)->h1.hp>h2.hp?-1 :1 ) .skip (2 ) .map (h->h.getName()) .findFirst () .get () ;
但是要用好聚合,必须先掌握Lambda表达式 ,聚合的章节讲放在Lambda与聚合操作 部分详细讲解
1 2 3 4 5 6 7 8 9 10 11 12 13 14 15 16 17 18 19 20 21 22 23 24 25 26 27 28 29 30 31 32 33 34 35 36 37 38 39 40 41 42 43 44 45 46 47 48 49 50 51 52 53 54 55 56 57 58 59 60 61 62 63 64 65 66 67 68 69 70 71 72 73 74 75 76 77 78 79 80 81 82 83 84 package LOL;public class Hero implements Comparable <Hero> { public String name; public float hp; public int damage; public Hero () { } public Hero (String name) { this .name =name; } public Hero (String name, float hp, int damage) { this .name = name; this .hp = hp; this .damage = damage; } @Override public String toString () { return "Hero{" + "name='" + name + '\'' + ", hp=" + hp + ", damage=" + damage + '}' ; } public int compareTo (Hero anotherHero) { if (damage < anotherHero.damage) { return 1 ; } else { return -1 ; } } public String getName () { return name; } } package lambda;import LOL.Hero;import java.util.*;public class TestAggregate { public static void main (String[] args) { Random r = new Random (); List<Hero> heros = new ArrayList <>(); for (int i = 0 ; i < 10 ; i++) { heros.add(new Hero ("hero " + i, r.nextInt(1000 ), r.nextInt(100 ))); } System.out.println("初始化集合后的数据 (最后一个数据重复):" ); System.out.println(heros); Collections.sort(heros,new Comparator <Hero>() { @Override public int compare (Hero o1, Hero o2) { return (int ) (o2.hp-o1.hp); } }); Hero hero = heros.get(2 ); System.out.println("通过传统方式找出来的hp第三高的英雄名称是:" + hero.name); String name = heros .stream() .sorted((h1,h2)->h1.hp>h2.hp?-1 :1 ) .skip(2 ) .map(h->h.getName()) .findFirst() .get(); System.out.println("通过聚合操作找出来的hp第三高的英雄名称是:" + name); } }
泛型 集合中的泛型 不使用泛型 不使用泛型带来的问题 ADHero(物理攻击英雄) APHero(魔法攻击英雄)都是Hero的子类 ArrayList 默认接受Object类型的对象,所以所有对象都可以放进ArrayList中 所以get(0) 返回的类型是Object 接着,需要进行强制转换才可以得到APHero类型或者ADHero类型。 如果软件开发人员记忆比较好,能记得哪个是哪个 ,还是可以的。 但是开发人员会犯错误,比如第20行,会记错,把第0个对象转换为ADHero,这样就会出现类型转换异常
使用泛型 使用泛型的好处: 泛型的用法是在容器后面添加 Type可以是类,抽象类,接口 泛型表示这种容器,只能存放APHero ,ADHero就放不进去了。
子类对象 假设容器的泛型是Hero,那么Hero的子类 APHero,ADHero都可以放进去 和Hero无关的类型Item还是放不进去
泛型的简写 1 ArrayList<Hero> heros2 = new ArrayList<>()
支持泛型的类 不支持泛型的Stack 以Stack栈 为例子,如果不使用泛型 当需要一个只能放Hero的栈的时候,就需要设计一个HeroStack 当需要一个只能放Item的栈的时候,就需要一个ItemStack
1 2 3 4 5 6 7 8 9 10 11 12 13 14 15 16 17 18 19 20 21 22 23 24 25 26 27 28 29 30 31 32 33 34 35 package generic;import LOL.Hero;import java.util.LinkedList;public class HeroStack { LinkedList<Hero> heros = new LinkedList <>(); public void push (Hero h) { heros.addLast(h); } public Hero pull () { return heros.removeLast(); } public Hero peek () { return heros.getLast(); } public static void main (String[] args) { HeroStack heroStack = new HeroStack (); for (int i = 0 ; i < 5 ; i++) { Hero h = new Hero ("hero name " + i); System.out.println("压入 hero:" + h); heroStack.push(h); } for (int i = 0 ; i < 5 ; i++) { Hero h = heroStack.pull(); System.out.println("弹出 hero:" + h); } } }
支持泛型的Stack 设计一个支持泛型的栈MyStack 设计这个类的时候,在类的声明上,加上一个,表示该类支持泛型。 T是type的缩写,也可以使用任何其他的合法的变量,比如A,B,X都可以,但是一般约定成俗使用T,代表类型。
1 2 3 4 5 6 7 8 9 10 11 12 13 14 15 16 17 18 19 20 21 22 23 24 25 26 27 28 29 30 31 32 33 34 35 36 37 package generic; import LOL .Hero ;import LOL .Item ;import java.util .LinkedList ;public class MyStack <T> { LinkedList <T> values = new LinkedList <>(); public void push (T t ) { values.addLast (t); } public T pull ( return values.removeLast (); } public T peek ( return values.getLast (); } public static void main (String [] args MyStack <Hero > heroMyStack = new MyStack <>(); heroMyStack.push (new Hero ()); MyStack <Item > itemStack = new MyStack <>(); itemStack.push (new Item ()); } }
通配符 ? extends ArrayList heroList<? extends Hero> 表示这是一个Hero泛型或者其子类泛型 heroList 的泛型可能是Hero heroList 的泛型可能是APHero heroList 的泛型可能是ADHero 所以 可以确凿的是,从heroList取出来的对象,一定是可以转型成Hero的
但是,不能往里面放东西,因为 放APHero就不满足 放ADHero又不满足
1 2 3 4 5 6 7 8 9 10 11 12 13 14 15 16 17 18 19 20 21 22 23 24 25 26 27 28 29 30 31 32 33 package generic;import java.util.ArrayList;import LOL.ADHero;import LOL.APHero;import LOL.Hero;public class TestGeneric public static void main(String [] args) { ArrayList<APHero> apHeroList = new ArrayList <APHero>(); apHeroList.add(new APHero ()); ArrayList<? extends Hero> heroList = apHeroList; Hero h= heroList.get (0 ); } }
? super ArrayList heroList<? super Hero> 表示这是一个Hero泛型或者其父类泛型 heroList的泛型可能是Hero heroList的泛型可能是Object
可以往里面插入Hero以及Hero的子类 但是取出来有风险,因为不确定取出来是Hero还是Object
1 2 3 4 5 6 7 8 9 10 11 12 13 14 15 16 17 18 19 20 21 22 23 24 25 26 27 28 29 30 31 32 33 package generic;import java.util.ArrayList;import LOL.ADHero;import LOL.APHero;import LOL.Hero;public class TestGeneric public static void main(String [] args) { ArrayList<? super Hero> heroList = new ArrayList <Object>(); heroList.add(new Hero ()); heroList.add(new APHero ()); heroList.add(new ADHero ()); heroList.add(new Object ()); Object h = heroList.get (0 ); } }
泛型通配符? 泛型通配符? 代表任意泛型 既然?代表任意泛型,那么换句话说,这个容器什么泛型都有可能
所以只能以Object的形式取出来 并且不能往里面放对象,因为不知道到底是一个什么泛型的容器
1 2 3 4 5 6 7 8 9 10 11 12 13 14 15 16 17 18 19 20 21 22 23 24 25 26 27 28 package generic;import java.util.ArrayList;import LOL.ADHero;import LOL.APHero;import LOL.Hero;import LOL.Item;public class TestGeneric { public static void main (String[] args) { ArrayList<APHero> apHeroList = new ArrayList <APHero>(); ArrayList<?> generalList = apHeroList; Object o = generalList.get(0 ); } }
总结 如果希望只取出,不插入,就使用? extends Hero 如果希望只插入,不取出,就使用? super Hero 如果希望,又能插入,又能取出,就不要用通配符?
泛型转型 对象转型 根据面向对象学习的知识,子类转父类 是一定可以成功的
1 2 3 4 5 6 7 8 9 10 11 12 13 package generic;import LOL.ADHero;import LOL.Hero;public class TestGeneric public static void main(String [] args) { Hero h = new Hero (); ADHero ad = new ADHero (); h = ad; } }
子类泛型转父类泛型 既然 子类对象 转 父类对象是可以成功的,那么子类泛型转父类泛型能成功吗? 如代码 hs的泛型是父类Hero adhs 的泛型是子类ADHero
那么 把adhs转换为hs能成功吗?
1 2 3 4 5 6 7 8 9 10 11 12 13 14 15 16 package generic;import LOL.ADHero;import LOL.Hero;import java.util.ArrayList;public class TestGeneric public static void main(String [] args) { ArrayList<Hero> hs = new ArrayList <>(); ArrayList<ADHero> adhs = new ArrayList <>(); hs = adhs; } }
假设可以转型成功 假设可以转型成功 引用hs指向了ADHero泛型的容器 作为Hero泛型的引用hs, 看上去是可以往里面加一个APHero的。 但是hs这个引用,实际上是指向的一个ADHero泛型的容器 如果能加进去,就变成了ADHero泛型的容器里放进了APHero,这就矛盾了
所以子类泛型不可以 转换为父类泛型
1 2 3 4 5 6 7 8 9 10 11 12 13 14 15 16 17 18 19 20 21 22 package generic;import LOL.ADHero;import LOL.APHero;import LOL.Hero;import java.util.ArrayList;public class TestGeneric public static void main(String [] args) { ArrayList<Hero> hs = new ArrayList <>(); ArrayList<ADHero> adhs = new ArrayList <>(); hs = adhs; hs.add(new APHero ()); } }
Lambda Hello Lambda 普通方法 使用一个普通方法,在for循环遍历中进行条件判断,筛选出满足条件的数据
1 2 3 4 5 6 7 8 9 10 11 12 13 14 15 16 17 18 19 20 21 22 23 24 25 26 27 28 29 30 31 32 33 34 35 36 37 38 39 40 41 42 43 44 45 46 47 48 49 50 51 52 53 54 55 56 57 58 59 60 61 62 63 64 65 66 67 68 69 package LOL;public class Hero implements Comparable <Hero> { public String name; public float hp; public int damage; public Hero () { } public Hero (String name) { this .name =name; } public Hero (String name, float hp, int damage) { this .name = name; this .hp = hp; this .damage = damage; } @Override public String toString () { return "Hero{" + "name='" + name + '\'' + ", hp=" + hp + ", damage=" + damage + '}' ; } public int compareTo (Hero anotherHero) { if (damage < anotherHero.damage) { return 1 ; } else { return -1 ; } } } package lambda;import LOL.Hero;import java.util.ArrayList;import java.util.List;import java.util.Random;public class TestLambda { public static void main (String[] args) { Random r = new Random (); List<Hero> heros = new ArrayList <>(); for (int i = 0 ; i < 10 ; i++) { heros.add(new Hero ("hero " + i, r.nextInt(1000 ), r.nextInt(100 ))); } System.out.println("初始化后的集合:" ); System.out.println(heros); System.out.println("筛选出 hp>100 && damange<50的英雄" ); filter(heros); } private static void filter (List<Hero> heros) { for (Hero hero : heros) { if (hero.hp > 100 && hero.damage < 50 ) { System.out.println(hero); } } } }
匿名类方式 首先准备一个接口HeroChecker,提供一个test(Hero)方法 然后通过匿名类的方式,实现这个接口
接着调用filter,传递这个checker进去进行判断,这种方式就很像通过Collections.sort在对一个Hero集合排序,需要传一个Comparator 的匿名类对象进去一样。
1 2 3 4 5 6 7 8 9 10 11 12 13 14 15 16 17 18 19 20 21 22 23 24 25 26 27 28 29 30 31 32 33 34 35 36 37 38 39 40 41 package lambda;import LOL.Hero;public interface HeroChecker { public boolean test (Hero h) ; } package lambda;import LOL.Hero;import java.util.ArrayList;import java.util.List;import java.util.Random;public class TestLambda { public static void main (String[] args) { Random r = new Random (); List<Hero> heros = new ArrayList <>(); for (int i = 0 ; i < 5 ; i++) { heros.add(new Hero ("hero " + i, r.nextInt(1000 ), r.nextInt(100 ))); } System.out.println("初始化后的集合:" ); System.out.println(heros); System.out.println("使用匿名类的方式,筛选出 hp>100 && damange<50的英雄" ); HeroChecker checker = new HeroChecker (){ public boolean test (Hero h) { return (h.hp > 100 && h.damage < 50 ); } }; filter(heros, checker); } private static void filter (List<Hero> heros, HeroChecker checker) { for (Hero hero : heros) { if (checker.test(hero)) { System.out.println(hero); } } } }
Lambda方式 使用Lambda方式筛选出数据
1 filter(heros,(h) ->100 && h.damage<50 );
同样是调用filter方法,从上一步的传递匿名类对象,变成了传递一个Lambda表达式进去
1 h ->h.hp>100 && h.damage<50
咋一看Lambda表达式似乎不好理解,其实很简单,下一步讲解如何从一个匿名类一点点演变成 Lambda表达式
1 2 3 4 5 6 7 8 9 10 11 12 13 14 15 16 17 18 19 20 21 22 23 24 25 26 27 28 29 package lambda;import LOL.Hero;import java.util.ArrayList;import java.util.List;import java.util.Random;public class TestLambda { public static void main (String[] args) { Random r = new Random (); List<Hero> heros = new ArrayList <>(); for (int i = 0 ; i < 5 ; i++) { heros.add(new Hero ("hero " + i, r.nextInt(1000 ), r.nextInt(100 ))); } System.out.println("初始化后的集合:" ); System.out.println(heros); System.out.println("使用Lamdba的方式,筛选出 hp>100 && damange<50的英雄" ); filter(heros, h->h.hp > 100 && h.damage < 50 ); } private static void filter (List<Hero> heros, HeroChecker checker) { for (Hero hero : heros) { if (checker.test(hero)) { System.out.println(hero); } } } }
从匿名类演变成Lambda表达式 Lambda表达式可以看成是匿名类一点点演变过来
1.匿名类的正常写法
1 2 3 4 5 HeroChecker c1 = new HeroChecker () { public boolean test (Hero h) { return (h.hp>100 && h.damage<50 ); } };
2.把外面的壳子去掉 只保留方法参数 和方法体 参数和方法体之间加上符号 ->
1 2 3 HeroChecker c2 = (Hero h) -> return h.hp>100 && h.damage<50 ; };
3.把return和{}去掉
1 HeroChecker c3 = (Hero h) ->100 && h.damage<50 ;
4.把 参数类型和圆括号去掉(只有一个参数的时候,才可以去掉圆括号)
1 HeroChecker c4 = h ->h.hp>100 && h.damage<50 ;
5.把c4作为参数传递进去
6.直接把表达式传递进去
1 filter (heros, h -> h.hp > 100 && h.damage < 50 );
匿名方法 与匿名类 概念相比较, Lambda 其实就是匿名方法 ,这是一种把方法作为参数 进行传递的编程思想。
虽然代码是这么写
但是,Java会在背后,悄悄的,把这些都还原成匿名类方式 。 引入Lambda表达式,会使得代码更加紧凑,而不是各种接口和匿名类到处飞。
Lambda的弊端 Lambda表达式虽然带来了代码的简洁,但是也有其局限性。 \1. 可读性差,与啰嗦的 但是清晰的 匿名类代码结构比较起来,Lambda表达式一旦变得比较长,就难以理解 \2. 不便于调试,很难在Lambda表达式中增加调试信息,比如日志 \3. 版本支持,Lambda表达式在JDK8版本中才开始支持,如果系统使用的是以前的版本,考虑系统的稳定性等原因,而不愿意升级,那么就无法使用。
Lambda比较适合用在简短的业务代码中,并不适合用在复杂的系统中,会加大维护成本。
方法引用 引用静态方法 1 2 3 4 5 6 7 8 9 10 11 12 13 14 15 16 17 18 19 20 21 22 23 24 25 26 27 28 29 30 31 32 33 34 35 36 37 38 39 40 41 42 43 44 45 46 47 48 package lambda; import LOL.Hero;import java.util.ArrayList;import java.util.List;import java.util.Random;public class TestLambda { public static void main(String[] args) { Random r = new Random(); List<Hero> heros = new ArrayList<>(); for (int i = 0 ; i < 5 ; i++) { heros.add (new Hero("hero " + i, r.nextInt(1000 ), r.nextInt(100 ))); } System .out .println("初始化后的集合:"); System .out .println(heros); HeroChecker c = new HeroChecker() { public boolean test(Hero h) { return h.hp>100 && h.damage<50 ; } }; System .out .println("使用匿名类过滤"); filter (heros, c); System .out .println("使用Lambda表达式"); filter (heros, h->h.hp>100 && h.damage<50 ); System .out .println("在Lambda表达式中使用静态方法"); filter (heros, h -> TestLambda.testHero(h)); System .out .println("直接引用静态方法"); filter (heros, TestLambda::testHero); } private static boolean testHero(Hero h) { return h.hp>100 && h.damage<50 ; } private static void filter (List<Hero> heros, HeroChecker checker) { for (Hero hero : heros) { if (checker.test(hero)) { System .out .println(hero); } } } }
引用对象方法 与引用静态方法很类似,只是传递方法的时候,需要一个对象的存在
1 2 TestLambda testLambda = new TestLambda() filter(heros , testLambda::testHero )
这种方式叫做引用对象方法
1 2 3 4 5 6 7 8 9 10 11 12 13 14 15 16 17 18 19 20 21 22 23 24 25 26 27 28 29 30 31 32 33 34 35 36 package lambda;import LOL.Hero;import java.util.ArrayList;import java.util.List;import java.util.Random;public class TestLambda { public static void main (String[] args) { Random r = new Random (); List<Hero> heros = new ArrayList <>(); for (int i = 0 ; i < 5 ; i++) { heros.add(new Hero ("hero " + i, r.nextInt(1000 ), r.nextInt(100 ))); } System.out.println("初始化后的集合:" ); System.out.println(heros); System.out.println("使用引用对象方法 的过滤结果:" ); TestLambda testLambda = new TestLambda (); filter(heros, testLambda::testHero); } private boolean testHero (Hero h) { return h.hp>100 && h.damage<50 ; } private static void filter (List<Hero> heros, HeroChecker checker) { for (Hero hero : heros) { if (checker.test(hero)) { System.out.println(hero); } } } }
引用容器中的对象的方法 首先为Hero添加一个方法
1 2 3 public boolean matched(){ return this .hp>100 && this .damage<50 ; }
使用Lambda表达式
1 filter (heros,h-> h.hp>100 && h.damage<50 );
在Lambda表达式中调用容器中的对象Hero的方法matched
1 filter(heros ,h-> h.matched() )
matched恰好就是容器中的对象Hero的方法,那就可以进一步改写为
1 filter (heros, Hero::matched);
这种方式就叫做引用容器中的对象的方法
1 2 3 4 5 6 7 8 9 10 11 12 13 14 15 16 17 18 19 20 21 22 23 24 25 26 27 28 29 30 31 32 33 34 35 36 37 38 39 40 package lambda; import LOL.Hero;import java.util.ArrayList;import java.util.List;import java.util.Random;public class TestLambda { public static void main(String[] args) { Random r = new Random(); List<Hero> heros = new ArrayList<>(); for (int i = 0 ; i < 5 ; i++) { heros.add (new Hero("hero " + i, r.nextInt(1000 ), r.nextInt(100 ))); } System .out .println("初始化后的集合:"); System .out .println(heros); System .out .println("Lambda表达式:"); filter (heros,h-> h.hp>100 && h.damage<50 ); System .out .println("Lambda表达式中调用容器中的对象的matched方法:"); filter (heros, h -> h.matched()); System .out .println("引用容器中对象的方法 之过滤结果:"); filter (heros, Hero::matched); } private boolean testHero(Hero h) { return h.hp>100 && h.damage<50 ; } private static void filter (List<Hero> heros, HeroChecker checker) { for (Hero hero : heros) { if (checker.test(hero)) { System .out .println(hero); } } } }
引用构造器 有的接口中的方法会返回一个对象,比如java.util.function.Supplier 提供 了一个get方法,返回一个对象。
1 2 3 4 5 6 7 8 9 10 11 12 13 14 15 16 17 18 19 20 21 22 23 24 25 26 27 28 29 package lambda;import java.util.ArrayList;import java.util.List;import java.util.function.Supplier;public class TestLambda { public static void main (String[] args) { Supplier<List> s = new Supplier <List>() { @Override public List get () { return new ArrayList (); } }; List list1 = getList(s); List list2 = getList(()->new ArrayList ()); List list3 = getList(ArrayList::new ); } public static List getList (Supplier<List> s) { return s.get(); } }
聚合操作 传统方式与聚合操作方式遍历数据 遍历数据的传统方式就是使用for循环,然后条件判断,最后打印出满足条件的数据
1 2 3 4 for (Hero h : heros) { if (h.hp > 100 && h.damage < 50 ) System .out .println(h.name); }
使用聚合操作方式,画风 就发生了变化:
1 2 3 4 5 6 7 8 9 10 11 12 13 14 15 16 17 18 19 20 21 22 23 24 25 26 27 28 29 30 31 32 33 34 35 heros .stream() .filter (h -> h.hp > 100 && h.damage < 50 ) .forEach (h -> System .out .println(h.name)); package lambda; import LOL.Hero;import java.util.*;public class TestAggregate { public static void main(String[] args) { Random r = new Random(); List<Hero> heros = new ArrayList<>(); for (int i = 0 ; i < 5 ; i++) { heros.add (new Hero("hero " + i, r.nextInt(1000 ), r.nextInt(100 ))); } System .out .println("初始化后的集合:"); System .out .println(heros); System .out .println("查询条件:hp>100 && damage<50"); System .out .println("通过传统操作方式找出满足条件的数据:"); for (Hero h : heros) { if (h.hp > 100 && h.damage < 50 ) System .out .println(h.name); } System .out .println("通过聚合操作方式找出满足条件的数据:"); heros .stream() .filter (h -> h.hp > 100 && h.damage < 50 ) .forEach (h -> System .out .println(h.name)); } }
Stream和管道的概念 1 2 3 4 heros .stream() .filter(h -> h.hp > 100 && h.damage < 50 ) .for Each(h -> System.out .println (h .name ) );
要了解聚合操作,首先要建立Stream 和管道 的概念 Stream 和Collection结构化的数据不一样,Stream是一系列的元素,就像是生产线上的罐头一样,一串串的出来。 管道 指的是一系列的聚合操作。
管道又分3个部分 管道源 :在这个例子里,源是一个List 中间操作 : 每个中间操作,又会返回一个Stream,比如.filter()又返回一个Stream, 中间操作是“懒”操作,并不会真正进行遍历。 结束操作 :当这个操作执行后,流就被使用“光”了,无法再被操作。所以这必定是流的最后一个操作。 结束操作不会返回Stream,但是会返回int、float、String、 Collection或者像forEach,什么都不返回, 结束操作才进行真正的遍历行为,在遍历的时候,才会去进行中间操作的相关判断
注: 这个Stream和I/O章节的InputStream,OutputStream是不一样的概念。
管道源 把Collection切换成管道源很简单,调用stream()就行了。
但是数组却没有stream()方法,需要使用
或者
1 2 3 4 5 6 7 8 9 10 11 12 13 14 15 16 17 18 19 20 21 22 23 24 25 26 27 Stream .of (hs)package lambda; import LOL.Hero; import java.lang.reflect.Array; import java.util.*; public class TestAggregate { public static void main(String[] args) { Random r = new Random() ; List<Hero> heros = new ArrayList<>() ; for (int i = 0 ; i < 5 ; i++) { heros.add(new Hero("hero " + i , r .nextInt (1000) , r.nextInt(100) )); } heros .stream() .for Each(h -> System.out .println (h .name ) ); Hero[] hs = heros.to Array(new Hero[heros .size () ]); Arrays . .for Each(h -> System.out .println (h .name ) ); } }
中间操作 每个中间操作,又会返回一个Stream,比如.filter()又返回一个Stream, 中间操作是“懒”操作,并不会真正进行遍历。 中间操作比较多,主要分两类 对元素进行筛选 和 转换为其他形式的流 对元素进行筛选: filter 匹配 distinct 去除重复(根据equals判断) sorted 自然排序 sorted(Comparator) 指定排序 limit 保留 skip 忽略 转换为其他形式的流 mapToDouble 转换为double的流 map 转换为任意类型的流
1 2 3 4 5 6 7 8 9 10 11 12 13 14 15 16 17 18 19 20 21 22 23 24 25 26 27 28 29 30 31 32 33 34 35 36 37 38 39 40 41 42 43 44 45 46 47 48 49 50 51 52 53 54 55 56 57 58 59 60 61 62 package lambda; import LOL.Hero; import java.util.*; public class TestAggregate { public static void main(String[] args) { Random r = new Random() ; List<Hero> heros = new ArrayList<>() ; for (int i = 0 ; i < 5 ; i++) { heros.add(new Hero("hero " + i , r .nextInt (1000) , r.nextInt(100) )); } heros.add(heros.get(0 )); System ."初始化集合后的数据 (最后一个数据重复):" ); System . System ."满足条件hp>100&&damage<50的数据" ); heros .stream() .filter(h->h.hp > 100 && h.damage < 50 ) .for Each(h -> System.out .println (h ) ); System ."去除重复的数据,去除标准是看equals" ); heros .stream() .distinct() .for Each(h ->System.out .println (h ) ); System ."按照血量排序" ); heros .stream() .sorted((h1, h2)->h1.hp >= h2.hp ? 1 : -1 ) .for Each(h -> System.out .println (h ) ); System ."保留3个" ); heros .stream() .limit(3 ) .for Each(h ->System.out .println (h ) ); System ."忽略前3个" ); heros .stream() .skip(3 ) .for Each(h ->System.out .println (h ) ); System ."转换为double的Stream" ); heros .stream() .mapToDouble(Hero::getHp ) .for Each(h ->System.out .println (h ) ); System ."转换任意类型的Stream" ); heros .stream() .map(h-> h.name + " - " + h.hp + " - " + h.damage) .for Each(h ->System.out .println (h ) ); } }
结束操作 当进行结束操作后,流就被使用“光”了,无法再被操作。所以这必定是流的最后一个操作。 结束操作不会返回Stream,但是会返回int、float、String、 Collection或者像forEach,什么都不返回,。 结束操作才真正进行遍历行为,前面的中间操作也在这个时候,才真正的执行。 常见结束操作如下: forEach() 遍历每个元素 toArray() 转换为数组 min(Comparator) 取最小的元素 max(Comparator) 取最大的元素 count() 总数 findFirst() 第一个元素
1 2 3 4 5 6 7 8 9 10 11 12 13 14 15 16 17 18 19 20 21 22 23 24 25 26 27 28 29 30 31 32 33 34 35 36 37 38 39 40 41 42 43 44 45 46 47 48 49 50 51 52 53 54 55 56 57 58 59 package lambda; import LOL.Hero;import java.util.*;public class TestAggregate { public static void main(String [] args) { Random r = new Random(); List<Hero> heros = new ArrayList<>(); for (int i = 0 ; i < 5 ; i++) { heros.add(new Hero("hero " + i, r.nextInt(1000 ), r.nextInt(100 ))); } System.out.println("遍历集合中的每个数据" ); heros .stream() .forEach(h->System.out.print (h)); System.out.println("返回一个数组" ); Object [] hs = heros .stream() .toArray(); System.out.println(Arrays.toString(hs)); System.out.println("返回伤害最低的那个英雄" ); Hero minDamageHero = heros .stream() .min((h1, h2)->h2.damage-h2.damage) .get () ; System .out .println (minDamageHero) ; System .out .println ("返回伤害最高的那个英雄" ) ; Hero mxnDamageHero = heros .stream () .max ((h1,h2)->h1.damage-h2.damage) .get () ; System .out .println (mxnDamageHero) ; System .out .println ("流中数据的总数" ) ; long count = heros .stream () .count () ; System .out .println (count) ; System .out .println ("第一个英雄" ) ; Hero firstHero = heros .stream () .findFirst () .get () ; System .out .println (firstHero) ; } }
多线程 启动一个线程 多线程即在同一时间,可以做多件事情。
创建多线程有3种方式,分别是继承线程类 ,实现Runnable接口 ,匿名类
线程概念 首先要理解进程(Processor)和线程(Thread)的区别 进程: 启动一个LOL.exe就叫一个进程。 接着又启动一个DOTA.exe,这叫两个进程。 线程: 线程是在进程内部同时做的事情,比如在LOL里,有很多事情要同时做,比如”盖伦” 击杀“提莫”,同时 “赏金猎人”又在击杀“盲僧”,这就是由多线程来实现的。
此处代码演示的是不使用多线程的情况 : 只有在盖伦杀掉提莫后,赏金猎人才开始杀盲僧
1 2 3 4 5 6 7 8 9 10 11 12 13 14 15 16 17 18 19 20 21 22 23 24 25 26 27 28 29 30 31 32 33 34 35 36 37 38 39 40 41 42 43 44 45 46 47 48 49 50 51 52 53 54 55 56 57 58 59 60 61 62 package multiplethread;public class Hero2 { public String name; public float hp; public int damage; public void attackHero (Hero2 h) { try { Thread.sleep(1000 ); } catch (InterruptedException e) { e.printStackTrace(); } h.hp -= damage; System.out.format("%s 正在攻击 %s, %s 的血变成了 %.0f%n" , name, h.name, h.name, h.hp); if (h.isDead()) { System.out.println(h.name + " 死了!" ); } } public boolean isDead () { return 0 >= hp; } } package multiplethread;public class TestThread { public static void main (String[] args) { Hero2 gareen= new Hero2 (); gareen.name = "盖伦" ; gareen.hp = 616 ; gareen.damage = 50 ; Hero2 teemo = new Hero2 (); teemo.name = "提莫" ; teemo.hp = 300 ; teemo.damage = 30 ; Hero2 bh = new Hero2 (); bh.name = "赏金猎人" ; bh.hp = 500 ; bh.damage = 65 ; Hero2 leesin = new Hero2 (); leesin.name = "盲僧" ; leesin.hp = 455 ; leesin.damage = 80 ; while (!teemo.isDead()){ gareen.attackHero(teemo); } while (!leesin.isDead()){ bh.attackHero(leesin); } } }
创建多线程-继承线程类 使用多线程,就可以做到盖伦在攻击提莫的同时 ,赏金猎人也在攻击盲僧 设计一个类KillThread 继承Thread ,并且重写run方法 启动线程办法: 实例化一个KillThread对象,并且调用其start 方法 就可以观察到 赏金猎人攻击盲僧的同时 ,盖伦也在攻击提莫
1 2 3 4 5 6 7 8 9 10 11 12 13 14 15 16 17 18 19 20 21 22 23 24 25 26 27 28 29 30 31 32 33 34 35 36 37 38 39 40 41 42 43 44 45 46 47 48 49 50 51 52 53 54 55 56 57 58 59 60 61 62 63 64 65 66 67 68 69 70 71 72 73 74 package multiplethread;public class Hero2 { public String name; public float hp; public int damage; public void attackHero (Hero2 h) { try { Thread.sleep(1000 ); } catch (InterruptedException e) { e.printStackTrace(); } h.hp -= damage; System.out.format("%s 正在攻击 %s, %s 的血变成了 %.0f%n" , name, h.name, h.name, h.hp); if (h.isDead()) { System.out.println(h.name + " 死了!" ); } } public boolean isDead () { return 0 >= hp; } } package multiplethread;public class KillThread extends Thread { private Hero2 h1; private Hero2 h2; public KillThread (Hero2 h1, Hero2 h2) { this .h1 = h1; this .h2 = h2; } public void run () { while (!h2.isDead()) { h1.attackHero(h2); } } } package multiplethread;public class TestThread { public static void main (String[] args) { Hero2 gareen= new Hero2 (); gareen.name = "盖伦" ; gareen.hp = 616 ; gareen.damage = 50 ; Hero2 teemo = new Hero2 (); teemo.name = "提莫" ; teemo.hp = 300 ; teemo.damage = 30 ; Hero2 bh = new Hero2 (); bh.name = "赏金猎人" ; bh.hp = 500 ; bh.damage = 65 ; Hero2 leesin = new Hero2 (); leesin.name = "盲僧" ; leesin.hp = 455 ; leesin.damage = 80 ; KillThread killThread1 = new KillThread (gareen, teemo); killThread1.start(); KillThread killThread2 = new KillThread (bh, leesin); killThread2.start(); } }
创建多线程-实现Runnable接口 创建类Battle,实现Runnable接口 启动的时候,首先创建一个Battle对象,然后再根据该battle对象创建一个线程对象,并启动
1 2 Battle battle1 = new Battle(gareen ,teemo ) ; new Thread(battle1 ) .start() ;
battle1 对象实现了Runnable接口,所以有run方法,但是直接调用run方法,并不会启动一个新的线程。 必须,借助一个线程对象的start()方法,才会启动一个新的线程。 所以,在创建Thread对象的时候,把battle1作为构造方法的参数传递进去,这个线程启动的时候,就会去执行battle1.run()方法了。
1 2 3 4 5 6 7 8 9 10 11 12 13 14 15 16 17 18 19 20 21 22 23 24 25 26 27 28 29 30 31 32 33 34 35 36 37 38 39 40 41 42 43 44 45 46 47 package multiplethread;public class Battle implements Runnable private Hero2 h1; private Hero2 h2; public Battle(Hero2 h1, Hero2 h2) { this .h1 = h1; this .h2 = h2; } public void run() { while (!h2.isDead()) { h1.attackHero(h2); } } } package multiplethread;public class TestThread public static void main(String [] args) { Hero2 gareen= new Hero2 (); gareen.name = "盖伦" ; gareen.hp = 616 ; gareen.damage = 50 ; Hero2 teemo = new Hero2 (); teemo.name = "提莫" ; teemo.hp = 300 ; teemo.damage = 30 ; Hero2 bh = new Hero2 (); bh.name = "赏金猎人" ; bh.hp = 500 ; bh.damage = 65 ; Hero2 leesin = new Hero2 (); leesin.name = "盲僧" ; leesin.hp = 455 ; leesin.damage = 80 ; Battle battle1 = new Battle (gareen, teemo); new Thread (battle1).start(); Battle battle2 = new Battle (bh, leesin); new Thread (battle2).start(); } }
创建多线程-匿名类 使用匿名类 ,继承Thread,重写run方法,直接在run方法中写业务代码 匿名类的一个好处是可以很方便的访问外部的局部变量。 前提是外部的局部变量需要被声明为final。(JDK7以后就不需要了)
1 2 3 4 5 6 7 8 9 10 11 12 13 14 15 16 17 18 19 20 21 22 23 24 25 26 27 28 29 30 31 32 33 34 35 36 37 38 39 40 41 42 43 44 45 46 package multiplethread;public class TestThread { public static void main (String[] args) { Hero2 gareen= new Hero2 (); gareen.name = "盖伦" ; gareen.hp = 616 ; gareen.damage = 50 ; final Hero2 teemo = new Hero2 (); teemo.name = "提莫" ; teemo.hp = 300 ; teemo.damage = 30 ; Hero2 bh = new Hero2 (); bh.name = "赏金猎人" ; bh.hp = 500 ; bh.damage = 65 ; Hero2 leesin = new Hero2 (); leesin.name = "盲僧" ; leesin.hp = 455 ; leesin.damage = 80 ; Thread t1 = new Thread () { public void run () { while (!teemo.isDead()) { gareen.attackHero(teemo); } } }; t1.start(); Thread t2 = new Thread () { public void run () { while (!leesin.isDead()) { bh.attackHero(leesin); } } }; t2.start(); } }
创建多线程的三种方式 把上述3种方式再整理一下:
\1. 继承Thread类 \2. 实现Runnable接口 \3. 匿名类的方式
注: 启动线程是start()方法,run()并不能启动一个新的线程
常见线程方法 当前线程暂停 Thread.sleep(1000); 表示当前线程暂停1000毫秒 ,其他线程不受影响 Thread.sleep(1000); 会抛出InterruptedException 中断异常,因为当前线程sleep的时候,有可能被停止,这时就会抛出 InterruptedException
1 2 3 4 5 6 7 8 9 10 11 12 13 14 15 16 17 18 19 20 package multiplethread; public class TestThread { public static void main (String[] args ) Thread t1 = new Thread() { public void run () int seconds = 0 ; while (true ) { try { Thread.sleep(1000 ); } catch (InterruptedException e) { e.printStackTrace(); } System.out .printf("已经玩了LOL %d 秒%n" , seconds++); } } }; t1.start(); } }
加入到当前线程中 首先解释一下主线程 的概念 所有进程,至少会有一个线程即主线程,即main方法开始执行,就会有一个看不见 的主线程存在。 在42行执行t.join,即表明在主线程中加入该线程 。 主线程会等待该线程结束完毕, 才会往下运行。
1 2 3 4 5 6 7 8 9 10 11 12 13 14 15 16 17 18 19 20 21 22 23 24 25 26 27 28 29 30 31 32 33 34 35 36 37 38 39 40 41 42 43 44 45 46 47 48 49 50 51 52 53 package multiplethread;public class TestThread { public static void main (String[] args) { final Hero2 gareen= new Hero2 (); gareen.name = "盖伦" ; gareen.hp = 616 ; gareen.damage = 50 ; final Hero2 teemo = new Hero2 (); teemo.name = "提莫" ; teemo.hp = 300 ; teemo.damage = 30 ; final Hero2 bh = new Hero2 (); bh.name = "赏金猎人" ; bh.hp = 500 ; bh.damage = 65 ; final Hero2 leesin = new Hero2 (); leesin.name = "盲僧" ; leesin.hp = 455 ; leesin.damage = 80 ; Thread t1 = new Thread () { public void run () { while (!teemo.isDead()) { gareen.attackHero(teemo); } } }; t1.start(); try { t1.join(); } catch (InterruptedException e) { e.printStackTrace(); } Thread t2 = new Thread () { public void run () { while (!leesin.isDead()) { bh.attackHero(leesin); } } }; t2.start(); } }
线程优先级 当线程处于竞争关系的时候,优先级高的线程会有更大的几率获得CPU资源 为了演示该效果,要把暂停时间去掉,多条线程各自会尽力去占有CPU资源 同时把英雄的血量增加100倍,攻击减低到1,才有足够的时间观察到优先级的演示 如图可见,线程1的优先级是MAX_PRIORITY,所以它争取到了更多的CPU资源执行代码
1 2 3 4 5 6 7 8 9 10 11 12 13 14 15 16 17 18 19 20 21 22 23 24 25 26 27 28 29 30 31 32 33 34 35 36 37 38 39 40 41 42 43 44 45 46 package multiplethread;public class TestThread { public static void main (String[] args) { final Hero2 gareen= new Hero2 (); gareen.name = "盖伦" ; gareen.hp = 6160 ; gareen.damage = 1 ; final Hero2 teemo = new Hero2 (); teemo.name = "提莫" ; teemo.hp = 3000 ; teemo.damage = 1 ; final Hero2 bh = new Hero2 (); bh.name = "赏金猎人" ; bh.hp = 5000 ; bh.damage = 1 ; final Hero2 leesin = new Hero2 (); leesin.name = "盲僧" ; leesin.hp = 4505 ; leesin.damage = 1 ; Thread t1 = new Thread () { public void run () { while (!teemo.isDead()) { gareen.attackHero(teemo); } } }; Thread t2 = new Thread () { public void run () { while (!leesin.isDead()) { bh.attackHero(leesin); } } }; t1.setPriority(Thread.MAX_PRIORITY); t2.setPriority(Thread.MIN_PRIORITY); t1.start(); t2.start(); } }
临时暂停 当前线程,临时暂停,使得其他线程可以有更多的机会占用CPU资源
1 2 3 4 5 6 7 8 9 10 11 12 13 14 15 16 17 18 19 20 21 22 23 24 25 26 27 28 29 30 31 32 33 34 35 36 37 38 39 40 41 42 43 44 45 46 47 48 package multiplethread;public class TestThread { public static void main (String[] args) { final Hero2 gareen= new Hero2 (); gareen.name = "盖伦" ; gareen.hp = 61600 ; gareen.damage = 1 ; final Hero2 teemo = new Hero2 (); teemo.name = "提莫" ; teemo.hp = 30000 ; teemo.damage = 1 ; final Hero2 bh = new Hero2 (); bh.name = "赏金猎人" ; bh.hp = 50000 ; bh.damage = 1 ; final Hero2 leesin = new Hero2 (); leesin.name = "盲僧" ; leesin.hp = 45050 ; leesin.damage = 1 ; Thread t1 = new Thread () { public void run () { while (!teemo.isDead()) { gareen.attackHero(teemo); } } }; Thread t2 = new Thread () { public void run () { while (!leesin.isDead()) { Thread.yield(); bh.attackHero(leesin); } } }; t1.setPriority(5 ); t2.setPriority(5 ); t1.start(); t2.start(); } }
守护线程 守护线程的概念是: 当一个进程里,所有的线程都是守护线程的时候,结束当前进程。
就好像一个公司有销售部,生产部这些和业务挂钩的部门。 除此之外,还有后勤,行政等这些支持部门。
如果一家公司销售部,生产部都解散了,那么只剩下后勤和行政,那么这家公司也可以解散了。
守护线程就相当于那些支持部门,如果一个进程只剩下守护线程,那么进程就会自动结束。
守护线程通常会被用来做日志,性能统计等工作。
1 2 3 4 5 6 7 8 9 10 11 12 13 14 15 16 17 18 19 20 21 22 package multiplethread; public class TestThread { public static void main (String[] args ) Thread t1 = new Thread() { public void run () int seconds = 0 ; while (true ) { try { Thread.sleep(1000 ); } catch (InterruptedException e) { e.printStackTrace(); } System.out .printf("已经玩了LOL %d 秒%n" , seconds++); } } }; t1.setDaemon(true ); t1.start(); } }
同步 多线程的同步问题指的是多个线程同时修改一个数据的时候,可能导致的问题
多线程的问题,又叫Concurrency 问题
演示同步问题 假设盖伦有10000滴血,并且在基地里,同时又被对方多个英雄攻击 就是有多个线程在减少盖伦的hp 同时又有多个线程在恢复盖伦的hp 假设线程的数量是一样的,并且每次改变的值都是1,那么所有线程结束后,盖伦应该还是10000滴血。 但是。。。
注意 : 不是每一次运行都会看到错误的数据产生,多运行几次,或者增加运行的次数
1 2 3 4 5 6 7 8 9 10 11 12 13 14 15 16 17 18 19 20 21 22 23 24 25 26 27 28 29 30 31 32 33 34 35 36 37 38 39 40 41 42 43 44 45 46 47 48 49 50 51 52 53 54 55 56 57 58 59 60 61 62 63 64 65 66 67 68 69 70 71 72 73 74 75 76 77 78 79 80 81 82 83 84 85 86 87 88 89 90 91 92 93 94 95 96 97 98 99 100 101 102 103 104 105 106 107 108 109 110 111 112 113 114 115 116 package multiplethread; public class Hero2 { public String name; public float hp; public int damage; public void recover () hp += 1 ; } public void hurt () hp -= 1 ; } public void attackHero (Hero2 h ) h.hp -= damage; System.out .format("%s 正在攻击 %s, %s 的血变成了 %.0f%n" , name, h.name, h.name, h.hp); if (h.isDead()) { System.out .println(h.name + " 死了!" ); } } public boolean isDead () return 0 >= hp; } } package multiplethread; public class TestThread { public static void main (String[] args ) final Hero2 gareen = new Hero2(); gareen.name = "盖伦" ; gareen.hp = 10000 ; System.out .printf("盖伦的初始血量是 %.0f%n" , gareen.hp); int n = 10000 ; Thread[] addThreads = new Thread[n]; Thread[] reduceThreads = new Thread[n]; for (int i = 0 ; i < n; i++) { Thread t = new Thread() { public void run () gareen.recover(); try { Thread.sleep(100 ); } catch (InterruptedException e) { e.printStackTrace(); } } }; t.start(); addThreads[i] = t; } for (int i = 0 ; i < n; i++) { Thread t = new Thread(){ public void run () gareen.hurt(); try { Thread.sleep(100 ); } catch (InterruptedException e) { e.printStackTrace(); } } }; t.start(); reduceThreads[i] = t; } for (Thread t : addThreads) { try { t.join (); } catch (InterruptedException e) { e.printStackTrace(); } } for (Thread t : reduceThreads) { try { t.join (); } catch (InterruptedException e) { e.printStackTrace(); } } System.out .printf("%d个增加线程和%d个减少线程结束后%n盖伦的血量变成了 %.0f%n" , n,n,gareen.hp); } } 输出: 盖伦的初始血量是 10000 10000 个增加线程和10000 个减少线程结束后 盖伦的血量变成了 9993
分析同步问题产生的原因 \1. 假设增加线程 先进入,得到的hp是10000 \2. 进行增加运算 \3. 正在做增加运算的时候,还没有来得及修改hp的值 ,减少线程 来了 \4. 减少线程得到的hp的值也是10000 \5. 减少线程进行减少运算 \6. 增加线程运算结束,得到值10001,并把这个值赋予hp \7. 减少线程也运算结束,得到值9999,并把这个值赋予hp hp,最后的值就是9999 虽然经历了两个线程各自增减了一次,本来期望还是原值10000,但是却得到了一个9999 这个时候的值9999是一个错误的值,在业务上又叫做脏数据
解决思路 总体解决思路是: 在增加线程访问hp期间,其他线程不可以访问hp \1. 增加线程获取到hp的值,并进行运算 \2. 在运算期间,减少线程试图来获取hp的值,但是不被允许 \3. 增加线程运算结束,并成功修改hp的值为10001 \4. 减少线程,在增加线程做完后,才能访问hp的值,即10001 \5. 减少线程运算,并得到新的值10000
synchronized 同步对象概念 解决上述问题之前,先理解 synchronized 关键字的意义 如下代码:
1 2 3 4 Object someObject = new Object ();synchronized (someObject ){ }
synchronized表示当前线程,独占 对象 someObject 当前线程独占 了对象someObject,如果有*其他线程*试图占有对象 someObject, *,直到当前线程释放对someObject的占用。 someObject 又叫同步对象,所有的对象,都可以作为同步对象 为了达到同步的效果,必须使用同一个同步对象
释放同步对象 的方式: synchronized 块自然结束,或者有异常抛出
1 2 3 4 5 6 7 8 9 10 11 12 13 14 15 16 17 18 19 20 21 22 23 24 25 26 27 28 29 30 31 32 33 34 35 36 37 38 39 40 41 42 43 44 45 46 47 48 49 50 51 52 53 package multiplethread; import java.text.SimpleDateFormat;import java.util.Date;public class TestThread { public static String now() { return new SimpleDateFormat("HH:mm:ss").format(new Date ()); } public static void main(String[] args) { final Object someObject = new Object (); Thread t1 = new Thread() { public void run() { try { System .out .println(now() + " t1 线程已经运行"); System .out .println(now() + this.getName() + " 试图占有对象:someObject"); synchronized (someObject) { System .out .println(now() + this.getName() + " 占有对象:someObject"); Thread.sleep(5000 ); System .out .println(now() + this.getName() + " 释放对象:someObject"); } System .out .println(now() + " t1 线程结束"); } catch (InterruptedException e) { e.printStackTrace(); } } }; t1.setName("t1"); t1.start (); Thread t2 = new Thread(){ public void run(){ try { System .out .println( now()+" t2 线程已经运行"); System .out .println( now()+this.getName()+ " 试图占有对象:someObject"); synchronized (someObject) { System .out .println( now()+this.getName()+ " 占有对象:someObject"); Thread.sleep(5000 ); System .out .println( now()+this.getName()+ " 释放对象:someObject"); } System .out .println(now()+" t2 线程结束"); } catch (InterruptedException e) { // TODO Auto-generated catch block e.printStackTrace(); } } }; t2.setName(" t2"); t2.start (); } }
使用synchronized 解决同步问题 所有需要修改hp的地方,有要建立在占有someObject的基础上 。 而对象 someObject在同一时间,只能被一个线程占有。 间接地,导致同一时间,hp只能被一个线程修改。
1 2 3 4 5 6 7 8 9 10 11 12 13 14 15 16 17 18 19 20 21 22 23 24 25 26 27 28 29 30 31 32 33 34 35 36 37 38 39 40 41 42 43 44 45 46 47 48 49 50 51 52 53 54 55 56 57 58 59 60 61 62 63 64 65 66 67 68 69 70 71 package multiplethread;public class TestThread { public static void main (String[] args) { final Object someObject = new Object (); final Hero2 gareen = new Hero2 (); gareen.name = "盖伦" ; gareen.hp = 10000 ; int n = 10000 ; Thread[] addThreads = new Thread [n]; Thread[] reduceThreads = new Thread [n]; for (int i = 0 ; i < n; i++) { Thread t = new Thread () { public void run () { synchronized (someObject) { gareen.recover(); } try { Thread.sleep(100 ); } catch (InterruptedException e) { e.printStackTrace(); } } }; t.start(); addThreads[i] = t; } for (int i = 0 ; i < n; i++) { Thread t = new Thread (){ public void run () { synchronized (someObject) { gareen.hurt(); } try { Thread.sleep(100 ); } catch (InterruptedException e) { e.printStackTrace(); } } }; t.start(); reduceThreads[i] = t; } for (Thread t : addThreads) { try { t.join(); } catch (InterruptedException e) { e.printStackTrace(); } } for (Thread t : reduceThreads) { try { t.join(); } catch (InterruptedException e) { e.printStackTrace(); } } System.out.printf("%d个增加线程和%d个减少线程结束后%n盖伦的血量是 %.0f%n" , n,n,gareen.hp); } }
使用hero对象作为同步对象 既然任意对象都可以用来作为同步对象,而所有的线程访问的都是同一个hero对象,索性就使用gareen来作为同步对象 进一步的,对于Hero的hurt方法,加上: synchronized (this) { } 表示当前对象为同步对象,即也是gareen为同步对象
1 2 3 4 5 6 7 8 9 10 11 12 13 14 15 16 17 18 19 20 21 22 23 24 25 26 27 28 29 30 31 32 33 34 35 36 37 38 39 40 41 42 43 44 45 46 47 48 49 50 51 52 53 54 55 56 57 58 59 60 61 62 63 64 65 66 67 68 69 70 71 72 73 74 75 76 77 78 79 80 81 82 83 84 85 86 87 88 89 90 91 92 93 94 95 96 97 98 99 100 101 102 103 package multiplethread; public class TestThread { public static void main (String[] args ) final Hero2 gareen = new Hero2(); gareen.name = "盖伦" ; gareen.hp = 10000 ; int n = 10000 ; Thread[] addThreads = new Thread[n]; Thread[] reduceThreads = new Thread[n]; for (int i = 0 ; i < n; i++) { Thread t = new Thread() { public void run () synchronized (gareen) { gareen.recover(); } try { Thread.sleep(100 ); } catch (InterruptedException e) { e.printStackTrace(); } } }; t.start(); addThreads[i] = t; } for (int i = 0 ; i < n; i++) { Thread t = new Thread(){ public void run () gareen.hurt(); try { Thread.sleep(100 ); } catch (InterruptedException e) { e.printStackTrace(); } } }; t.start(); reduceThreads[i] = t; } for (Thread t : addThreads) { try { t.join (); } catch (InterruptedException e) { e.printStackTrace(); } } for (Thread t : reduceThreads) { try { t.join (); } catch (InterruptedException e) { e.printStackTrace(); } } System.out .printf("%d个增加线程和%d个减少线程结束后%n盖伦的血量是 %.0f%n" , n,n,gareen.hp); } } package multiplethread; public class Hero2 { public String name; public float hp; public int damage; public void recover () hp += 1 ; } public void hurt () synchronized (this ) { hp -= 1 ; } } public void attackHero (Hero2 h ) h.hp -= damage; System.out .format("%s 正在攻击 %s, %s 的血变成了 %.0f%n" , name, h.name, h.name, h.hp); if (h.isDead()) { System.out .println(h.name + " 死了!" ); } } public boolean isDead () return 0 >= hp; } }
在方法前,加上修饰符synchronized 在recover前,直接加上synchronized ,其所对应的同步对象,就是this 和hurt方法达到的效果是一样 外部线程访问gareen的方法,就不需要额外使用synchronized 了
1 2 3 4 5 6 7 8 9 10 11 12 13 14 15 16 17 18 19 20 21 22 23 24 25 26 27 28 29 30 31 32 33 34 35 36 37 38 39 40 41 42 43 44 45 46 47 48 49 50 51 52 53 54 55 56 57 58 59 60 61 62 63 64 65 66 67 68 69 70 71 72 73 74 75 76 77 78 79 80 81 82 83 84 85 86 87 88 89 90 91 92 93 94 95 96 97 98 99 100 101 102 103 104 package multiplethread; public class Hero2 { public String name; public float hp; public int damage; public synchronized void recover () hp += 1 ; } public void hurt () synchronized (this ) { hp -= 1 ; } } public void attackHero (Hero2 h ) h.hp -= damage; System.out .format("%s 正在攻击 %s, %s 的血变成了 %.0f%n" , name, h.name, h.name, h.hp); if (h.isDead()) { System.out .println(h.name + " 死了!" ); } } public boolean isDead () return 0 >= hp; } } package multiplethread; public class TestThread { public static void main (String[] args ) final Hero2 gareen = new Hero2(); gareen.name = "盖伦" ; gareen.hp = 10000 ; int n = 10000 ; Thread[] addThreads = new Thread[n]; Thread[] reduceThreads = new Thread[n]; for (int i = 0 ; i < n; i++) { Thread t = new Thread() { public void run () gareen.recover(); try { Thread.sleep(100 ); } catch (InterruptedException e) { e.printStackTrace(); } } }; t.start(); addThreads[i] = t; } for (int i = 0 ; i < n; i++) { Thread t = new Thread(){ public void run () gareen.hurt(); try { Thread.sleep(100 ); } catch (InterruptedException e) { e.printStackTrace(); } } }; t.start(); reduceThreads[i] = t; } for (Thread t : addThreads) { try { t.join (); } catch (InterruptedException e) { e.printStackTrace(); } } for (Thread t : reduceThreads) { try { t.join (); } catch (InterruptedException e) { e.printStackTrace(); } } System.out .printf("%d个增加线程和%d个减少线程结束后%n盖伦的血量是 %.0f%n" , n,n,gareen.hp); } }
线程安全的类 如果一个类,其方法都是有synchronized修饰的 ,那么该类就叫做线程安全的类
同一时间,只有一个线程能够进入 这种类的一个实例 的去修改数据,进而保证了这个实例中的数据的安全(不会同时被多线程修改而变成脏数据)
比如StringBuffer和StringBuilder的区别 StringBuffer的方法都是有synchronized修饰的,StringBuffer就叫做线程安全的类 而StringBuilder就不是线程安全的类
线程安全的类 常见的线程安全相关的面试题
HashMap和Hashtable的区别 HashMap和Hashtable都实现了Map接口,都是键值对保存数据的方式 区别1: HashMap可以存放 null Hashtable不能存放null 区别2: HashMap不是线程安全的类 Hashtable是线程安全的类
StringBuffer和StringBuilder的区别 StringBuffer 是线程安全的 StringBuilder 是非线程安全的
所以当进行大量字符串拼接操作的时候,如果是单线程就用StringBuilder会更快些,如果是多线程,就需要用StringBuffer 保证数据的安全性
非线程安全的 为什么会比线程安全的 快? 因为不需要同步嘛,省略了些时间
ArrayList和Vector的区别 ArrayList类的声明:
1 2 public class ArrayList<E> extends AbstractList<E> implements List <E >, RandomAccess , Cloneable , java.io.Serializable
Vector类的声明:
1 2 public class Vector<E> extends AbstractList<E> implements List <E >, RandomAccess , Cloneable , java.io.Serializable
一模一样的~ 他们的区别也在于,Vector是线程安全的类,而ArrayList是非线程安全的。
把非线程安全的集合转换为线程安全 ArrayList是非线程安全的,换句话说,多个线程可以同时进入一个ArrayList对象 的add方法
借助Collections.synchronizedList,可以把ArrayList转换为线程安全的List。
与此类似的,还有HashSet,LinkedList,HashMap等等非线程安全的类,都通过工具类Collections 转换为线程安全的
1 2 3 4 5 6 7 8 9 10 11 12 package multiplethread;import java.util.ArrayList;import java.util.Collections;import java.util.List;public class TestThread { public static void main (String[] args) { List<Integer> list1 = new ArrayList <>(); List<Integer> list2 = Collections.synchronizedList(list1); } }
死锁 演示死锁 \1. 线程1 首先占有对象1,接着试图占有对象2 \2. 线程2 首先占有对象2,接着试图占有对象1 \3. 线程1 等待线程2释放对象2 \4. 与此同时,线程2等待线程1释放对象1 就会。。。一直等待下去,直到天荒地老,海枯石烂,山无棱 ,天地合。。。
1 2 3 4 5 6 7 8 9 10 11 12 13 14 15 16 17 18 19 20 21 22 23 24 25 26 27 28 29 30 31 32 33 34 35 36 37 38 39 40 41 42 43 44 45 46 47 48 49 50 51 52 53 54 55 56 package multiplethread;public class TestThread { public static void main(String[] args) { final Hero2 ahri = new Hero2(); ahri.name = "九尾妖狐" ; final Hero2 annie = new Hero2(); annie.name = "安妮" ; Thread t1 = new Thread() { public void run() { synchronized (ahri) { System.out.println ("t1 已占有九尾妖狐" ); try { Thread.sleep(1000 ); } catch (InterruptedException e) { e.printStackTrace(); } System.out.println ("t1 试图占有安妮" ); System.out.println ("t1 等待中 。。。。" ); synchronized (annie) { System.out.println ("do something" ); } } } }; t1.start(); Thread t2 = new Thread(){ public void run(){ synchronized (annie) { System.out.println ("t2 已占有安妮" ); try { Thread.sleep(1000 ); } catch (InterruptedException e) { e.printStackTrace(); } System.out.println ("t2 试图占有九尾妖狐" ); System.out.println ("t2 等待中 。。。。" ); synchronized (ahri) { System.out.println ("do something" ); } } } }; t2.start(); } }
交互 线程之间有交互通知 的需求,考虑如下情况: 有两个线程,处理同一个英雄。 一个加血,一个减血。
减血的线程,发现血量=1,就停止减血,直到加血的线程为英雄加了血,才可以继续减血
不好的解决方式 故意设计减血线程频率更高,盖伦的血量迟早会到达1 减血线程中使用while循环判断是否是1 ,如果是1就不停的循环,直到加血线程回复了血量 这是不好的解决方式,因为会大量占用CPU,拖慢性能
1 2 3 4 5 6 7 8 9 10 11 12 13 14 15 16 17 18 19 20 21 22 23 24 25 26 27 28 29 30 31 32 33 34 35 36 37 38 39 40 41 42 43 44 45 46 47 48 49 50 51 52 53 54 55 56 57 58 59 60 61 62 63 64 65 66 67 68 69 70 71 72 73 74 75 76 77 78 package multiplethread; public class Hero2 { public String name; public float hp; public int damage; public synchronized void recover () hp += 1 ; } public synchronized void hurt () hp -= 1 ; } public void attackHero (Hero2 h ) h.hp -= damage; System.out .format("%s 正在攻击 %s, %s 的血变成了 %.0f%n" , name, h.name, h.name, h.hp); if (h.isDead()) { System.out .println(h.name + " 死了!" ); } } public boolean isDead () return 0 >= hp; } } package multiplethread; public class TestThread { public static void main (String[] args ) final Hero2 gareen = new Hero2(); gareen.name = "盖伦" ; gareen.hp = 616 ; Thread t1 = new Thread() { public void run () while (true ) { while (gareen.hp == 1 ) { continue ; } gareen.hurt(); System.out .printf("t1 为%s 减血1点,减少血后,%s的血量是%.0f%n" ,gareen.name,gareen.name,gareen.hp); try { Thread.sleep(10 ); } catch (InterruptedException e) { e.printStackTrace(); } } } }; t1.start(); Thread t2 = new Thread(){ public void run () while (true ){ gareen.recover(); System.out .printf("t2 为%s 回血1点,增加血后,%s的血量是%.0f%n" ,gareen.name,gareen.name,gareen.hp); try { Thread.sleep(100 ); } catch (InterruptedException e) { e.printStackTrace(); } } } }; t2.start(); } }
使用wait和notify进行线程交互 在Hero类中:hurt()减血方法:当hp=1的时候,执行this.wait(). this.wait()表示 让占有this的线程等待,并临时释放占有 进入hurt方法的线程必然是减血线程,this.wait()会让减血线程临时释放对this的占有。 这样加血线程,就有机会进入recover()加血方法了 。
recover() 加血方法:增加了血量,执行this.notify(); this.notify() 表示通知那些等待在this的线程 ,可以苏醒过来了。 等待在this的线程,恰恰就是减血线程。 一旦recover()结束, 加血线程释放了this,减血线程,就可以重新占有this,并执行后面的减血工作。
1 2 3 4 5 6 7 8 9 10 11 12 13 14 15 16 17 18 19 20 21 22 23 24 25 26 27 28 29 30 31 32 33 34 35 36 37 38 39 40 41 42 43 44 45 46 47 48 49 50 51 52 53 54 55 56 57 58 59 60 61 62 63 64 65 66 67 68 69 70 71 72 73 74 75 76 77 78 79 80 81 82 83 84 85 86 87 package multiplethread; public class Hero2 { public String name; public float hp; public int damage; public synchronized void recover () hp += 1 ; System.out .printf("%s 回血1点,增加血后,%s的血量是%.0f%n" , name, name, hp); this .notify(); } public synchronized void hurt () if (hp == 1 ) { try { this .wait(); } catch (InterruptedException e) { e.printStackTrace(); } } hp -= 1 ; System.out .printf("%s 减血1点,减少血后,%s的血量是%.0f%n" , name, name, hp); } public void attackHero (Hero2 h ) h.hp -= damage; System.out .format("%s 正在攻击 %s, %s 的血变成了 %.0f%n" , name, h.name, h.name, h.hp); if (h.isDead()) { System.out .println(h.name + " 死了!" ); } } public boolean isDead () return 0 >= hp; } } package multiplethread; public class TestThread { public static void main (String[] args ) final Hero2 gareen = new Hero2(); gareen.name = "盖伦" ; gareen.hp = 616 ; Thread t1 = new Thread() { public void run () while (true ) { gareen.hurt(); try { Thread.sleep(10 ); } catch (InterruptedException e) { e.printStackTrace(); } } } }; t1.start(); Thread t2 = new Thread(){ public void run () while (true ){ gareen.recover(); try { Thread.sleep(100 ); } catch (InterruptedException e) { e.printStackTrace(); } } } }; t2.start(); } }
关于wait、notify和notifyAll 留意wait()和notify() 这两个方法是什么对象上的?
1 2 3 4 5 6 7 8 9 public synchronized void hurt () 。。。 this .wait (); 。。。 } public synchronized void recover () 。。。 this .notify (); }
这里需要强调的是,wait方法和notify方法,并不是Thread线程上的方法 ,它们是Object上的方法。
因为所有的Object都可以被用来作为同步对象,所以准确的讲,wait和notify是同步对象上的方法。
wait()的意思是: 让占用了这个同步对象的线程 ,临时释放当前的占用,并且等待。 所以调用wait是有前提条件的,一定是在synchronized块里,否则就会出错。
notify() 的意思是,通知一个 等待在这个同步对象上的线程,你 可以苏醒过来了,有机会重新占用当前对象了。
notifyAll() 的意思是,通知所有的 等待在这个同步对象上的线程,你们 可以苏醒过来了,有机会重新占用当前对象了。
线程池 每一个线程的启动和结束都是比较消耗时间和占用资源的。
如果在系统中用到了很多的线程,大量的启动和结束动作会导致系统的性能变卡,响应变慢。
为了解决这个问题,引入线程池这种设计思想。
线程池的模式很像生产者消费者模式 ,消费的对象是一个一个的能够运行的任务
线程池设计思路 线程池的思路和生产者消费者模型 是很接近的。 \1. 准备一个任务容器 \2. 一次性启动10个 消费者线程 \3. 刚开始任务容器是空的,所以线程都wait 在上面。 \4. 直到一个外部线程往这个任务容器中扔了一个“任务”,就会有一个消费者线程被唤醒notify \5. 这个消费者线程取出“任务”,并且执行这个任务 ,执行完毕后,继续等待下一次任务的到来。 \6. 如果短时间内,有较多的任务加入,那么就会有多个线程被唤醒 ,去执行这些任务。
在整个过程中,都不需要创建新的线程,而是循环使用这些已经存在的线程
开发一个自定义线程池 这是一个自定义的线程池,虽然不够完善和健壮,但是已经足以说明线程池的工作原理
缓慢的给这个线程池添加任务,会看到有多条线程来执行这些任务。 线程7执行完毕任务后,又回到池子里 ,下一次任务来的时候,线程7又来执行新的任务。
1 2 3 4 5 6 7 8 9 10 11 12 13 14 15 16 17 18 19 20 21 22 23 24 25 26 27 28 29 30 31 32 33 34 35 36 37 38 39 40 41 42 43 44 45 46 47 48 49 50 51 52 53 54 55 56 57 58 59 60 61 62 63 64 65 66 67 68 69 70 71 72 73 74 75 76 77 78 79 80 81 82 83 package multiplethread;import java.util.LinkedList;public class ThreadPool { int threadPoolSize; LinkedList<Runnable> tasks = new LinkedList <>(); public ThreadPool () { threadPoolSize = 10 ; synchronized (tasks) { for (int i = 0 ; i < threadPoolSize; i++) { new TaskConsumeThread ("任务消费者线程 " + i).start(); } } } public void add (Runnable r) { synchronized (tasks) { tasks.add(r); tasks.notifyAll(); } } class TaskConsumeThread extends Thread { public TaskConsumeThread (String name) { super (name); } Runnable task; public void run () { System.out.println("启动: " + this .getName()); while (true ) { synchronized (tasks) { while (tasks.isEmpty()) { try { tasks.wait(); } catch (InterruptedException e) { e.printStackTrace(); } } task = tasks.removeLast(); tasks.notifyAll(); } System.out.println(this .getName() + " 获取到任务,并执行" ); task.run(); } } } } package multiplethread;public class TestThread { public static void main (String[] args) { ThreadPool pool = new ThreadPool (); for (int i = 0 ; i < 5 ; i++) { Runnable task = new Runnable () { @Override public void run () { System.out.println("执行任务" ); } }; pool.add(task); try { Thread.sleep(1000 ); } catch (InterruptedException e) { e.printStackTrace(); } } } }
测试线程池 创造一个情景,每个任务执行的时间都是1秒 刚开始是间隔1秒钟向线程池中添加任务
然后间隔时间越来越短,执行任务的线程还没有来得及结束,新的任务又来了。 就会观察到线程池里的其他线程被唤醒来执行这些任务
1 2 3 4 5 6 7 8 9 10 11 12 13 14 15 16 17 18 19 20 21 22 23 24 25 26 27 package multiplethread;public class TestThread { public static void main (String[] args) { ThreadPool pool = new ThreadPool (); int sleep = 1000 ; while (true ) { pool.add(new Runnable () { @Override public void run () { try { Thread.sleep(1000 ); } catch (InterruptedException e) { e.printStackTrace(); } } }); try { Thread.sleep(sleep); sleep = sleep > 100 ? sleep-100 : sleep; } catch (InterruptedException e) { e.printStackTrace(); } } } }
使用java自带线程池 java提供自带的线程池,而不需要自己去开发一个自定义线程池了。
线程池类ThreadPoolExecutor 在包java.util.concurrent 下
1 ThreadPoolExecutor threadPool= new ThreadPoolExecutor (10 , 15 , 60 , TimeUnit.SECONDS, new LinkedBlockingQueue <Runnable>());
第一个 参数10 表示这个线程池初始化了10个 线程在里面工作 第二个 参数15 表示如果10个线程不够用了,就会自动增加到最多15个线程 第三个 参数60 结合第四个参数TimeUnit.SECONDS,表示经过60秒 ,多出来的线程还没有接到活儿,就会回收,最后保持池子里就10个 第四个 参数TimeUnit.SECONDS 如上 第五个 参数 new LinkedBlockingQueue() 用来放任务的集合
execute 方法用于添加新的任务
1 2 3 4 5 6 7 8 9 10 11 12 13 14 15 16 17 package multiplethread;import java.util.concurrent.LinkedBlockingDeque;import java.util.concurrent.ThreadPoolExecutor;import java.util.concurrent.TimeUnit;public class TestThread { public static void main (String[] args) throws InterruptedException { ThreadPoolExecutor threadPoolExecutor = new ThreadPoolExecutor (10 , 15 , 60 , TimeUnit.SECONDS, new LinkedBlockingDeque <Runnable>()); threadPoolExecutor.execute(new Runnable () { @Override public void run () { System.out.println("任务1" ); } }); } }
Lock对象 回忆 synchronized 同步的方式 首先回忆一下 synchronized 同步对象 的方式
当一个线程占用 synchronized 同步对象,其他线程就不能占用了,直到释放这个同步对象为止
使用Lock对象实现同步效果 Lock是一个接口,为了使用一个Lock对象,需要用到
1 Lock lock = new ReentrantLock()
与 synchronized (someObject) 类似的,lock()方法,表示当前线程占用lock对象,一旦占用,其他线程就不能占用了。 与 synchronized 不同的是,一旦synchronized 块结束,就会自动释放对 someObject 的占用。 lock却必须调用unlock 方法进行手动释放,为了保证释放的执行,往往会把unlock() 放在finally中进行。
1 2 3 4 5 6 7 8 9 10 11 12 13 14 15 16 17 18 19 20 21 22 23 24 25 26 27 28 29 30 31 32 33 34 35 36 37 38 39 40 41 42 43 44 45 46 47 48 49 50 51 52 53 54 55 56 57 58 59 60 61 62 63 64 65 66 67 68 69 70 71 72 73 74 package multiplethread; import java.text.SimpleDateFormat;import java.util.Date;import java.util.concurrent.locks.Lock ;import java.util.concurrent.locks.ReentrantLock;public class TestThread { public static String now() { return new SimpleDateFormat("HH:mm:ss").format(new Date ()); } public static void log(String msg) { System .out .printf("%s %s %s %n", now(), Thread.currentThread().getName(), msg); } public static void main(String[] args) { Lock lock = new ReentrantLock(); Thread t1 = new Thread() { public void run() { try { log("线程启动"); log("试图占有对象:lock"); lock .lock (); log("占有对象:lock"); log("进行5秒的业务操作"); Thread.sleep(5000 ); } catch (InterruptedException e) { e.printStackTrace(); } finally { log("释放对象:lock"); lock .unlock(); } log("线程结束"); } }; t1.setName("t1"); t1.start (); try { //先让t1飞2 秒 Thread.sleep(2000 ); } catch (InterruptedException e1) { e1.printStackTrace(); } Thread t2 = new Thread() { public void run() { try { log("线程启动"); log("试图占有对象:lock"); lock .lock (); log("占有对象:lock"); log("进行5秒的业务操作"); Thread.sleep(5000 ); } catch (InterruptedException e) { e.printStackTrace(); } finally { log("释放对象:lock"); lock .unlock(); } log("线程结束"); } }; t2.setName("t2"); t2.start (); } }
trylock方法 synchronized 是不占用到手不罢休 的,会一直试图占用下去。 与 synchronized 的钻牛角尖 不一样,Lock接口还提供了一个trylock方法。 trylock会在指定时间范围内试图占用 ,占成功了,就啪啪啪。 如果时间到了,还占用不成功,扭头就走~
注意: 因为使用trylock有可能成功,有可能失败,所以后面unlock释放锁的时候,需要判断是否占用成功了,如果没占用成功也unlock,就会抛出异常
1 2 3 4 5 6 7 8 9 10 11 12 13 14 15 16 17 18 19 20 21 22 23 24 25 26 27 28 29 30 31 32 33 34 35 36 37 38 39 40 41 42 43 44 45 46 47 48 49 50 51 52 53 54 55 56 57 58 59 60 61 62 63 64 65 66 67 68 69 70 71 72 73 74 75 76 77 78 79 80 81 82 83 84 85 86 87 88 89 90 91 92 93 94 package multiplethread; import java.text.SimpleDateFormat;import java.util.Date;import java.util.concurrent.TimeUnit;import java.util.concurrent.locks.Lock ;import java.util.concurrent.locks.ReentrantLock;public class TestThread { public static String now() { return new SimpleDateFormat("HH:mm:ss").format(new Date ()); } public static void log(String msg) { System .out .printf("%s %s %s %n", now(), Thread.currentThread().getName(), msg); } public static void main(String[] args) { Lock lock = new ReentrantLock(); Thread t1 = new Thread() { public void run() { boolean locked = false ; try { log("线程启动"); log("试图占有对象:lock"); locked = lock .tryLock(1 , TimeUnit.SECONDS); if (locked) { log("占有对象:lock"); log("进行5秒的业务操作"); Thread.sleep(5000 ); } else { log("经过1秒钟的努力,还没有占有对象,放弃占有"); } } catch (InterruptedException e) { e.printStackTrace(); } finally { if (locked) { log("释放对象:lock"); lock .unlock(); } } log("线程结束"); } }; t1.setName("t1"); t1.start (); try { //先让t1飞2 秒 Thread.sleep(2000 ); } catch (InterruptedException e1) { e1.printStackTrace(); } Thread t2 = new Thread() { public void run() { boolean locked = false ; try { log("线程启动"); log("试图占有对象:lock"); locked = lock .tryLock(1 , TimeUnit.SECONDS); if (locked) { log("占有对象:lock"); log("进行5秒的业务操作"); Thread.sleep(5000 ); } else { log("经过1秒钟的努力,还没有占有对象,放弃占有"); } } catch (InterruptedException e) { e.printStackTrace(); } finally { if (locked) { log("释放对象:lock"); lock .unlock(); } } log("线程结束"); } }; t2.setName("t2"); t2.start (); } }
线程交互 使用synchronized方式进行线程交互,用到的是同步对象的wait,notify和notifyAll方法
Lock也提供了类似的解决办法,首先通过lock对象得到一个Condition对象,然后分别调用这个Condition对象的:await , signal ,signalAll 方法
注意 : 不是Condition对象的wait,nofity,notifyAll方法,是await,signal,signalAll
1 2 3 4 5 6 7 8 9 10 11 12 13 14 15 16 17 18 19 20 21 22 23 24 25 26 27 28 29 30 31 32 33 34 35 36 37 38 39 40 41 42 43 44 45 46 47 48 49 50 51 52 53 54 55 56 57 58 59 60 61 62 63 64 65 66 67 68 69 70 71 72 73 74 75 76 77 78 79 80 81 82 83 84 85 package multiplethread; import java.text.SimpleDateFormat;import java.util.Date;import java.util.concurrent.locks.Condition;import java.util.concurrent.locks.Lock ;import java.util.concurrent.locks.ReentrantLock;public class TestThread { public static String now() { return new SimpleDateFormat("HH:mm:ss").format(new Date ()); } public static void log(String msg) { System .out .printf("%s %s %s %n", now(), Thread.currentThread().getName(), msg); } public static void main(String[] args) { Lock lock = new ReentrantLock(); Condition condition = lock .newCondition(); Thread t1 = new Thread() { public void run() { try { log("线程启动"); log("试图占有对象:lock"); lock .lock (); log("占有对象:lock"); log("进行5秒的业务操作"); Thread.sleep(5000 ); log("临时释放对象 lock, 并等待"); condition.await(); log("重新占有对象 lock,并进行5秒的业务操作"); } catch (InterruptedException e) { e.printStackTrace(); } finally { log("释放对象:lock"); lock .unlock(); } log("线程结束"); } }; t1.setName("t1"); t1.start (); try { //先让t1飞2 秒 Thread.sleep(2000 ); } catch (InterruptedException e1) { e1.printStackTrace(); } Thread t2 = new Thread() { public void run() { try { log("线程启动"); log("试图占有对象:lock"); lock .lock (); log("占有对象:lock"); log("进行5秒的业务操作"); Thread.sleep(5000 ); log("唤醒等待中的线程"); condition.signal(); } catch (InterruptedException e) { e.printStackTrace(); } finally { log("释放对象:lock"); lock .unlock(); } log("线程结束"); } }; t2.setName("t2"); t2.start (); } }
总结Lock和synchronized的区别 \1. Lock是一个接口,而synchronized是Java中的关键字,synchronized是内置的语言实现,Lock是代码层面的实现。
\2. Lock可以选择性的获取锁,如果一段时间获取不到,可以放弃。synchronized不行,会一根筋一直获取下去。 借助Lock的这个特性,就能够规避死锁,synchronized必须通过谨慎和良好的设计,才能减少死锁的发生。
\3. synchronized在发生异常和同步块结束的时候,会自动释放锁。而Lock必须手动释放, 所以如果忘记了释放锁,一样会造成死锁。
原子访问 原子性操作概念 所谓的原子性操作 即不可中断的操作,比如赋值操作
原子性操作本身是线程安全的 但是 i++ 这个行为,事实上是有3个原子性操作组成的。 步骤 1. 取 i 的值 步骤 2. i + 1 步骤 3. 把新的值赋予i 这三个步骤,每一步都是一个原子操作,但是合在一起,就不是原子操作。就不是线程安全 的。 换句话说,一个线程在步骤1 取i 的值结束后,还没有来得及进行步骤2,另一个线程也可以取 i的值了。 这也是分析同步问题产生的原因 中的原理。 i++ ,i–, i = i+1 这些都是非原子性操作。 只有int i = 1,这个赋值操作是原子性的。
AtomicInteger JDK6 以后,新增加了一个包java.util.concurrent.atomic ,里面有各种原子类,比如AtomicInteger 。 而AtomicInteger提供了各种自增,自减等方法,这些方法都是原子性的。 换句话说,自增方法 incrementAndGet 是线程安全的,同一个时间,只有一个线程可以调用这个方法。
1 2 3 4 5 6 7 8 9 10 11 12 13 14 15 package multiplethread;import java.util.concurrent.atomic.AtomicInteger;public class TestThread2 { public static void main (String[] args) throws InterruptedException { AtomicInteger atomicInteger = new AtomicInteger (1 ); int i = atomicInteger.decrementAndGet(); int j = atomicInteger.incrementAndGet(); int k = atomicInteger.addAndGet(3 ); System.out.println(i); System.out.println(j); System.out.println(k); } }
同步测试 分别使用基本变量的非原子性的**++运算符和 原子性的 AtomicInteger对象的 incrementAndGet** 来进行多线程测试。 测试结果如图所示
1 2 3 4 5 6 7 8 9 10 11 12 13 14 15 16 17 18 19 20 21 22 23 24 25 26 27 28 29 30 31 32 33 34 35 36 37 38 39 40 41 42 43 44 45 46 47 48 49 50 51 52 53 54 55 56 57 58 59 package multiplethread; import java.util .concurrent .atomic .AtomicInteger ;public class TestThread2 { private static int value = 0 ; private static AtomicInteger atomicValue = new AtomicInteger (); public static void main (String [] args int number = 100000 ; Thread [] ts1 = new Thread [number ]; for (int i = 0 ; i < number ; i++) { Thread t = new Thread () { public void run ( value++; } }; t.start (); ts1[i] = t; } for (Thread t : ts1) { try { t.join (); } catch (InterruptedException e) { e.printStackTrace (); } } System .out .printf ("%d个线程进行value++后,value的值变成:%d%n" , number ,value); Thread [] ts2 = new Thread [number ]; for (int i = 0 ; i < number ; i++) { Thread t =new Thread (){ public void run ( atomicValue.incrementAndGet (); } }; t.start (); ts2[i] = t; } for (Thread t : ts2) { try { t.join (); } catch (InterruptedException e) { e.printStackTrace (); } } System .out .printf ("%d个线程进行atomicValue.incrementAndGet();后,atomicValue的值变成:%d%n" , number ,atomicValue.intValue ()); } } 输出: 100000 个线程进行value++后,value的值变成:99996 100000 个线程进行atomicValue.incrementAndGet ();后,atomicValue的值变成:100000
JDBC Hello JDBC 为项目导入mysql-jdbc的jar包 初始化驱动 通过Class.forName (“com.mysql.jdbc.Driver”); 初始化驱动类com.mysql.jdbc.Driver 就在 mysql-connector-java-5.0.8-bin.jar中 如果忘记了第一个步骤的导包 ,就会抛出ClassNotFoundException
Class.forName是把这个类加载到JVM中,加载的时候,就会执行其中的静态初始化块,完成驱动的初始化的相关工作。
1 2 3 4 5 6 7 8 9 10 11 12 13 14 15 16 17 package jdbc;public class TestJDBC { public static void main(String[] args) { try { Class .forName("com.mysql.jdbc.Driver" ); System.out.println ("数据库驱动加载成功 !" ); } catch (ClassNotFoundException e) { e.printStackTrace(); } } }
建立与数据库的连接 建立与数据库的Connection连接 这里需要提供: 数据库所处于的ip:127.0.0.1 (本机) 数据库的端口号: 3306 (mysql专用端口号) 数据库名称 how2java 编码方式 UTF-8 账号 root 密码 admin
注: 这一步要成功执行,必须建立在mysql中有数据库how2java的基础上,如果没有,点击创建数据库 查看如何进行数据库的创建。
1 2 3 4 5 6 7 8 9 10 11 12 13 14 15 16 17 18 19 20 21 22 23 24 25 26 27 28 29 30 31 32 33 34 package jdbc;import java.sql.Connection;import java.sql.DriverManager;import java.sql.SQLException;public class TestJDBC { public static void main (String[] args) { try { Class.forName("com.mysql.jdbc.Driver" ); Connection c = DriverManager .getConnection( "jdbc:mysql://127.0.0.1:3306/how2java?characterEncoding=UTF-8" , "root" , "admin" ); System.out.println("连接成功,获取连接对象: " + c); } catch (ClassNotFoundException e) { e.printStackTrace(); } catch (SQLException e) { e.printStackTrace(); } } }
创建Statement Statement是用于执行SQL语句的,比如增加,删除
1 2 3 4 5 6 7 8 9 10 11 12 13 14 15 16 17 18 19 20 21 22 23 24 25 package jdbc;import java.sql.Connection;import java.sql.DriverManager;import java.sql.SQLException;import java.sql.Statement;public class TestJDBC { public static void main (String[] args) { try { Class.forName("com.mysql.jdbc.Driver" ); Connection c = DriverManager.getConnection("jdbc:mysql://127.0.0.1:3306/how2java?characterEncoding=UTF-8" , "root" , "admin" ); Statement s = c.createStatement(); System.out.println("获取 Statement对象: " + s); } catch (ClassNotFoundException e) { e.printStackTrace(); } catch (SQLException e) { e.printStackTrace(); } } }
执行SQL语句 s.execute执行sql语句 执行成功后,用mysql-front进行查看,明确插入成功
执行SQL语句之前要确保数据库how2java中有表hero的存在,如果没有,需要事先创建表
1 2 3 4 5 6 7 8 9 10 11 12 13 14 15 16 17 18 19 20 21 22 23 24 25 26 27 28 29 30 31 package jdbc;import java.sql.Connection;import java.sql.DriverManager;import java.sql.SQLException;import java.sql.Statement;public class TestJDBC { public static void main (String[] args) { try { Class.forName("com.mysql.jdbc.Driver" ); Connection c = DriverManager.getConnection("jdbc:mysql://127.0.0.1:3306/how2java?characterEncoding=UTF-8" , "root" , "admin" ); Statement s = c.createStatement(); String sql = "insert into hero values(null, " +"'提莫'" +"," +313.0f +"," +50 +")" ; s.execute(sql); System.out.println("执行插入语句成功" ); } catch (ClassNotFoundException e) { e.printStackTrace(); } catch (SQLException e) { e.printStackTrace(); } } }
关闭连接 数据库的连接是有限资源,相关操作结束后,养成关闭数据库的好习惯 先关闭Statement 后关闭Connection
1 2 3 4 5 6 7 8 9 10 11 12 13 14 15 16 17 18 19 20 21 22 23 24 25 26 27 28 29 30 31 32 33 34 35 36 37 38 39 40 41 42 43 44 45 46 47 48 49 50 51 52 53 package jdbc;import java.sql.Connection;import java.sql.DriverManager;import java.sql.SQLException;import java.sql.Statement;public class TestJDBC { public static void main (String[] args) { Connection c = null ; Statement s = null ; try { Class.forName("com.mysql.jdbc.Driver" ); c = DriverManager.getConnection("jdbc:mysql://127.0.0.1:3306/how2java?characterEncoding=UTF-8" , "root" , "admin" ); s = c.createStatement(); String sql = "insert into hero values(null, " +"'提莫'" +"," +313.0f +"," +50 +")" ; s.execute(sql); System.out.println("执行插入语句成功" ); } catch (ClassNotFoundException e) { e.printStackTrace(); } catch (SQLException e) { e.printStackTrace(); } finally { if (s != null ) { try { s.close(); } catch (SQLException e) { e.printStackTrace(); } } if (c != null ) try { c.close(); } catch (SQLException e) { e.printStackTrace(); } } } }
使用try-with-resource的方式自动关闭连接 如果觉得上一步的关闭连接的方式很麻烦,可以参考关闭流 的方式,使用try-with-resource 的方式自动关闭连接,因为Connection和Statement都实现了AutoCloseable接口
1 2 3 4 5 6 7 8 9 10 11 12 13 14 15 16 17 18 19 20 21 22 23 24 25 26 27 28 29 30 31 32 33 package jdbc;import java.sql.Connection;import java.sql.DriverManager;import java.sql.SQLException;import java.sql.Statement;public class TestJDBC { public static void main (String[] args) { try { Class.forName("com.mysql.jdbc.Driver" ); } catch (ClassNotFoundException e) { e.printStackTrace(); } try ( Connection c = DriverManager.getConnection("jdbc:mysql://127.0.0.1:3306/how2java?characterEncoding=UTF-8" , "root" , "admin" ); Statement s = c.createStatement(); ) { String sql = "insert into hero values(null, " +"'提莫'" +"," +313.0f +"," +50 +")" ; s.execute(sql); System.out.println("执行插入语句成功" ); } catch (SQLException e) { e.printStackTrace(); } } }
增、删、改 CRUD是最常见的数据库操作,即增删改查 C 增加(Create) R 读取查询(Retrieve) U 更新(Update) D 删除(Delete)
在JDBC中增加,删除,修改的操作都很类似,只是传递不同的SQL语句就行了。
查询因为要返回数据,所以和上面的不一样,将在查询 章节讲解。
1 2 3 4 5 6 7 8 9 10 11 12 13 14 15 16 17 18 19 20 21 22 23 24 25 26 27 28 29 30 31 32 33 package jdbc;import java.sql.Connection;import java.sql.DriverManager;import java.sql.SQLException;import java.sql.Statement;public class TestJDBC { public static void main (String[] args) { try { Class.forName("com.mysql.jdbc.Driver" ); } catch (ClassNotFoundException e) { e.printStackTrace(); } try ( Connection c = DriverManager.getConnection("jdbc:mysql://127.0.0.1:3306/how2java?characterEncoding=UTF-8" , "root" , "admin" ); Statement s = c.createStatement(); ) { String sql = "insert into hero values(null, " +"'提莫'" +"," +313.0f +"," +50 +")" ; s.execute(sql); System.out.println("执行插入语句成功" ); } catch (SQLException e) { e.printStackTrace(); } } }
删除 删除和增加很类似,只不过是执行的SQL语句不一样罢了
1 2 3 4 5 6 7 8 9 10 11 12 13 14 15 16 17 18 19 20 21 22 23 24 25 26 27 28 29 30 31 package jdbc;import java.sql.Connection;import java.sql.DriverManager;import java.sql.SQLException;import java.sql.Statement;public class TestJDBC { public static void main (String[] args) { try { Class.forName("com.mysql.jdbc.Driver" ); } catch (ClassNotFoundException e) { e.printStackTrace(); } try ( Connection c = DriverManager.getConnection("jdbc:mysql://127.0.0.1:3306/how2java?characterEncoding=UTF-8" , "root" , "admin" ); Statement s = c.createStatement(); ) { String sql = "delete from hero where id = 5" ; s.execute(sql); } catch (SQLException e) { e.printStackTrace(); } } }
修改 修改也一样,执行另一条SQL语句就可以了
1 2 3 4 5 6 7 8 9 10 11 12 13 14 15 16 17 18 19 20 21 22 23 24 25 26 27 28 29 30 31 package jdbc;import java.sql.Connection;import java.sql.DriverManager;import java.sql.SQLException;import java.sql.Statement;public class TestJDBC { public static void main (String[] args) { try { Class.forName("com.mysql.jdbc.Driver" ); } catch (ClassNotFoundException e) { e.printStackTrace(); } try ( Connection c = DriverManager.getConnection("jdbc:mysql://127.0.0.1:3306/how2java?characterEncoding=UTF-8" , "root" , "admin" ); Statement s = c.createStatement(); ) { String sql = "update hero set name = 'name 5' where id = 3" ; s.execute(sql); } catch (SQLException e) { e.printStackTrace(); } } }
查询 执行查询SQL语句
查询语句 executeQuery 执行SQL查询语句
注意: 在取第二列的数据的时候,用的是rs.get(2) ,而不是get(1). 这个是整个Java自带的api里唯二 的地方,使用基1 的,即2就代表第二个。
另一个地方是在PreparedStatement 这里
1 2 3 4 5 6 7 8 9 10 11 12 13 14 15 16 17 18 19 20 21 22 23 24 25 26 27 28 29 30 31 32 33 34 35 36 37 38 39 40 41 42 43 44 45 46 47 package jdbc;import java.sql.*;public class TestJDBC { public static void main (String[] args) { try { Class.forName("com.mysql.jdbc.Driver" ); } catch (ClassNotFoundException e) { e.printStackTrace(); } try ( Connection c = DriverManager.getConnection("jdbc:mysql://127.0.0.1:3306/how2java?characterEncoding=UTF-8" , "root" , "admin" ); Statement s = c.createStatement(); ) { String sql = "select * from hero" ; ResultSet rs = s.executeQuery(sql); while (rs.next()) { int id = rs.getInt("id" ); String name = rs.getString(2 ); float hp = rs.getFloat("hp" ); int damage = rs.getInt(4 ); System.out.printf("%d\t%s\t%f\t%d%n" , id, name, hp, damage); } } catch (SQLException e) { e.printStackTrace(); } } } 输出: 1 提莫 313.000000 50 3 name 5 313.000000 50 4 提莫 313.000000 50 6 提莫莫 313.000000 50 7 提莫莫 313.000000 50 8 提莫莫 313.000000 50
SQL语句判断账号密码是否正确 \1. 创建一个用户表,有字段name,password \2. 插入一条数据
1 insert into user values (null ,'dashen' ,'thisispassword' );
\3. SQL语句判断账号密码是否正确
判断账号密码的正确方式 是根据账号和密码到表中去找数据,如果有数据,就表明密码正确了,如果没数据,就表明密码错误。
不恰当的方式 是把uers表的数据全部查到内存中,挨个进行比较。 如果users表里有100万条数据呢? 内存都不够用的。
1 2 3 4 5 6 7 8 9 10 11 12 13 14 15 16 17 18 19 20 21 22 23 24 25 26 27 28 29 30 31 32 33 34 35 36 37 38 39 40 41 42 43 44 45 46 CREATE TABLE user ( id int (11 ) AUTO_INCREMENT, name varchar (30 ) , password varchar (30 ), PRIMARY KEY (id) ) ; insert into user values (null ,'dashen' ,'thisispassword' );package jdbc; import java.sql .*;public class TestJDBC { public static void main(String[] args) { try { Class .forName("com.mysql.jdbc.Driver"); } catch (ClassNotFoundException e) { e.printStackTrace(); } try ( Connection c = DriverManager.getConnection("jdbc:mysql://127.0.0.1:3306/how2java?characterEncoding=UTF-8", "root", "admin"); Statement s = c.createStatement(); ) { String name = "dashen"; //正确的密码是:thisispassword String password = "thisispassword1"; String sql = "select * from user where name = '" + name +"' and password = '" + password +"'"; // 执行查询语句,并把结果集返回给ResultSet ResultSet rs = s.executeQuery(sql ); if (rs.next()) System .out .println("账号密码正确"); else System .out .println("账号密码错误"); } catch (SQLException e) { e.printStackTrace(); } } }
获取总数 执行的sql语句为
1 select count (*) from hero
然后通过ResultSet获取出来
1 2 3 4 5 6 7 8 9 10 11 12 13 14 15 16 17 18 19 20 21 22 23 24 25 26 27 28 29 30 31 32 33 34 35 36 37 38 39 40 package jdbc;import java.sql.*;public class TestJDBC { public static void main (String[] args) { try { Class.forName("com.mysql.jdbc.Driver" ); } catch (ClassNotFoundException e) { e.printStackTrace(); } try ( Connection c = DriverManager.getConnection("jdbc:mysql://127.0.0.1:3306/how2java?characterEncoding=UTF-8" , "root" , "admin" ); Statement s = c.createStatement(); ) { String name = "dashen" ; String password = "thisispassword1" ; String sql = "select count(*) from hero" ; ResultSet rs = s.executeQuery(sql); int total = 0 ; while (rs.next()) { total = rs.getInt(1 ); } System.out.println("表Hero中总共有:" + total +" 条数据" ); } catch (SQLException e) { e.printStackTrace(); } } }
预编译Statement 使用PreparedStatement 和 Statement一样,PreparedStatement也是用来执行sql语句的 与创建Statement不同的是,需要根据sql语句创建PreparedStatement 除此之外,还能够通过设置参数,指定相应的值,而不是Statement那样使用字符串拼接
注: 这是JAVA里唯二的基1的地方,另一个是查询语句 中的ResultSet也是基1的。
1 2 3 4 5 6 7 8 9 10 11 12 13 14 15 16 17 18 19 20 21 22 23 24 25 26 27 28 29 30 31 32 33 package jdbc;import java.sql.*;public class TestJDBC { public static void main (String[] args) { try { Class.forName("com.mysql.jdbc.Driver" ); } catch (ClassNotFoundException e) { e.printStackTrace(); } String sql = "insert into hero values(null,?,?,?)" ; try ( Connection c = DriverManager.getConnection("jdbc:mysql://127.0.0.1:3306/how2java?characterEncoding=UTF-8" , "root" , "admin" ); PreparedStatement ps = c.prepareStatement(sql); ) { ps.setString(1 , "提莫" ); ps.setFloat(2 , 313.0f ); ps.setInt(3 , 50 ); ps.execute(); } catch (SQLException e) { e.printStackTrace(); } } }
PreparedStatement的优点1-参数设置 Statement 需要进行字符串拼接,可读性和维护性比较差
1 String sql = "insert into hero values (null ,"+" '提莫' "+" ,"+313.0f+" ,"+50+" )";
PreparedStatement 使用参数设置,可读性好,不易犯错
1 String sql = "insert into hero values (null ,?,?,?)";
PreparedStatement的优点2-性能表现 PreparedStatement有预编译机制,性能比Statement更快
1 2 3 4 5 6 7 8 9 10 11 12 13 14 15 16 17 18 19 20 21 22 23 24 25 26 27 28 29 30 31 32 33 34 35 36 37 38 39 40 41 42 43 44 45 46 47 48 49 package jdbc;import java.sql.Connection;import java.sql.DriverManager;import java.sql.PreparedStatement;import java.sql.SQLException;import java.sql.Statement;public class TestJDBC { public static void main (String[] args) { try { Class.forName("com.mysql.jdbc.Driver" ); } catch (ClassNotFoundException e) { e.printStackTrace(); } String sql = "insert into hero values(null,?,?,?)" ; try (Connection c = DriverManager.getConnection("jdbc:mysql://127.0.0.1:3306/how2java?characterEncoding=UTF-8" ,"root" , "admin" ); Statement s = c.createStatement(); PreparedStatement ps = c.prepareStatement(sql); ) { for (int i = 0 ; i < 10 ; i++) { String sql0 = "insert into hero values(null," + "'提莫'" + "," + 313.0f + "," + 50 + ")" ; s.execute(sql0); } for (int i = 0 ; i < 10 ; i++) { ps.setString(1 , "提莫" ); ps.setFloat(2 , 313.0f ); ps.setInt(3 , 50 ); ps.execute(); } } catch (SQLException e) { e.printStackTrace(); } } }
PreparedStatement的优点3-防止SQL注入式攻击 假设name是用户提交来的数据
1 String name = "'盖伦' OR 1=1"
使用Statement就需要进行字符串拼接 拼接出来的语句是:
1 select * from hero where name = '盖伦' OR 1 =1
因为有OR 1=1,这是恒成立的 那么就会把所有的英雄都查出来,而不只是盖伦 如果Hero表里的数据是海量的,比如几百万条,把这个表里的数据全部查出来 会让数据库负载变高,CPU100%,内存消耗光,响应变得极其缓慢
而PreparedStatement使用的是参数设置 ,就不会有这个问题
execute与executeUpdate的区别 相同点 execute 与executeUpdate 的相同点:都可以执行增加,删除,修改
1 2 3 4 5 6 7 8 9 10 11 12 13 14 15 16 17 18 19 20 21 22 23 24 25 26 27 28 29 30 31 32 33 34 35 36 37 38 package jdbc; import java.sql.Connection;import java.sql.DriverManager;import java.sql.SQLException;import java.sql.Statement; public class TestJDBC { public static void main (String[] args) { try { Class.forName("com.mysql.jdbc.Driver" ); } catch (ClassNotFoundException e) { e.printStackTrace(); } try (Connection c = DriverManager.getConnection("jdbc:mysql://127.0.0.1:3306/how2java?characterEncoding=UTF-8" ,"root" , "admin" ); Statement s = c.createStatement();) { String sqlInsert = "insert into Hero values (null,'盖伦',616,100)" ; String sqlDelete = "delete from Hero where id = 100" ; String sqlUpdate = "update Hero set hp = 300 where id = 100" ; s.execute(sqlInsert); s.execute(sqlDelete); s.execute(sqlUpdate); s.executeUpdate(sqlInsert); s.executeUpdate(sqlDelete); s.executeUpdate(sqlUpdate); } catch (SQLException e) { e.printStackTrace(); } } }
不同点 不同1: execute可以执行查询语句 然后通过getResultSet,把结果集取出来 executeUpdate不能执行查询语句 不同2: execute返回boolean类型 ,true表示执行的是查询语句,false表示执行的是insert,delete,update等等 executeUpdate返回的是int ,表示有多少条数据受到了影响
1 2 3 4 5 6 7 8 9 10 11 12 13 14 15 16 17 18 19 20 21 22 23 24 25 26 27 28 29 30 31 32 33 34 35 36 37 38 39 40 41 42 43 44 45 46 47 48 49 package jdbc;import java.sql.Connection;import java.sql.DriverManager;import java.sql.ResultSet;import java.sql.SQLException;import java.sql.Statement;public class TestJDBC { public static void main (String[] args) { try { Class.forName("com.mysql.jdbc.Driver" ); } catch (ClassNotFoundException e) { e.printStackTrace(); } try (Connection c = DriverManager.getConnection("jdbc:mysql://127.0.0.1:3306/how2java?characterEncoding=UTF-8" ,"root" , "admin" ); Statement s = c.createStatement();) { String sqlSelect = "select * from hero" ; s.execute(sqlSelect); ResultSet rs = s.getResultSet(); while (rs.next()) { System.out.println(rs.getInt("id" )); } boolean isSelect = s.execute(sqlSelect); System.out.println(isSelect); String sqlUpdate = "update Hero set hp = 300 where id < 100" ; int number = s.executeUpdate(sqlUpdate); System.out.println(number); } catch (SQLException e) { e.printStackTrace(); } } }
特殊操作 获取自增长id 在Statement通过execute或者executeUpdate执行完插入语句后,MySQL会为新插入的数据分配一个自增长id,(前提是这个表的id设置为了自增长,在Mysql创建表的时候,AUTO_INCREMENT就表示自增长)
1 2 3 4 CREATE TABLE hero ( id int (11) AUTO_INCREMENT, ... }
但是无论是execute还是executeUpdate都不会返回这个自增长id是多少。需要通过Statement 的getGeneratedKeys 获取该id 注: 第20行的代码,后面加了个Statement.RETURN_GENERATED_KEYS 参数,以确保会返回自增长ID。 通常情况下不需要加这个,有的时候需要加,所以先加上,保险一些
1 2 3 4 5 6 7 8 9 10 11 12 13 14 15 16 17 18 19 20 21 22 23 24 25 26 27 28 29 30 31 32 33 34 35 36 37 38 39 40 41 42 43 44 PreparedStatement ps = c.prepareStatement(sql, Statement.RETURN_GENERATED_KEYS);package jdbc;import java.sql.Connection;import java.sql.DriverManager;import java.sql.PreparedStatement;import java.sql.ResultSet;import java.sql.SQLException;import java.sql.Statement;public class TestJDBC { public static void main (String[] args) { try { Class.forName("com.mysql.jdbc.Driver" ); } catch (ClassNotFoundException e) { e.printStackTrace(); } String sql = "insert into hero values(null,?,?,?)" ; try (Connection c = DriverManager.getConnection("jdbc:mysql://127.0.0.1:3306/how2java?characterEncoding=UTF-8" ,"root" , "admin" ); PreparedStatement ps = c.prepareStatement(sql, Statement.RETURN_GENERATED_KEYS); ) { ps.setString(1 , "盖伦" ); ps.setFloat(2 , 616 ); ps.setInt(3 , 100 ); ps.execute(); ResultSet rs = ps.getGeneratedKeys(); if (rs.next()) { int id = rs.getInt(1 ); System.out.println(id); } } catch (SQLException e) { e.printStackTrace(); } } }
获取表的元数据 元数据概念: 和数据库服务器相关的数据,比如数据库版本,有哪些表,表有哪些字段,字段类型是什么等等。
1 2 3 4 5 6 7 8 9 10 11 12 13 14 15 16 17 18 19 20 21 22 23 24 25 26 27 28 29 30 31 32 33 34 35 36 37 38 39 40 41 42 43 44 45 46 47 48 package jdbc;import java.sql.Connection;import java.sql.DatabaseMetaData;import java.sql.DriverManager;import java.sql.ResultSet;import java.sql.SQLException;import java.sql.Statement;public class TestJDBC { public static void main (String[] args) throws Exception { try { Class.forName("com.mysql.jdbc.Driver" ); } catch (ClassNotFoundException e) { e.printStackTrace(); } try (Connection c = DriverManager.getConnection("jdbc:mysql://127.0.0.1:3306/how2java?characterEncoding=UTF-8" ,"root" , "admin" );) { DatabaseMetaData dbmd = c.getMetaData(); System.out.println("数据库产品名称:\t" +dbmd.getDatabaseProductName()); System.out.println("数据库产品版本:\t" +dbmd.getDatabaseProductVersion()); System.out.println("数据库和表分隔符:\t" +dbmd.getCatalogSeparator()); System.out.println("驱动版本:\t" +dbmd.getDriverVersion()); System.out.println("可用的数据库列表:" ); ResultSet rs = dbmd.getCatalogs(); while (rs.next()) { System.out.println("数据库名称:\t" +rs.getString(1 )); } } catch (SQLException e) { e.printStackTrace(); } } }
事务 不使用事务的情况 没有事务的前提下 假设业务操作是:加血,减血各做一次 结束后,英雄的血量不变 而减血的SQL 不小心写错写成了 updata (而非update) 那么最后结果是血量增加了,而非期望的不变
1 2 3 4 5 6 7 8 9 10 11 12 13 14 15 16 17 18 19 20 21 22 23 24 25 26 27 28 29 30 31 32 33 34 35 36 37 38 39 package jdbc; import java.sql.Connection;import java.sql.DriverManager;import java.sql.SQLException;import java.sql.Statement; public class TestJDBC { public static void main (String[] args) { try { Class.forName("com.mysql.jdbc.Driver" ); } catch (ClassNotFoundException e) { e.printStackTrace(); } try (Connection c = DriverManager.getConnection("jdbc:mysql://127.0.0.1:3306/how2java?characterEncoding=UTF-8" ,"root" , "admin" ); Statement s = c.createStatement();) { String sql1 = "update hero set hp = hp +1 where id = 22" ; s.execute(sql1); String sql2 = "updata hero set hp = hp -1 where id = 22" ; s.execute(sql2); } catch (SQLException e) { e.printStackTrace(); } } }
使用事务 在事务中的多个操作,要么都成功,要么都失败 通过 c.setAutoCommit(false);关闭自动提交 使用 c.commit();进行手动提交 在22行-35行之间的数据库操作,就处于同一个事务当中,要么都成功,要么都失败 所以,虽然第一条SQL语句是可以执行的,但是第二条SQL语句有错误,其结果就是两条SQL语句都没有被提交 。 除非两条SQL语句都是正确的。
1 2 3 4 5 6 7 8 9 10 11 12 13 14 15 16 17 18 19 20 21 22 23 24 25 26 27 28 29 30 31 32 33 34 35 36 37 38 39 40 41 42 43 package jdbc; import java.sql.Connection;import java.sql.DriverManager;import java.sql.SQLException;import java.sql.Statement; public class TestJDBC { public static void main (String[] args) { try { Class.forName("com.mysql.jdbc.Driver" ); } catch (ClassNotFoundException e) { e.printStackTrace(); } try (Connection c = DriverManager.getConnection("jdbc:mysql://127.0.0.1:3306/how2java?characterEncoding=UTF-8" ,"root" , "admin" ); Statement s = c.createStatement();) { c.setAutoCommit(false ); String sql1 = "update hero set hp = hp +1 where id = 22" ; s.execute(sql1); String sql2 = "updata hero set hp = hp -1 where id = 22" ; s.execute(sql2); c.commit(); } catch (SQLException e) { e.printStackTrace(); } } }
MYSQL 表的类型必须是INNODB才支持事务 在Mysql中,只有当表的类型是INNODB的时候,才支持事务,所以需要把表的类型设置为INNODB,否则无法观察到事务.
修改表的类型为INNODB的SQL:
1 alter table hero ENGINE = innodb
查看表的类型的SQL
1 show table status from how2java;
不过有个前提,就是当前的MYSQL服务器本身要支持INNODB,如果不支持,请看 开启MYSQL INNODB的办法
ORM ORM=Object Relationship Database Mapping
对象和关系数据库的映射
简单说,一个对象 ,对应数据库里的一条记录
根据id返回一个Hero对象 提供方法get(int id) 返回一个Hero3对象
1 2 3 4 5 6 7 8 9 10 11 12 13 14 15 16 17 18 19 20 21 22 23 24 25 26 27 28 29 30 31 32 33 34 35 36 37 38 39 40 41 42 43 44 45 46 package jdbc;import java.sql.*;public class TestJDBC { public static Hero3 get (int id) { Hero3 hero3 = null ; try { Class.forName("com.mysql.jdbc.Driver" ); } catch (ClassNotFoundException e) { e.printStackTrace(); } try ( Connection c = DriverManager.getConnection("jdbc:mysql://127.0.0.1:3306/how2java?characterEncoding=UTF-8" ,"root" , "admin" ); Statement s = c.createStatement(); ) { String sql = "select * from hero where id = " + id; ResultSet rs = s.executeQuery(sql); if (rs.next()) { hero3 = new Hero3 (); String name = rs.getString(2 ); float hp = rs.getFloat("hp" ); int damage = rs.getInt(4 ); hero3.name = name; hero3.hp = hp; hero3.damage = damage; hero3.id = id; } } catch (SQLException e) { e.printStackTrace(); } return hero3; } public static void main (String[] args) { Hero3 h = get(22 ); System.out.println(h.name); } }
DAO DAO=D ataA ccess O bject
数据访问对象
实际上就是运用了练习-ORM 中的思路,把数据库相关的操作都封装在这个类里面,其他地方看不到JDBC的代码
DAO接口 1 2 3 4 5 6 7 8 9 10 11 12 13 14 15 16 17 18 package jdbc;import java.util.List;public interface DAO { public void add (Hero3 hero) ; public void update (Hero3 hero) ; public void delete (int id) ; public Hero3 get (int id) ; public List<Hero3> list () ; public List<Hero3> list (int start, int count) ; }
HeroDAO 设计类HeroDAO,实现接口DAO
这个HeroDAO和答案-ORM 很接近,做了几个改进: \1. 把驱动的初始化放在了构造方法HeroDAO里:
1 2 3 4 5 6 7 public HeroDAO () try { Class.forName("com.mysql.jdbc.Driver" ); } catch (ClassNotFoundException e) { e.printStackTrace(); } }
因为驱动初始化只需要执行一次,所以放在这里更合适,其他方法里也不需要写了,代码更简洁
\2. 提供了一个getConnection方法返回连接 所有的数据库操作都需要事先拿到一个数据库连接Connection,以前的做法每个方法里都会写一个,如果要改动密码,那么每个地方都需要修改。 通过这种方式,只需要修改这一个地方就可以了。 代码变得更容易维护,而且也更加简洁。
1 2 3 4 5 6 7 8 9 10 11 12 13 14 15 16 17 18 19 20 21 22 23 24 25 26 27 28 29 30 31 32 33 34 35 36 37 38 39 40 41 42 43 44 45 46 47 48 49 50 51 52 53 54 55 56 57 58 59 60 61 62 63 64 65 66 67 68 69 70 71 72 73 74 75 76 77 78 79 80 81 82 83 84 85 86 87 88 89 90 91 92 93 94 95 96 97 98 99 100 101 102 103 104 105 106 107 108 109 110 111 112 113 114 115 116 117 118 119 120 121 122 123 124 125 126 127 128 129 130 131 132 133 134 135 136 137 138 139 140 141 142 143 144 145 146 147 148 149 150 151 152 153 154 155 156 157 158 159 160 161 162 163 164 165 166 167 168 169 170 171 172 173 174 175 176 177 178 package jdbc;import java.util.List;public interface DAO { public void add (Hero3 hero) ; public void update (Hero3 hero) ; public void delete (int id) ; public Hero3 get (int id) ; public List<Hero3> list () ; public List<Hero3> list (int start, int count) ; } package jdbc;import java.sql.*;import java.util.ArrayList;import java.util.List;public class HeroDAO implements DAO { public HeroDAO () { try { Class.forName("com.mysql.jdbc.Driver" ); } catch (ClassNotFoundException e) { e.printStackTrace(); } } public Connection getConnection () throws SQLException { return DriverManager.getConnection("jdbc:mysql://127.0.0.1:3306/how2java?characterEncoding=UTF-8" , "root" , "admin" ); } public int getTotal () { int total = 0 ; try ( Connection c = getConnection(); Statement s = c.createStatement(); ) { String sql = "select count(*) from hero" ; ResultSet rs = s.executeQuery(sql); while (rs.next()) { total = rs.getInt(1 ); } System.out.println("total:" + total); } catch (SQLException e) { e.printStackTrace(); } return total; } public void add (Hero3 hero) { String sql = "insert into hero values(null,?,?,?)" ; try ( Connection c = getConnection(); PreparedStatement ps = c.prepareStatement(sql, Statement.RETURN_GENERATED_KEYS); ) { ps.setString(1 , hero.name); ps.setFloat(2 , hero.hp); ps.setInt(3 , hero.damage); ps.execute(); ResultSet rs = ps.getGeneratedKeys(); if (rs.next()) { int id = rs.getInt(1 ); hero.id = id; } } catch (SQLException e) { e.printStackTrace(); } } public void update (Hero3 hero) { String sql = "update hero set name= ?, hp = ? , damage = ? where id = ?" ; try (Connection c = getConnection(); PreparedStatement ps = c.prepareStatement(sql);) { ps.setString(1 , hero.name); ps.setFloat(2 , hero.hp); ps.setInt(3 , hero.damage); ps.setInt(4 , hero.id); ps.execute(); } catch (SQLException e) { e.printStackTrace(); } } public void delete (int id) { try (Connection c = getConnection(); Statement s = c.createStatement();) { String sql = "delete from hero where id = " + id; s.execute(sql); } catch (SQLException e) { e.printStackTrace(); } } public Hero3 get (int id) { Hero3 hero = null ; try (Connection c = getConnection(); Statement s = c.createStatement();) { String sql = "select * from hero where id = " + id; ResultSet rs = s.executeQuery(sql); if (rs.next()) { hero = new Hero3 (); String name = rs.getString(2 ); float hp = rs.getFloat("hp" ); int damage = rs.getInt(4 ); hero.name = name; hero.hp = hp; hero.damage = damage; hero.id = id; } } catch (SQLException e) { e.printStackTrace(); } return hero; } public List<Hero3> list () { return list(0 , Short.MAX_VALUE); } public List<Hero3> list (int start, int count) { List<Hero3> heros = new ArrayList <Hero3>(); String sql = "select * from hero order by id desc limit ?,? " ; try (Connection c = getConnection(); PreparedStatement ps = c.prepareStatement(sql);) { ps.setInt(1 , start); ps.setInt(2 , count); ResultSet rs = ps.executeQuery(); while (rs.next()) { Hero3 hero = new Hero3 (); int id = rs.getInt(1 ); String name = rs.getString(2 ); float hp = rs.getFloat("hp" ); int damage = rs.getInt(4 ); hero.id = id; hero.name = name; hero.hp = hp; hero.damage = damage; heros.add(hero); } } catch (SQLException e) { e.printStackTrace(); } return heros; } }
数据库线程池 与线程池 类似的,数据库也有一个数据库连接池。 不过他们的实现思路是不一样的。 本章节讲解了自定义数据库连接池类:ConnectionPool,虽然不是很完善和健壮,但是足以帮助大家理解ConnectionPool的基本原理。
数据库连接池原理-传统方式 当有多个线程,每个线程都需要连接数据库执行SQL语句的话,那么每个线程都会创建一个连接,并且在使用完毕后,关闭连接。
创建连接和关闭连接的过程也是比较消耗时间的,当多线程并发的时候,系统就会变得很卡顿。
同时,一个数据库同时支持的连接总数也是有限的,如果多线程并发量很大,那么数据库连接的总数就会被消耗光,后续线程发起的数据库连接就会失败。
数据库连接池原理-使用池 与传统方式不同,连接池在使用之前,就会创建好一定数量的连接。 如果有任何线程需要使用连接,那么就从连接池里面借用 ,而不是自己重新创建 . 使用完毕后,又把这个连接归还 给连接池供下一次或者其他线程使用。 倘若发生多线程并发情况,连接池里的连接被借用光 了,那么其他线程就会临时等待,直到有连接被归还 回来,再继续使用。 整个过程,这些连接都不会被关闭 ,而是不断的被循环使用,从而节约了启动和关闭连接的时间。
ConnectionPool构造方法和初始化 \1. ConnectionPool() 构造方法约定了这个连接池一共有多少连接
\2. 在init() 初始化方法中,创建了size条连接。 注意,这里不能使用try-with-resource这种自动关闭连接的方式,因为连接恰恰需要保持不关闭状态,供后续循环使用
\3. getConnection, 判断是否为空,如果是空的就wait等待,否则就借用一条连接出去
\4. returnConnection, 在使用完毕后,归还这个连接到连接池,并且在归还完毕后,调用notifyAll,通知那些等待的线程,有新的连接可以借用了。
注:连接池设计用到了多线程的wait和notifyAll,这些内容可以在多线程交互 章节查阅学习。
代码比较复制代码
1 2 3 4 5 6 7 8 9 10 11 12 13 14 15 16 17 18 19 20 21 22 23 24 25 26 27 28 29 30 31 32 33 34 35 36 37 38 39 40 41 42 43 44 45 46 47 48 49 50 51 package jdbc;import java.sql.Connection;import java.sql.DriverManager;import java.sql.SQLException;import java.util.ArrayList;import java.util.List;public class ConnectionPool { List<Connection> cs = new ArrayList <>(); int size; public ConnectionPool (int size) { this .size = size; init(); } public void init () { try { Class.forName("com.mysql.jdbc.Driver" ); for (int i = 0 ; i < size; i++) { Connection c = DriverManager.getConnection("jdbc:mysql://127.0.0.1:3306/how2java?characterEncoding=UTF-8" , "root" , "admin" ); cs.add(c); } } catch (ClassNotFoundException e) { e.printStackTrace(); } catch (SQLException e) { e.printStackTrace(); } } public synchronized Connection getConnection () { while (cs.isEmpty()) { try { this .wait(); } catch (InterruptedException e) { e.printStackTrace(); } } Connection c = cs.remove(0 ); return c; } public synchronized void returnConnection (Connection c) { cs.add(c); this .notifyAll(); } }
测试类 首先初始化一个有3条连接的数据库连接池 然后创建100个线程,每个线程都会从连接池中借用连接 ,并且在借用之后,归还连接。 拿到连接之后,执行一个耗时1秒的SQL语句。
运行程序,就可以观察到如图所示的效果
1 2 3 4 5 6 7 8 9 10 11 12 13 14 15 16 17 18 19 20 21 22 23 24 25 26 27 28 29 30 31 32 33 34 35 36 37 38 39 package jdbc;import java.sql.Connection;import java.sql.SQLException;import java.sql.Statement;public class TestConnectionPool { public static void main (String[] args) { ConnectionPool cp = new ConnectionPool (3 ); for (int i = 0 ; i < 100 ; i++) { new WorkingThread ("working thread" + i, cp).start(); } } } class WorkingThread extends Thread { private ConnectionPool cp; public WorkingThread (String name, ConnectionPool cp) { super (name); this .cp = cp; } public void run () { Connection c = cp.getConnection(); System.out.println(this .getName()+ ":\t 获取了一根连接,并开始工作" ); try (Statement st = c.createStatement()){ Thread.sleep(1000 ); st.execute("select * from hero" ); } catch (SQLException | InterruptedException e) { e.printStackTrace(); } cp.returnConnection(c); } }
网络编程 IP地址 端口 IP地址 在网络中每台计算机都必须有一个的IP地址; 32位,4个字节,常用点分十进制的格式表示,例如:192.168.1.100 127.0.0.1 是固定ip地址,代表当前计算机,相当于面向对象里的 “this “
端口 两台计算机进行连接,总有一台服务器,一台客户端。 服务器和客户端之间的通信通过端口进行。如图:
ip地址是 192.168.1.100的服务器通过端口 8080 与ip地址是192.168.1.189的客户端 的1087端口通信
获取本机IP地址 1 2 3 4 5 6 7 8 9 10 11 12 package socket;import java.net.InetAddress;import java.net.UnknownHostException;public class TestSocket { public static void main (String[] args) throws UnknownHostException { InetAddress host = InetAddress.getLocalHost(); String ip = host.getHostAddress(); System.out.println("本机ip地址:" + ip); } }
ping命令 使用ping判断一个地址是否能够到达 ping不是java的api,是windows中的一个小工具,用于判断一个地址的响应时间
如图 ping 192.168.2.106 可以返回这个地址的响应时间 time<1ms表示很快,局域网一般就是这个响应时间
ping 192.168.2.206 返回Request timed out表示时间较久都没有响应返回,基本判断这个地址不可用
使用java 执行ping命令 借助 Runtime.getRuntime().exec() 可以运行一个windows的exe程序 如图,使用java运行 ping 192.168.2.106 ,返回这样的字符串
1 2 3 4 5 6 7 8 9 10 11 12 13 14 15 16 17 18 19 20 21 22 23 24 25 26 27 28 29 30 31 32 package socket;import java.io.BufferedReader;import java.io.IOException;import java.io.InputStreamReader;public class TestSocket { public static void main (String[] args) throws IOException { Process p = Runtime.getRuntime().exec("ping " + "192.168.2.106" ); BufferedReader br = new BufferedReader (new InputStreamReader (p.getInputStream(), "GBK" )); String line = null ; StringBuilder sb = new StringBuilder (); while ((line = br.readLine()) != null ) { if (line.length() != 0 ) sb.append(line + "\r\n" ); } System.out.println("本次指令返回的消息是:" ); System.out.println(sb.toString()); } } 输出: 本次指令返回的消息是: 正在 Ping 192.168 .2 .106 具有 32 字节的数据: 请求超时。 请求超时。 请求超时。 请求超时。 192.168 .2 .106 的 Ping 统计信息: 数据包: 已发送 = 4 ,已接收 = 0 ,丢失 = 4 (100 % 丢失),
Socket 使用 Socket(套接字)进行不同的程序之间的通信
建立连接 \1. 服务端开启8888端口,并监听着,时刻等待着客户端的连接请求 \2. 客户端知道服务端的ip地址和监听端口号,发出请求到服务端 客户端的端口地址是系统分配的,通常都会大于1024 一旦建立了连接,服务端会得到一个新的Socket对象,该对象负责与客户端进行通信。 注意: 在开发调试的过程中,如果修改过了服务器Server代码,要关闭启动的Server,否则新的Server不能启动,因为8888端口被占用了
1 2 3 4 5 6 7 8 9 10 11 12 13 14 15 16 17 18 19 20 21 22 23 24 25 26 27 28 29 30 31 32 33 34 35 36 37 38 39 40 41 42 43 44 45 package socket;import java.io.IOException;import java.net.ServerSocket;import java.net.Socket;public class Server { public static void main (String[] args) { try { ServerSocket ss = new ServerSocket (8888 ); System.out.println("监听在端口号:8888" ); Socket s = ss.accept(); System.out.println("有连接过来" + s); s.close(); ss.close(); } catch (IOException e) { e.printStackTrace(); } } } package socket;import java.io.IOException;import java.net.Socket;import java.net.UnknownHostException;public class Client { public static void main (String[] args) { try { Socket s = new Socket ("127.0.0.1" , 8888 ); System.out.println(s); s.close(); } catch (UnknownHostException e) { e.printStackTrace(); } catch (IOException e) { e.printStackTrace(); } } }
收发数字 一旦建立了连接,服务端和客户端就可以通过Socket进行通信了 \1. 客户端打开输出流,并发送数字 110 \2. 服务端打开输入流,接受数字 110,并打印
1 2 3 4 5 6 7 8 9 10 11 12 13 14 15 16 17 18 19 20 21 22 23 24 25 26 27 28 29 30 31 32 33 34 35 36 37 38 39 40 41 42 43 44 45 46 47 48 49 50 51 52 53 54 55 56 57 58 59 60 61 package socket;import java.io.IOException;import java.io.InputStream;import java.net.ServerSocket;import java.net.Socket;public class Server { public static void main (String[] args) { try { ServerSocket ss = new ServerSocket (8888 ); System.out.println("监听在端口号:8888" ); Socket s = ss.accept(); InputStream is = s.getInputStream(); int msg = is.read(); System.out.println(msg); is.close(); s.close(); ss.close(); } catch (IOException e) { e.printStackTrace(); } } } package socket;import java.io.IOException;import java.io.OutputStream;import java.net.Socket;import java.net.UnknownHostException;public class Client { public static void main (String[] args) { try { Socket s = new Socket ("127.0.0.1" , 8888 ); OutputStream os = s.getOutputStream(); os.write(110 ); os.close(); s.close(); } catch (UnknownHostException e) { e.printStackTrace(); } catch (IOException e) { e.printStackTrace(); } } }
收发字符串 直接使用字节流收发字符串比较麻烦,使用数据流 对字节流进行封装,这样收发字符串就容易了 \1. 把输出流封装在DataOutputStream中 使用writeUTF发送字符串 “Legendary!” \2. 把输入流封装在DataInputStream 使用readUTF读取字符串,并打印
1 2 3 4 5 6 7 8 9 10 11 12 13 14 15 16 17 18 19 20 21 22 23 24 25 26 27 28 29 30 31 32 33 34 35 36 37 38 39 40 41 42 43 44 45 46 47 48 49 50 51 52 53 54 55 56 57 58 59 60 61 62 63 64 65 66 67 package socket;import java.io.DataInputStream;import java.io.IOException;import java.io.InputStream;import java.net.ServerSocket;import java.net.Socket;public class Server { public static void main (String[] args) { try { ServerSocket ss = new ServerSocket (8888 ); System.out.println("监听在端口号:8888" ); Socket s = ss.accept(); InputStream is = s.getInputStream(); DataInputStream dis = new DataInputStream (is); String msg = dis.readUTF(); System.out.println(msg); dis.close(); s.close(); ss.close(); } catch (IOException e) { e.printStackTrace(); } } } package socket;import java.io.DataOutputStream;import java.io.IOException;import java.io.OutputStream;import java.net.Socket;import java.net.UnknownHostException;public class Client { public static void main (String[] args) { try { Socket s = new Socket ("127.0.0.1" , 8888 ); OutputStream os = s.getOutputStream(); DataOutputStream dos = new DataOutputStream (os); dos.writeUTF("Legendary!" ); dos.close(); s.close(); } catch (UnknownHostException e) { e.printStackTrace(); } catch (IOException e) { e.printStackTrace(); } } }
使用Scanner 在上个步骤中,每次要发不同的数据都需要修改代码 可以使用Scanner 读取控制台的输入,并发送到服务端,这样每次都可以发送不同的数据了。
1 2 3 4 5 6 7 8 9 10 11 12 13 14 15 16 17 18 19 20 21 22 23 24 25 26 27 28 29 30 31 32 33 34 35 36 37 package socket;import java.io.DataOutputStream;import java.io.IOException;import java.io.OutputStream;import java.net.Socket;import java.net.UnknownHostException;import java.util.Scanner;public class Client { public static void main (String[] args) { try { Socket s = new Socket ("127.0.0.1" , 8888 ); OutputStream os = s.getOutputStream(); DataOutputStream dos = new DataOutputStream (os); Scanner sc = new Scanner (System.in); String str = sc.next(); dos.writeUTF(str); dos.close(); s.close(); } catch (UnknownHostException e) { e.printStackTrace(); } catch (IOException e) { e.printStackTrace(); } } }
服务端和客户端互聊 前面部分的学习效果是服务端接受数据,客户端发送数据。
做相应的改动,使得服务端也能发送数据,客户端也能接受数据,并且可以一直持续下去
1 2 3 4 5 6 7 8 9 10 11 12 13 14 15 16 17 18 19 20 21 22 23 24 25 26 27 28 29 30 31 32 33 34 35 36 37 38 39 40 41 42 43 44 45 46 47 48 49 50 51 52 53 54 55 56 57 58 59 60 61 62 63 64 65 66 67 68 69 package socket;import java.io.*;import java.net.ServerSocket;import java.net.Socket;import java.util.Scanner;public class Server { public static void main (String[] args) { try { ServerSocket ss = new ServerSocket (8888 ); System.out.println("监听在端口号:8888" ); Socket s = ss.accept(); InputStream is = s.getInputStream(); DataInputStream dis = new DataInputStream (is); OutputStream os = s.getOutputStream(); DataOutputStream dos = new DataOutputStream (os); while (true ) { String msg = dis.readUTF(); System.out.println("收到客户端信息" +msg); Scanner sc = new Scanner (System.in); String str = sc.next(); dos.writeUTF(str); } } catch (IOException e) { e.printStackTrace(); } } } package socket;import java.io.*;import java.net.Socket;import java.net.UnknownHostException;import java.util.Scanner;public class Client { public static void main (String[] args) { try { Socket s = new Socket ("127.0.0.1" , 8888 ); OutputStream os = s.getOutputStream(); DataOutputStream dos = new DataOutputStream (os); InputStream is = s.getInputStream(); DataInputStream dis = new DataInputStream (is); while (true ){ Scanner sc = new Scanner (System.in); String str = sc.next(); dos.writeUTF(str); String msg = dis.readUTF(); System.out.println("收到服务端信息" +msg); } } catch (UnknownHostException e) { e.printStackTrace(); } catch (IOException e) { e.printStackTrace(); } } }
多线程聊天 如果使用单线程开发Socket应用,那么同一时间,要么收消息,要么发消息,不能同时进行。
为了实现同时收发消息 ,就需要用到多线程
在练习-服务端和客户端互聊 中,只能一人说一句,说了之后,必须等待另一个人的回复,才能说下一句。
这是因为接受和发送都在主线程中,不能同时进行。 为了实现同时收发消息,基本设计思路是把收发分别放在不同的线程中进行
\1. SendThread 发送消息线程 \2. RecieveThread 接受消息线程 \3. Server一旦接受到连接,就启动收发两个线程 \4. Client 一旦建立了连接,就启动收发两个线程
1 2 3 4 5 6 7 8 9 10 11 12 13 14 15 16 17 18 19 20 21 22 23 24 25 26 27 28 29 30 31 32 33 34 35 36 37 38 39 40 41 42 43 44 45 46 47 48 49 50 51 52 53 54 55 56 57 58 59 60 61 62 63 64 65 66 67 68 69 70 71 72 73 74 75 76 77 78 79 80 81 82 83 84 85 86 87 88 89 90 91 92 93 94 95 96 97 98 99 100 101 102 103 104 105 106 107 package socket;import java.io.DataOutputStream;import java.io.IOException;import java.io.OutputStream;import java.net.Socket;import java.util.Scanner;public class SendThread extends Thread { private Socket s; public SendThread (Socket s) { this .s = s; } public void run () { try { OutputStream os = s.getOutputStream(); DataOutputStream dos = new DataOutputStream (os); while (true ){ Scanner sc = new Scanner (System.in); String str = sc.next(); dos.writeUTF(str); } } catch (IOException e) { e.printStackTrace(); } } } package socket;import java.io.DataInputStream;import java.io.IOException;import java.io.InputStream;import java.net.Socket;public class RecieveThread extends Thread { private Socket s; public RecieveThread (Socket s) { this .s = s; } public void run () { try { InputStream is = s.getInputStream(); DataInputStream dis = new DataInputStream (is); while (true ) { String msg = dis.readUTF(); System.out.println(msg); } } catch (IOException e) { e.printStackTrace(); } } } package socket;import java.io.*;import java.net.ServerSocket;import java.net.Socket;public class Server { public static void main (String[] args) { try { ServerSocket ss = new ServerSocket (8888 ); System.out.println("监听在端口号:8888" ); Socket s = ss.accept(); new SendThread (s).start(); new RecieveThread (s).start(); } catch (IOException e) { e.printStackTrace(); } } } package socket;import java.io.*;import java.net.Socket;import java.net.UnknownHostException;public class Client { public static void main (String[] args) { try { Socket s = new Socket ("127.0.0.1" , 8888 ); new SendThread (s).start(); new RecieveThread (s).start(); } catch (UnknownHostException e) { e.printStackTrace(); } catch (IOException e) { e.printStackTrace(); } } }