Spring IOC/DI 学习链接:Spring系列教材 (一)- 教程 (how2j.cn)
Spring是一个基于IOC和AOP的结构J2EE系统的框架
导入实验项目过程:
原理:
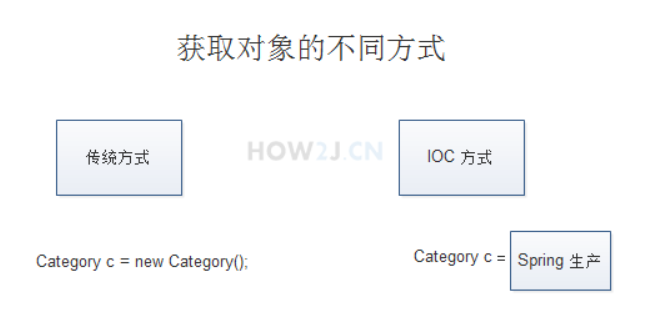
以获取对象的方式来进行比较
传统的方式: IOC方式 反转控制 (Inversion Of Control)的缩写,就像控制权从本来在自己手里,交给了Spring。
打个比喻:传统方式: 相当于你自己去菜市场new 了一只鸡,不过是生鸡,要自己拔毛,去内脏,再上花椒,酱油,烤制,经过各种工序之后,才可以食用。用 IOC: 相当于去馆子(Spring)点了一只鸡,交到你手上的时候,已经五味俱全,你就只管吃就行了。
一些解释:
学习链接:Spring系列教材 (一)- 教程 (how2j.cn)
1.这里的意思是通过关键字c即可获取com.how2java.pojo.Category对象,并且将”category 1”这个字符串,注入到了com.how2java.pojo.Category这个类的private String name;属性中
1 2 3 <bean name ="c" class ="com.how2java.pojo.Category" > <property name ="name" value ="category 1" /> </bean >
2.这里的意思是由Spring创建bean对象,也就是c,也就是com.how2java.pojo.Category这个类对应的对象
1
2
3
4
5
6
7
8
public class TestSpring { public static void main (String[] args) { ApplicationContext context = new ClassPathXmlApplicationContext ( new String [] { "applicationContext.xml" }); Category c = (Category) context.getBean("c" ); System.out.println(c.getName()); } }
Spring 注入对象 在上例中,对Category的name属性注入了”category 1”字符串
Product类中有对Category对象的setter getter
1
2
3
4
5
6
7
8
9
10
11
12
13
14
15
16
17
18
19
20
21
22
23
24
25
26
package com.how2java.pojo;public class Product { private int id; private String name; private Category category; public int getId () { return id; } public void setId (int id) { this .id = id; } public String getName () { return name; } public void setName (String name) { this .name = name; } public Category getCategory () { return category; } public void setCategory (Category category) { this .category = category; } }
applicationContext.xml
在创建Product的时候注入一个Category对象
我的理解是:
这里给com.how2java.pojo.Category对象的name属性赋值category 1
并且可以通过p调用com.how2java.pojo.Product的对象,并且com.how2java.pojo.Product对象的category属性是一个c,也就是com.how2java.pojo.Category对象
1 2 3 4 5 6 7 <bean name ="c" class ="com.how2java.pojo.Category" > <property name ="name" value ="category 1" /> </bean > <bean name ="p" class ="com.how2java.pojo.Product" > <property name ="name" value ="product1" /> <property name ="category" ref ="c" /> </bean >
TestSpring
这里的意思是由Spring创建bean对象,也就是p,也就是com.how2java.pojo.Product对象,然后调用p.getName()得到com.how2java.pojo.Product对象的name属性,也就是字符串”product1”
然后通过p.getCategory()得到com.how2java.pojo.Category对象,然后再通过getName()得到其name属性,也就是字符串”category 1”
1
2
3
4
5
6
7
8
public class TestSpring { public static void main (String[] args) { ApplicationContext context = new ClassPathXmlApplicationContext (new String [] { "applicationContext.xml" }); Product p = (Product) context.getBean("p" ); System.out.println(p.getName()); System.out.println(p.getCategory().getName()); } }
Spring 注解方式 IOC/DI 修改applicationContext.xml
添加<context:annotation-config/> 意思是注解配置,annotation注解
注释掉<property name=”category” ref=”c” /> 这个行为在后面将使用注解来完成
1 2 3 4 5 6 7 8 9 <context:annotation-config /> <bean name ="c" class ="com.how2java.pojo.Category" > <property name ="name" value ="category 1" /> </bean > <bean name ="p" class ="com.how2java.pojo.Product" > <property name ="name" value ="product1" /> </bean >
修改Product.java
在Product.java的category属性前加上@Autowired注解,Autowired自动接线
我的理解就是,让com.how2java.pojo.Category对象自动接线,赋值到com.how2java.pojo.Product对象的private Category category;属性中
1
2
@Autowired private Category category;
除了前面的 在属性前加上@Autowired 这种方式外,也可以在setCategory方法前加上@Autowired,这样来达到相同的效果
1
2
3
4
@Autowired public void setCategory (Category category) { this .category = category; }
@Resource
除了@Autowired之外,@Resource也是常用的手段 @Resource(name=”c”)
Product.java文件添加
1
2
@Resource(name="c") private Category category;
或者
1
2
3
4
@Resource(name="c") public void setCategory (Category category) { this .category = category; }
对Bean的注解
上述例子是对注入对象行为 的注解,那么bean对象本身,比如Category,Product可不可以移出
applicationContext.xml配置文件,也通过注解进行呢?
接下来就讲解如何对Bean进行注解配置
修改applicationContext.xml,什么都去掉,只新增:
其作用是告诉Spring,bean都放在com.how2java.pojo这个包下,让java自动扫描com.how2java.pojo这个包,自己去找bean
1 <context:component-scan base-package ="com.how2java.pojo" />
为Product类加上@Component注解,即表明此类是bean,也就是再测试类中,可以通过p,来生成一个Product对象
1
2
@Component("p") public class Product {
为Category 类加上@Component注解,即表明此类是bean
1
2
@Component("c") public class Category {
另外,因为配置从applicationContext.xml中移出来了,所以属性初始化放在属性声明上进行了。
1 2 3 4 Product.java文件中直接定义name字符串是"product 1" private String name="product 1" ;Category.java文件中直接定义name字符串是"category 1" private String name="category 1" ;
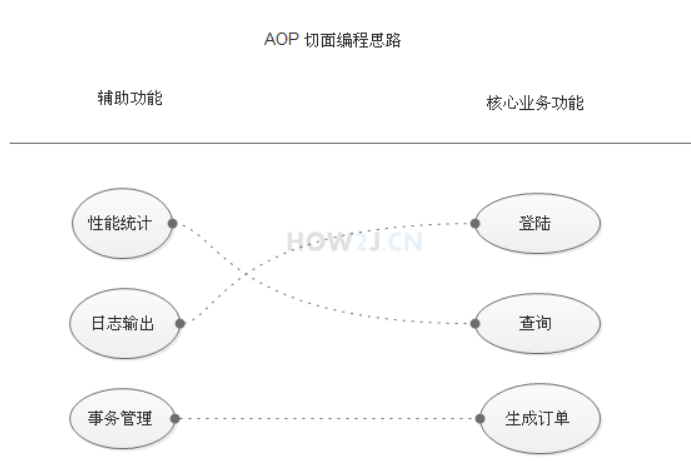
Spring AOP AOP 即 Aspect Oriented Program 面向切面编程核心业务功能 ,和周边功能 。
周边功能在Spring的面向切面编程AOP思想里,即被定义为切面
在面向切面编程AOP的思想里面,核心业务功能和切面功能分别独立进行开发 “编织” 在一起,这就叫AOP
思路图:
\1. 功能分两大类,辅助功能和核心业务功能
\2. 辅助功能和核心业务功能彼此独立 进行开发
\3. 比如登陆功能,即便是没有性能统计和日志输出,也可以正常运行
\4. 如果有需要,就把”日志输出” 功能和 “登陆” 功能 编织 在一起,这样登陆的时候,就可以看到日志输出了
\5. 辅助功能,又叫做切面 ,这种能够选择性的,低耦合的 把切面和核心业务功能结合在一起的编程思想,就叫做切面编程
更改applicationContext.xml配置(一)
1 <context:component-scan base-package ="com.how2java.service" />
准备业务类 ProductService(一)
1
2
3
4
5
6
7
8
9
10
11
package com.how2java.service;import org.springframework.stereotype.Component;@Component("s") public class ProductService { public void doSomeService () { System.out.println("doSomeService" ); } }
或者更改applicationContext.xml配置(二)
1 2 3 <context:annotation-config /> <bean name ="s" class ="com.how2java.service.ProductService" > </bean >
或者准备业务类 ProductService(二)
1
2
3
4
5
6
7
package com.how2java.service;public class ProductService { public void doSomeService () { System.out.println("doSomeService" ); } }
在引入切面之前,调用该业务类
1
2
3
4
5
6
7
8
9
10
11
12
13
14
15
package com.how2java.test;import org.springframework.context.ApplicationContext;import org.springframework.context.support.ClassPathXmlApplicationContext;import com.how2java.service.ProductService;public class TestSpring { public static void main (String[] args) { ApplicationContext context = new ClassPathXmlApplicationContext (new String [] { "applicationContext.xml" }); ProductService s = (ProductService) context.getBean("s" ); s.doSomeService(); } }
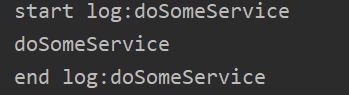
准备日志切面 LoggerAspect
该日志切面的功能是 在调用核心功能之前和之后分别打印日志,切面就是原理图中讲的那些辅助功能。
Object object = joinPoint.proceed();就是将来与某个核心功能编织之后,用于执行核心功能的代码
1
2
3
4
5
6
7
8
9
10
11
12
package com.how2java.aspect;import org.aspectj.lang.ProceedingJoinPoint;public class LoggerAspect { public Object log (ProceedingJoinPoint joinPoint) throws Throwable { System.out.println("start log:" + joinPoint.getSignature().getName()); Object object = joinPoint.proceed(); System.out.println("end log:" + joinPoint.getSignature().getName()); return object; } }
applicationContext.xml
1 2 3 4 5 6 7 8 9 10 11 12 13 14 15 16 17 18 19 20 21 22 23 24 25 <bean name ="s" class ="com.how2java.service.ProductService" > </bean > <bean id ="loggerAspect" class ="com.how2java.aspect.LoggerAspect" /> <aop:config > <aop:pointcut id ="loggerCutpoint" expression = "execution(* com.how2java.service.ProductService.*(..)) " /> <aop:aspect id ="logAspect" ref ="loggerAspect" > <aop:around pointcut-ref ="loggerCutpoint" method ="log" /> </aop:aspect > </aop:config >
Spring 注解方式 AOP 注解配置业务类
使用@Component(“s”) 注解ProductService 类
1
2
@Component("s") public class ProductService {
注解配置切面
@Aspect 注解表示这是一个切面
1
2
3
4
5
6
7
8
9
10
11
12
@Aspect @Component public class LoggerAspect { @Around(value = "execution(* com.how2java.service.ProductService.*(..))") public Object log (ProceedingJoinPoint joinPoint) throws Throwable { System.out.println("start log:" + joinPoint.getSignature().getName()); Object object = joinPoint.proceed(); System.out.println("end log:" + joinPoint.getSignature().getName()); return object; } }
applicationContext.xml去掉原有信息,添加如下3行
1 2 3 4 5 6 <context:component-scan base-package ="com.how2java.aspect" /> <context:component-scan base-package ="com.how2java.service" /> <aop:aspectj-autoproxy />
运行
Spring 注解方式测试 修改TestSpring, 并运行
修改前:
1
2
3
4
5
6
7
8
9
10
11
12
13
14
15
16
17
18
package com.how2java.test; import org.springframework.context.ApplicationContext;import org.springframework.context.support.ClassPathXmlApplicationContext; import com.how2java.pojo.Category; public class TestSpring { public static void main (String[] args) { ApplicationContext context = new ClassPathXmlApplicationContext ( new String [] { "applicationContext.xml" }); Category c = (Category) context.getBean("c" ); System.out.println(c.getName()); } }
修改后:
1
2
3
4
5
6
7
8
9
10
11
12
13
14
15
16
17
18
19
20
21
22
23
24
25
26
package com.how2java.test;import org.junit.Test;import org.junit.runner.RunWith;import org.springframework.beans.factory.annotation.Autowired;import org.springframework.test.context.ContextConfiguration;import org.springframework.test.context.junit4.SpringJUnit4ClassRunner;import com.how2java.pojo.Category;@RunWith(SpringJUnit4ClassRunner.class) @ContextConfiguration("classpath:applicationContext.xml") public class TestSpring { @Autowired Category c; @Test public void test () { System.out.println(c.getName()); } }
applicationContext.xml
1 2 3 <bean name ="c" class ="com.how2java.pojo.Category" > <property name ="name" value ="category 1" /> </bean >